
-
Products and Technology
By Category
-
Groups
Activity Groups
Industry Groups
Influence and Feedback Groups
Interest Groups
Location Groups
Customer Only Groups
- Developers
- Partners
- Events
- Help Center
- Topic Pages
-
Explore SAP
Products
- Autonomous Enterprise
- Artificial intelligence
- Data and analytics
- Autonomous Suite
- Technology platform
- Transformation management
- Midsize business solutions
- Financial management
- Spend management
- Supply chain management
- Human capital management
- Customer experience
- Enterprise resource planning
- Business network
- Sustainability management
- SAP Store
- Try SAP
- View all industries
- Partners
- Services
Learning and Support
-
- Products and Technology
- Groups
- Developers
- Partners
- Events
- Help Center
- Topic Pages
-
Explore SAP
- Explore SAP
-
Products
- Products
- Autonomous Enterprise
- Artificial intelligence
- Data and analytics
- Autonomous Suite
- Technology platform
- Transformation management
- Midsize business solutions
- Financial management
- Spend management
- Supply chain management
- Human capital management
- Customer experience
- Enterprise resource planning
- Business network
- Sustainability management
- SAP Store
- Try SAP
- View all industries
- Partners
- Services
- Learning and Support
- About

- SAP Community
- Products and Technology
- Technology
- Technology Blog Posts by SAP
- SAP Cloud Platform Workflow Sample Application in ...
Technology Blog Posts by SAP
Turn on suggestions
Auto-suggest helps you quickly narrow down your search results by suggesting possible matches as you type.
Showing results for
Success! Subscription added.

 Venugopal
Product and Topic Expert
Options
- Subscribe to RSS Feed
- Mark as New
- Mark as Read
- Bookmark
- Subscribe
- Printer Friendly Page
- Report Inappropriate Content
2019 May 20
5:35 PM
6,078
Overview
As part of SAP Cloud Platform multi cloud strategy, SAP Cloud Platform Workflow is available in AWS Frankfurt data center in Cloud Foundry environment. See more details in this blog.
Workflow application from Neo environment requires a few migration steps to deploy in Cloud Foundry. We have migrated our sample application Employee Onboarding from Neo and it is available now in SAP WebIDE full stack to deploy and run in Cloud Foundry environment.
This blog will guide you to import, configure ,deploy and run the workflow sample application in SAP Cloud Platform Cloud Foundry Environment.
Pre requisite
- You have a SAP Cloud Platform - Cloud Foundry account in AWS Frankfurt DC with entitlements to Workflow ,Portal , HTML5 Application Repository and runtime of HTML5 Application Repository.
- You have created a Space in your Cloud foundry org and assigned Space Developer role to your user. Please go through the help portal to create a space in a sub account.
- You have created an instance of workflow and portal service in your Cloud Foundry Space. Please go through the help portal.
- You have created a portal site to create Monitor Workflow and My Inbox tiles. Please go through the hep portal to learn how to create a monitor workflow and My Inbox tiles.
- You have a Neo sub account with Web IDE full stack subscription.
Setup Sample Application
- Open SAP Web IDE full stack in Neo environment and enable workflow feature.

2. Create a Multi Target Application using a Sample application.
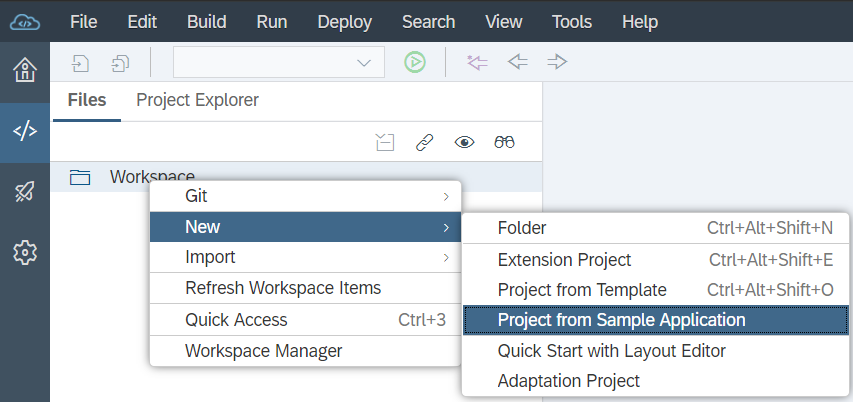
3. Select the Cloud Foundry version of Employee Onboarding Sample Application.

4. Accept License agreement and click Finish button.

Configure Employee Onboarding Sample Application
Employee Onboarding Sample Application is now imported into your work space. You have to make couple of configuration changes before deploy and run the application in your account.
SAP Cloud Platform Workflow supports Multi Target Application model to create,build and deploy workflow applications in cloud foundry environment. A multi target application contains multiple modules created with different services, build and deployed to different targets but with a common life cycle. A MTA model is a platform independent description of the different modules , their dependencies and configuration data they expose and the resource they require to run. This model is specified using YAML(www.ymal.org).
Update mta.yaml file
Expand the project sample.onboarding.mta and open the mta.yaml file. If you have already created a Workflow Service Instance in your space, Select the Resources tab and update your workflow instance name. Change the type as org.cloudfoundry.existing-service.

Modify the Workflow Sample Data
Modify the workflow SampleInputContex.json by updating appropriate onboarding userId from Successfactors. You could add your Cloud Platform userId as both buddyId and managerId.

Build and Deploy Sample Application
- Right click project sample.onboarding.mta and select Build.

A successful build will create a mta-archives folder under the sample.onboarding.mta project.
2. Select the build archive ,right click and select Deploy

A successful deployment will show a message on the top right corner and the build logs in the console.

Create a Destination to call SuccessFactors APIs
The sample workflow application is calling SuccessFactors to get the user details of the new hire and the team members. A destination (SFSF) is used in the Workflow model to call these apis.
Go to your SAP Cloud Platform Cockpit and select your subaccount where you have deployed the workflow sample application. Select Connectivity->Destination and click New Destination.
Enter the Name as SFSF and provide the API url based on your SuccessFactors Data Center. Please refer the note to get the correct api url. You can get a new SuccessFactors test tenant using your S-user account from here.
Use basic authentication and provide the user name as UserName@CompanyID. Company ID is the SuccessFactors company Id.
 .
.Execute workflow Sample Application
- Logon to your Fiori Launch Pad where you have configured Monitor Workflows application and My Inbox. Select Workflow Definitions to see all deployed workflow definitions.

2. You can see the deployed onboard workflow. Select onboard workflow definition and click Start New Instance to create a workflow instance.

3. Enter the workflow context json payload. Make sure you enter a valid SuccessFactors user Id and for testing use your cloud Platform user Id as buddyId and managerId. Click Start New Instance button.

4. Click Show Instances button to see all workflow Instances of onboard workflow definition.

5. You could see the newly created workflow instance details including context data and workflow logs.

6. Go home page and click My Inbox to see the use task created. The count at the My Inbox tile indicates there is a task instance to the user. Click My Inbox tile.

7. The Workflow task Confirm or Change Equipment is displayed. You can click the + button to add any new equipment. Click Confirm button to complete the task. On completion the task will disappear from the list.

8. If you have assigned the buddyId and managerId as the same user, refresh My Inbox to get the Approve Equipment task. If it is two different users, logoff and logon using the manager user id and access My Inbox. Approve Equipment task will show the equipment configured by the buddy. The manager could either Approve or Reject the proposed equipment for the new hire. Click Approve button to complete the task.

9. If you have assigned buddyId and managerId as the same user, refresh My Inbox to get the Accept Workplace task. If it is two different users, logoff and logon using the buddy user id and access My Inbox. Click Accept Workplace button to complete the task.

10. This will change the workflow status to completed. Go to home screen and click on Monitor workflow Workflow Instances tile. In order to see the completed instance click the filter button and add Completed status.

11. You could see the workflow instance is completed.

Labels
7 Comments
You must be a registered user to add a comment. If you've already registered, sign in. Otherwise, register and sign in.
 Bluesky
Related Content
- Lessons Learned from Real SAP S/4HANA Migrations: A Technical Approach to Reducing Risk in Technology Blog Posts by Members
- AI has outgrown legacy data architectures like SAP BW — is your stack ready to keep up? in Technology Blog Posts by SAP
- Enhance SAP Joule for Consultants with Custom Knowledge Grounding in Technology Blog Posts by SAP
- Building an LLM Agent using CAP in Technology Blog Posts by SAP
- Start Small. Think at Scale. Business Professionals Can Use SAP & Claude to Build a Business Case. in Technology Blog Posts by Members
Top liked authors
| User | Count |
|---|---|
| 53 | |
| 50 | |
| 37 | |
| 31 | |
| 31 | |
| 29 | |
| 27 | |
| 27 | |
| 26 | |
| 23 |


