
-
Products and Technology
By Category
-
Groups
Activity Groups
Industry Groups
Influence and Feedback Groups
Interest Groups
Location Groups
Customer Only Groups
- Developers
- Partners
- Events
- Help Center
- Topic Pages
-
Explore SAP
Products
- Autonomous Enterprise
- Artificial intelligence
- Data and analytics
- Autonomous Suite
- Technology platform
- Transformation management
- Midsize business solutions
- Financial management
- Spend management
- Supply chain management
- Human capital management
- Customer experience
- Enterprise resource planning
- Business network
- Sustainability management
- SAP Store
- Try SAP
- View all industries
- Partners
- Services
Learning and Support
-
- Products and Technology
- Groups
- Developers
- Partners
- Events
- Help Center
- Topic Pages
-
Explore SAP
- Explore SAP
-
Products
- Products
- Autonomous Enterprise
- Artificial intelligence
- Data and analytics
- Autonomous Suite
- Technology platform
- Transformation management
- Midsize business solutions
- Financial management
- Spend management
- Supply chain management
- Human capital management
- Customer experience
- Enterprise resource planning
- Business network
- Sustainability management
- SAP Store
- Try SAP
- View all industries
- Partners
- Services
- Learning and Support
- About
- SAP Community
- Products and Technology
- Technology
- Technology Blog Posts by SAP
- OAuth Client Grant Types - authorization_code & pa...
Technology Blog Posts by SAP
Turn on suggestions
Auto-suggest helps you quickly narrow down your search results by suggesting possible matches as you type.
Showing results for
Success! Subscription added.
Product and Topic Expert
Options
- Subscribe to RSS Feed
- Mark as New
- Mark as Read
- Bookmark
- Subscribe
- Printer Friendly Page
- Report Inappropriate Content
2018 Jul 29
11:26 AM
27,605
Hi there,
After following the most excellent SAP S/4HANA Cloud SDK Overview tutorial I wanted to learn more about configuring OAuth grants for different usage scenarios.
I'll share with you how to get both Authorization Code Grant and Resource Owner Password Credentials Grant configured for access to the backend microservice.
As a prerequisite I'll assume you have successfully completed the SAP S/4HANA Cloud SDK Overview tutorial to Step 7. If you have you'll get a 401 code with the following warning when accessing the backend microservice API
To get the grants below working you will need the application name, clientid, client secret and authorization service url (XSUAA). All can be found in the backend microservices service binding to the xsuaa service.

As per Cloud Foundry doco:
So, in the authorization code grant flow the user is prompted to grant approvals by providing valid credentials. You might have seen this type of flow when one website wants you to allow it to use the APIs of another web site e.g. a recruitment agency requests access to your LinkedIn account to read your employment history.
The Cloud Foundry UAA doco specifies the parameters. Adjust below url accordingly.
Note - the scope is specified in the Tutorial Step 7 as the applicationName.Display. And as we have seen the application name was in the service bindings. Just add them together in this case.
You will be redirected to the uaa login page. Complete and proceed.

Upon submission of the login page you will be redirect to the redirect url parameter specified. Now you'll see the authorization code as a parameter. Copy the auth code.

I'll use Postman to simulate how a client might exchange the auth code for an access token. The Cloud Found UAA doco specifies the parameters for the /oauth/token request. My url is:
Request authorization
Add the client id and client secret obtained earlier.

Request headers
This is what the request headers looks like. Authorization header is added by Postman.

Request body

Response
Upon successful post you will get the access_token in the response body. Also, you will get other information,e.g. refresh_token, to generate a new access token once the current one expires. You don't want to prompt the user for access every time! Keep this info safe.

The Authorization header contains the access token as "Bearer Access_Token". We will use this to get access to the backend microservice.

You will now have access to the backend microservice.
As per Cloud Foundry doco:
Can be used in situations where the client is not running in a browser e.g. a mobile application. Note the username and password does not need to be saved. The password grant will specify a refresh_token that can be used to generate an access_token if the current access token expires.
I'll use Postman to simulate how a client might use the user credentials to get the access token. HTTP post to the authorization service (XSUAA)
Request authorization
Add the client id and client secret as basic authentication to the request.

Request headers
Authorization header is added by Postman.

Request body
The Cloud Foundry UAA doco specifies the parameters.

Response
Upon successful post you will get the access_token in the response body. Also, you will be other information,e.g. refresh_token, to generate a new access token once the current one expires. You don't want to persist the user credentials! Keep this info safe.
Use this acces_token to get access to the backend microservice.
And that is how you can use the xsuaa service to implement various oauth flows. Hope you find it helpful.
After following the most excellent SAP S/4HANA Cloud SDK Overview tutorial I wanted to learn more about configuring OAuth grants for different usage scenarios.
I'll share with you how to get both Authorization Code Grant and Resource Owner Password Credentials Grant configured for access to the backend microservice.
As a prerequisite I'll assume you have successfully completed the SAP S/4HANA Cloud SDK Overview tutorial to Step 7. If you have you'll get a 401 code with the following warning when accessing the backend microservice API
{

    "error": "unauthorized",

    "error_description": "An Authentication object was not found in the SecurityContext"

}
To get the grants below working you will need the application name, clientid, client secret and authorization service url (XSUAA). All can be found in the backend microservices service binding to the xsuaa service.
Authorization Code Grant
As per Cloud Foundry doco:
In the authorization code grant flow, the user is directed to a page on the UAA where they grant approvals to the client (Step 1); After the user approves the requested scopes, they are redirected back to the client application with an authorization code in the URL parameters (Step 2); The client application may then exchange the authorization code with UAA to obtain an access token (Step 3). Client application use the access token to view the restricted resource (Step 4).
So, in the authorization code grant flow the user is prompted to grant approvals by providing valid credentials. You might have seen this type of flow when one website wants you to allow it to use the APIs of another web site e.g. a recruitment agency requests access to your LinkedIn account to read your employment history.
Step 1 - Grant approvals
The Cloud Foundry UAA doco specifies the parameters. Adjust below url accordingly.
https://xxxtrial.authentication.eu10.hana.ondemand.com/oauth/authorize?response_type=code&client_id=...Note - the scope is specified in the Tutorial Step 7 as the applicationName.Display. And as we have seen the application name was in the service bindings. Just add them together in this case.
You will be redirected to the uaa login page. Complete and proceed.
Step 2 - Get the authorization code
Upon submission of the login page you will be redirect to the redirect url parameter specified. Now you'll see the authorization code as a parameter. Copy the auth code.
Step 3 - Exchange authorization code for an access token
I'll use Postman to simulate how a client might exchange the auth code for an access token. The Cloud Found UAA doco specifies the parameters for the /oauth/token request. My url is:
https://xxxtrial.authentication.eu10.hana.ondemand.com/oauth/tokenRequest authorization
Add the client id and client secret obtained earlier.
Request headers
This is what the request headers looks like. Authorization header is added by Postman.
Request body
- grant_type - the type of authentication being used to obtain the token, in this case authorization_code
- code - authorization code obtained in step 2 above (the observant reader will notice the screenshot codes doesn't match, I know, just ignore and follow instructions)
- redirect_uri - restricted resource which in this case is the backend microservice.
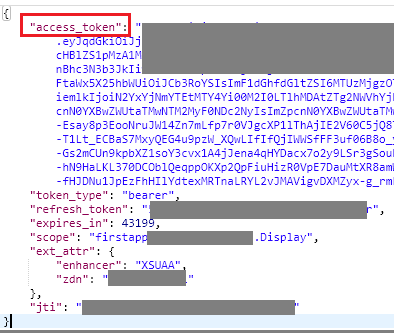
Response
Upon successful post you will get the access_token in the response body. Also, you will get other information,e.g. refresh_token, to generate a new access token once the current one expires. You don't want to prompt the user for access every time! Keep this info safe.
Step 4 - Use the access token to get access to restricted resource
The Authorization header contains the access token as "Bearer Access_Token". We will use this to get access to the backend microservice.
You will now have access to the backend microservice.
Resource Owner Password Credentials Grant
As per Cloud Foundry doco:
The name “password” refers to the Resource Owner Password Grant type. The user, who trusts the security of the application, provides their username and password to the client app which may then use them to obtain an access_token(Step 1). Client app use the access token to view the restricted resource.Can be used in situations where the client is not running in a browser e.g. a mobile application. Note the username and password does not need to be saved. The password grant will specify a refresh_token that can be used to generate an access_token if the current access token expires.
Step 1 - Get the access token
I'll use Postman to simulate how a client might use the user credentials to get the access token. HTTP post to the authorization service (XSUAA)
https://xxxtrial.authentication.eu10.hana.ondemand.com/oauth/tokenRequest authorization
Add the client id and client secret as basic authentication to the request.
Request headers
Authorization header is added by Postman.
Request body
The Cloud Foundry UAA doco specifies the parameters.
- grant_type - the type of authentication being used to obtain the token, in this case password
- username - the user's username
- password - the user's password
Response
Upon successful post you will get the access_token in the response body. Also, you will be other information,e.g. refresh_token, to generate a new access token once the current one expires. You don't want to persist the user credentials! Keep this info safe.
Use this acces_token to get access to the backend microservice.
Summary
And that is how you can use the xsuaa service to implement various oauth flows. Hope you find it helpful.
11 Comments
You must be a registered user to add a comment. If you've already registered, sign in. Otherwise, register and sign in.
 Bluesky
Related Content
- Connect SAP S/4HANA Odata Service Directly with SAP APIM with Oauth2.0 Based Authentication in Technology Blog Posts by Members
- Log in to the Cloud Identity Service using an administrator account with Corporate Identity Provider in Technology Blog Posts by Members
- Part 2 - Create a Custom SAP AI Core Chat Model Node in n8n in Technology Blog Posts by SAP
- Calling SAP CAP API protected by SAP IAS from ABAP in Technology Q&A
- How to obtain an OAuth 2.0 refresh token using OA2C_CONFIG in Technology Q&A
Top liked authors
| User | Count |
|---|---|
| 48 | |
| 47 | |
| 37 | |
| 32 | |
| 29 | |
| 27 | |
| 25 | |
| 23 | |
| 23 | |
| 22 |