


SAP provides standard content for Concur Integration via the SAP Financials with SAP Concur package but what if we need a Concur integration that is not covered by the standard content? This blog aims to assist with the development of custom integration scenarios with Concur particularly using the Concur APIs.
Let’s take a sample scenario to demonstrate all the relevant catch-alls and hints and tips when building an interface. Scenario: An interface that retrieves all un-submitted expense reports in the Concur system. From there, obviously the scenario can do further with the reports e.g. update data etc. but we’ll simplify things here.
Before starting, the most important reference when designing and building an integration with Concur using APIs is https://developer.concur.com/. This contains documentation as well as a testing tool for all the available APIs.
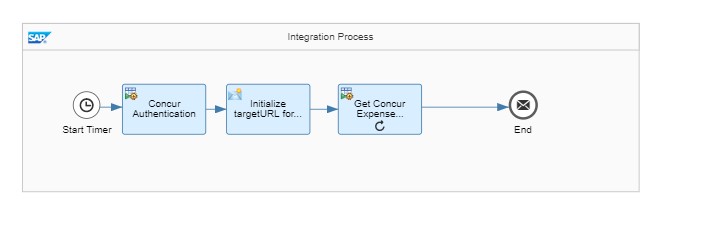
So let’s go through building the scenario. Here is the main integration process:
Let’s further outline the 2 local integration process steps i.e. Step 1 Authentication and Step 3 Get Expense Reports.
Main Integration Process Step 1: Concur Authentication Local Integration Process:

Main Integration Process Step 3: Get Concur Expense Reports and Loop each Looping Process:

So that is the end of this scenario. It demonstrates the Concur authentication step which is required to call any of the other Concur APIs. It also demonstrates the call to another Concur API with the access token and the concept of the looping process call based on the NextPage field. This field is similarly used in a number of Concur APIs. From here, this scenario can be extended further to retrieve further information, update fields etc. Basically anything that Concur allows via APIS. Hopefully this has provided enough information to your scenarios going!
Let’s take a sample scenario to demonstrate all the relevant catch-alls and hints and tips when building an interface. Scenario: An interface that retrieves all un-submitted expense reports in the Concur system. From there, obviously the scenario can do further with the reports e.g. update data etc. but we’ll simplify things here.
Before starting, the most important reference when designing and building an integration with Concur using APIs is https://developer.concur.com/. This contains documentation as well as a testing tool for all the available APIs.
So let’s go through building the scenario. Here is the main integration process:
| Step 1: Concur Authentication | |
Type = Local Integration Process This process handles the call to the Concur Authentication API to retrieve the access token which is required in the header for all other Concur API calls. This will be outlined further in the blog. | |
| Step 2: Initialize targetURL for reports | |
Type = Content Modifier This step sets the URL for the call to the next API- the Reports API. targetURLReports = https://us.api.concursolutions.com/api/v3.0/expense/reports?limit=100&user=ALL&approvalStatusCode=A_...  This URL will retrieve all un-submitted expense reports in batches of 100 (which is the maximum allowed by the Reports API). | |
| Step 3: Get Concur Expense Reports and Loop each | |
Type = Looping Process Call This process handles the call to the Get Reports API and will repeatedly call this process till there are no reports to retrieve. The Reports API returns a URL in the NextPage field to retrieve the next batch of reports if there are more to retrieve. This field is used in the Condition Expression in the Looping Process Call. 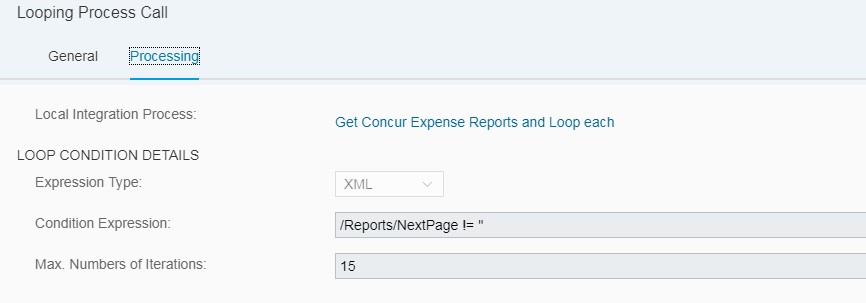 | |
Let’s further outline the 2 local integration process steps i.e. Step 1 Authentication and Step 3 Get Expense Reports.
Main Integration Process Step 1: Concur Authentication Local Integration Process:
| Step 1: Initialize message | |
Type = Content Modifier This step sets all the required parameters for the Authentication API | |
Message Header: targetURL = https://us.api.concursolutions.com/oauth2/v0/token  | |
Message Body: client_id=<ID supplied by Concur>&client_secret=<secret supplied by Concur>&grant_type=password &username=<username supplied by Concur>&password=<password supplied by Concur>  | |
| Step 2: Prepare Authentication API call | |
Type = Groovy Script This step encodes the message body into “x-www-form-urlencoded” as required by the Concur API. This is important as the Authentication API does not work without this coding. | |
Script: | |
| Step 3: Call Authentication API | |
Type = Request Reply This step invokes the Concur Authentication API | |
Connection:  | |
| Step 4: Extract access token | |
Type = Groovy Script This script extracts the access token and places it in the message header for subsequent API calls. | |
Script: | |
Main Integration Process Step 3: Get Concur Expense Reports and Loop each Looping Process:
| Step 1: Prepare HTTP URL | |
Type = Groovy Script This step prepares the request to the Get Reports API and is a copy of the groovy script from the SAP standard Concur integration content. | |
Script: | |
| Step 2: Call Reports API | |
Type = Request Reply This step invokes the Get Reports API | |
Connection:  | |
| Step 3: Extract access token | |
Type = Content Modifier This step updates the target URL for the next loop (if there is more reports to retrieve). As mentioned, if there are more reports to retrieve, then the NextPage field will contain a URL to retrieve the next batch.  | |
So that is the end of this scenario. It demonstrates the Concur authentication step which is required to call any of the other Concur APIs. It also demonstrates the call to another Concur API with the access token and the concept of the looping process call based on the NextPage field. This field is similarly used in a number of Concur APIs. From here, this scenario can be extended further to retrieve further information, update fields etc. Basically anything that Concur allows via APIS. Hopefully this has provided enough information to your scenarios going!
 Bluesky


