
- SAP Community
- Products and Technology
- Product Lifecycle Management
- PLM Blogs by SAP
- Create a Compliance Scenario to Calculate Greenhou...
Product Lifecycle Management Blogs by SAP
Dive into product lifecycle management news, learn about digitalizing PLM for the digital supply chain, and stay informed with product updates from SAP.
Turn on suggestions
Auto-suggest helps you quickly narrow down your search results by suggesting possible matches as you type.
Showing results for
Advisor
Options
- Subscribe to RSS Feed
- Mark as New
- Mark as Read
- Bookmark
- Subscribe
- Printer Friendly Page
- Report Inappropriate Content
01-12-2024
7:21 AM
With this blog post I'd like to show you how to setup a GHG scenario for stationary combustion using SAP EHS, Environment Management using equations from a compliance requirement. You start with creating a location and then the compliance scenario for yearly CO2 equivalent calculation is created with a data collection for collecting natural gas and the calculation for the CO2 equivalent based on equations from a compliance requirement.
The calculation is created according the Guideline for GHG Emission Inventories in SAP EHS so that the results can be used with:
This scenario uses sample content that is shipped with SAP EHS, Environment Management that contains hard-coded values for greenhouse warming potential and emission factors. In a production scenario, you will need to review and most probably create your own compliance requirements for your specific data.
Currently, GHG data needs to be assigned at a location of type Site or Plant to be recognized as GHG data. If you want to import data into SCT, you have to maintain a Plant ID for the location as well. The Plant ID is used as the id for the node in SCT's Business Location hierarchy.
Let's create such a location:
Next, you create the compliance scenario for collecting source data and calculating GHG data:
The calculation consists of four equations:
The calculation for CO2 equivalent uses the listed substance Carbon Dioxide Equivalent and metric tons as the unit of measure. Both is essential for being recognized as GHG data in EHS.
You can use the data created by this scenario with the analytical dashboard and with the integration as mentioned in the beginning of this blog. You can also use the built-in view browser feature to view your GHG data.
I hope you've enjoyed this blog post and found it useful. I'm looking forward to your comments.
Bye 👋
The calculation is created according the Guideline for GHG Emission Inventories in SAP EHS so that the results can be used with:
- Environment Health and Safety (EHS) - Sustainable Operations Insights (SAP Analytics Cloud Content)
- SAP Sustainability Control Tower: SAP EHS, Environment Management Integration
- SAP Sustainability Footprint Management: SAP EHS, Environment Management Integration
- ...and it's ready for future integration and analytical scenarios 🚀
Preconditions
- A S/4HANA Cloud, public edition, S/4HANA Cloud, private edition or S/4HANA in a recent version.
- SAP EHS, Environment Management licensed and activated in the system.
- Default content for compliance requirements.
- A user with business partner and employee assigned for use as Environmental Manager and Environmental Technician (given for S/4HANA Cloud business users).
- The standard data classifiers for GHG emissions are imported or manually created in your system.
Disclaimer
This scenario uses sample content that is shipped with SAP EHS, Environment Management that contains hard-coded values for greenhouse warming potential and emission factors. In a production scenario, you will need to review and most probably create your own compliance requirements for your specific data.
Create a Location for GHG Data
Currently, GHG data needs to be assigned at a location of type Site or Plant to be recognized as GHG data. If you want to import data into SCT, you have to maintain a Plant ID for the location as well. The Plant ID is used as the id for the node in SCT's Business Location hierarchy.
Let's create such a location:
- Open your Fiori launchpad.
- Open application Manage Locations.
- Choose Edit Location Structure.
- Navigate to the location, where you want to create your GHG location as a child node. Select the location.
- Choose New to enter the Create Location screen.
- For group Identification, enter the follow values.
- Enter the Location name, for example
Boston. - Set the Location type to
Site(EHFND_LTY_SI). Alternatively, you can usePlant(EHFND_LTY_PLNT). - Enter the Revision Start Date, for example
01/01/2023. - For group Organizational Information, enter the following value.
- Enter the Plant ID for the location, for example
1742.
- Add further information if needed.
- Choose tab Persons Responsible.
- Open the value help on the empty field for Name in the first row of the table Persons Responsible by Roles.
- Search for the name of the environmental manager, select them and confirm with OK.
- Set field Role in the first row to
Environmental Manager. - Open the value help on the empty field for Name in the second row of the table Persons Responsible by Roles.
- Search for the name of the environmental technician, select them and confirm with OK.
- Set field Role in the first row to
Environmental Technician. - Choose Save.
- Choose Return to Location Structure to go back to the calling app.
- You should see now your location underneath it's parent.
- Choose the newly created location to open it again.
- Choose Set Status → Active to activate it.
- Choose Save.
Create Your Compliance Scenario
Next, you create the compliance scenario for collecting source data and calculating GHG data:
- Open your Fiori launchpad.
- Open application Manage Compliance Scenario.
- Choose tab Display by Location.
- Find your location in the Location Structure and select it.
- Choose Create → Compliance Scenario to enter the Create Compliance Scenario screen.
- For group Basic Information, enter the following values.
- Set Valid From to the start date of your new compliance scenario, for example
01/01/2023. - Set Scenario Name to your desired name, for example
Facilities Heating. - Add the to be used Requirement Paragraphs as follows.
- Open the value help for New Entry to add a compliance requirement paragraph.
- Enter
Predefined Equations for Greenhouse Gas Calculations based on Title 40 Part 98in the Name filter field. - Choose Go.
- Expand the table entry Predefined Equations for Greenhouse Gas Calculations based on Title 40 Part 98 and select Subpart C, Tier 1 Calculation Methodology.
- Choose OK.

- Choose Save to create the compliance scenario and move over to the Edit Compliance Scenario screen.

Add Data Collection for Collecting Natural Gas Consumption
- Do the following actions on the edit compliance scenario screen for your new compliance scenario.
- In the Activities area, choose Add → Data Collection to open the Add Data Collection popup.
- Set name as desired, for example
Facilities Heating - Natural Gas. - Set Data Period to
Yearly. - Open the value help for Subject.
- Open the value help for the Source filter.
- Check
Listed Substance. - Choose OK.
- Enter
Natural Gasin the Name field and choose Go. - Select the first entry for Natural Gas and choose OK to confirm.

- Set Unit to
Therm. - Choose OK to create the data collection.

Create Calculation for Carbon Dioxide Equivalent
- Do the following actions on the edit compliance scenario screen for your new compliance scenario.
- In the Activities area, choose Add → Calculation to open the Add Calculation popup.
- Keep the default selection Equation from Compliance Requirement and choose OK.
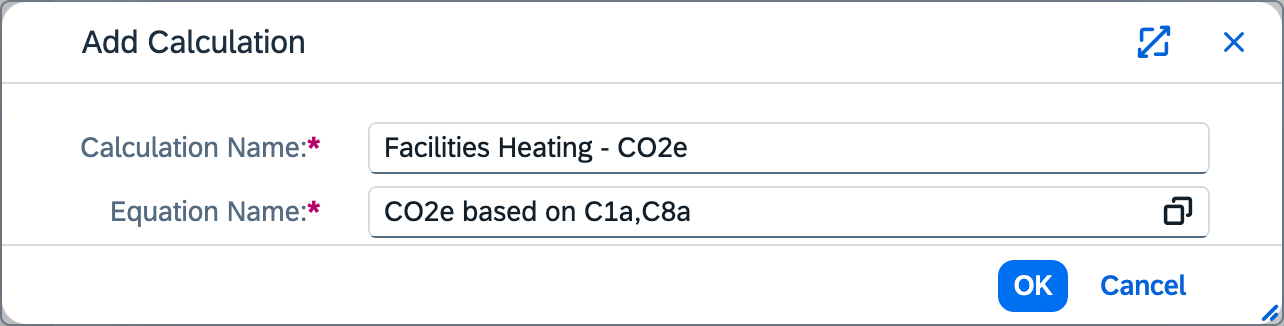
- Set Calculation Name as desired, for example
Facilities Heating - CO2e. - Open the value help for Equation Name.
- Now, you get the list of equations from the previously assigned compliance requirement paragraphs.
- Select Equation Name
CO2ebased on C1a,C8a from Compliance Requirement VersionPredefined Equations for Greenhouse Gas Calculations based on Title 40 Part 98to create the calculation based on EPA requirement for natural gas combustion. - Back on the Add Calculation popup, choose OK.
- It shows your newly added calculation.

The calculation consists of four equations:
- three for calculating emissions of the actual gases CO2, N2O and CH4
- one for calculating the resulting CO2 equivalent
The calculation for CO2 equivalent uses the listed substance Carbon Dioxide Equivalent and metric tons as the unit of measure. Both is essential for being recognized as GHG data in EHS.
Provide Input Variables for the Calculation
- Do the following actions on the edit compliance scenario screen for your compliance scenario.
- Select the just created
Calculation Facilities Heating - CO2eCalculation in the Activities area of the screen. - Choose Calculation Setup Details.
- The table Input Variables contains one Calc Variable with name
GAS. - Set Data Source Type for
GAStoCollected Data. - Open the value help for the Data Source field for
GAS. - Choose Go.
- Select row with
Yearly Natural Gas, Therm / ID: XX. - Choose OK.
- Choose Save.
- Choose Back to Compliance Scenario.
Assign Data Classifiers for GHG Classification
- Do the following actions on the edit compliance scenario screen for your new compliance scenario.
- Select the just created
Calculation Facilities Heating - CO2eCalculation in the Activities area of the screen. - Select equation with title
Yearly Carbon Dioxide Equivalentin the Calculation Results table. - Choose Manage Data Classifiers.
- Set Data Classifier to
Scope 1and choose Assign Data Classifier to identify the record as GHG scope 1 emission. Setting a classifier for the scope is mandatory. - Set Data Classifier to
S1 Stationary Combustionand choose Assign Data Classifier. This is an optional setting that provided further information about the GHG emission.
- Choose Close, save is not required.
Activate the Scenario
- Do the following actions on the edit compliance scenario screen for your new compliance scenario.
- Choose Set Status → Active
- In case a popup is opened with the message "You are about to activate the compliance scenario and send notifications for missing".
- Keep default selection
Missing data should be collected. - Confirm with OK.
Enter Natural Gas Data to Test the Calculation
- Do the following actions on the edit compliance scenario screen for your new compliance scenario.
- Select the
Facilities Heating - Natural GasData Collection in the Activities area of the screen. - Choose Monitor Collected Data to open the data monitoring app.
- In Monitor Data app, switch the view from graph to tabular display by choosing the grid icon on the very right of the toolbar.

- Now, select a row and choose Replace to add the missing data.
Check Calculation Results
- Do the following actions on the edit compliance scenario screen for your new compliance scenario.
- Select the
Calculation Facilities Heating - CO2eCalculation in the Activities area of the screen.
- Select equation with title
Yearly Carbon Dioxide Equivalentin the Calculation Results table. - Choose Monitor Calculated Data.
- You should see the calculated amount of CO2 equivalent based on your entered amount of natural gas.
- In this example, there is only the value for year 2023, as of creating this blog post the year 2024 is not completed and thus the data isn't calculated automatically.

- Done 🎉
What's next?
You can use the data created by this scenario with the analytical dashboard and with the integration as mentioned in the beginning of this blog. You can also use the built-in view browser feature to view your GHG data.
I hope you've enjoyed this blog post and found it useful. I'm looking forward to your comments.
Bye 👋
- SAP Managed Tags:
- SAP Environment, Health, and Safety Management
Labels:
You must be a registered user to add a comment. If you've already registered, sign in. Otherwise, register and sign in.
Labels in this area
Related Content
- Striking the Perfect Balance in Product Lifecycle Management Blogs by SAP
- Operational Risk Management in SAP S/4HANA Cloud Public Edition 2402 in Product Lifecycle Management Blogs by SAP
- Location and Calculation Setup for Greenhouse Gas (GHG) Emissions in SAP EHS, Environment Management in Product Lifecycle Management Blogs by SAP
- Extending SAP Digital Manufacturing with Azure, Part II: Applying the reference architecture to a visual inspection scenario in Product Lifecycle Management Blogs by Members