
- SAP Community
- Products and Technology
- CRM and Customer Experience
- CRM and CX Blogs by Members
- SAP Customer Checkout Plugin Development – Part IV
CRM and CX Blogs by Members
Find insights on SAP customer relationship management and customer experience products in blog posts from community members. Post your own perspective today!
Turn on suggestions
Auto-suggest helps you quickly narrow down your search results by suggesting possible matches as you type.
Showing results for
R_Zieschang
Contributor
Options
- Subscribe to RSS Feed
- Mark as New
- Mark as Read
- Bookmark
- Subscribe
- Printer Friendly Page
- Report Inappropriate Content
2019 May 20
7:51 PM
5,267
- SAP Managed Tags:
- Java,
- SAP Business One,
- SAP Customer Checkout
Back to part I
Back to part II
Back to part III
Welcome to the fourth part of this blog series. If you are new to this blog series, please use the links above to follow the prerequisites for this part as we will dive directly into this topic.
In this part we will create a plugin, which will gather data directly from the cashier in the SAP Customer Checkout UI. We will use the retail UI for this part. The use case is to have an input field for the customer age for all casual customers. For this we will learn how to inject javascript into the salescreen, create html code, react on the receipt posting to send the data to our plugin via REST POST.
We will also create a user defined table to save the data from the frontend with the receipt key as reference.
When SAP Customer Checkout sends the receipts to the B1i we will use a plugin exit to expand the data with our customer age.
On the b1i site we will use the b1i sample extension scenarios provided at the partner edge but I will also include it in the git repository. The last thing we need to do is adding an UDF field in SAP Business One.
To summarize:
As always we create a maven project in which our base class extends the BasePlugin class provided by SAP Customer Checkout. If you need some more details you may read Part I again where I described this in much more detail.
Set Id, Name and Version of your plugin as shown in the screenshot.

To inject javascript code, we will use the annotation @JSInject which is provided by SAP Customer Checkout. This annotation needs to have the property targetScreen set. This determines in which UI screen our javascript will be injected. For our purpose it is the screen "sales".
You can determine the screen like this: start CCO and navigate to the screen you would like to inject your code. Look at the url in your browser:


So "sales" for the first example and "cashdeskclosing" for the second example.
Next thing is, we going to look for a possible place where we can add our input field. This would be the perfect place to place our input field.

Press F12 to open the google chrome developer tools. Click on this litte icon.

With this feature we can select certain parts of the html site to examine it's structure.

The corresponding div part is the customer area. Let's examine what is the structure of this div and determine the right position for our own input area.

The div customer area is split into the customerInfoContainer div and the salesDetailsMain div. So we will place our input are after the customerInfoContainer.
Implement the following method to inject javascript code:
You may have noticed, that this method returns a stream of a resource from our project which is actually a javascript file. This means we need to create this javascript file.

Now we will add the javascript code. The code is split into three parts I will roughly explain.
In the first part we add our own div, which will hold the input field. With the jquery function .after we will determine where our div will be placed. This will be the customerInfoContainer we determined earlier.
The second part is something called "monkey patching". Most of the actions happening on the receipt will be run through the execute function of the BasicReceiptActionCommand. You can have a look at the javascript code with the developer tools of google chrome.
Our code does roughly the following. Save the original execute in a variable we call origMethod.
The third part is implementing our own execute method which is then called by SAP Customer Checkout. In our method we can implement our custom code. After that we call the original SAP Customer Checkout execute function we saved in the variable origMethod earlier.
In our custom code we first check, if SAP Customer Checkout wants to create the receipt.
We also need to determine the current receiptkey and the entered customer age. The element where we get the entered value is #customerAge which is the id of our input fied (see <input type="number" id="customerAge">).
As we want to send some data to our plugin we will send the data via POST. So we need to send the data as JSON in the http request body.
With the jquery function "ajax" we now send both the receipt key as URL parameter and the customer age in the JSON body. Please also consult the official jquery doc for further information.
If our request was sucessfull, we check if our plugin answers with a status == 1 so that we can reset our input field in the UI. We will learn a bit later how to handle a request from the UI and how to send a response from our plugin.
After our POST request we will call the original function we stored earlier in our own variable.
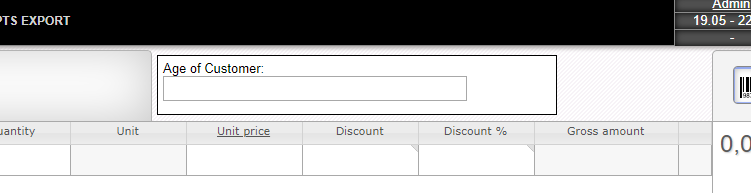
Now we can build our plugin and we can see our newly created div element with our input field.
The next thing we need to implement is some logic to handle the POST request we implemented on javascript side. For this we can use the plugin exit "PluginServlet.callback.post". There is also a servlet for get requests which is called "PluginServlet.callback.get". For our use-case we stick to post.
In the objects array we will get a request object and also a response object. The response object we can use to send data back to the ui. These objects are from the type HttpServletRequest and HttpServletResponse.
The RequestDelegate is a class we will implement now. I like to handle all the request and response stuff in a seperate class to keep my main plugin class nice and clean.
The request delegate is implemented as a singleton to make sure, that only one instance will ever handle the requests and we will not run into any concurrent problems.
So what happens here is pretty straight forward. We have a private constructor. We access the instance of the request delegate via the getInstance() method which returns the instance or if not existing, creates a new one.
The handleRequest method is where we extract the url method (POST or GET) and also the action (see salesInject.js action=customerAge). This is used to distinguish between calls from the UI. You can use this to extend or implement further actions or request types.
If the action was customerAge we also get the url parameter receiptId to save in our customerAgeDAO the receiptId and the customerAge the cashier set.
When everything worked fine, we set the status 1 in our respone object. Remember the success part in our salesInject.js?
For production use you may implement some further validation.
In the RequestDelegate class you may have noticed the CustomerAgeDao and the CustomerAgeDto. The DAO is the data-access-object (our user defined table including all methods for accessing the data) and the DTO is the data-transfer-object we use for transfer the data through our plugin.
As we already learned how to do this, I will not go into the details. Have a look into part III if you want to know more.
Lets wrap up. We created an input field in the UI. We sent the data to our plugin via the plugin servlet and we saved the data in a user defined table. Now we are implementing a method to intercept the receipt which is going to be sent to our B1i server.
So lets examine, what we are doing here. We listen to the exit BusinessOneServiceWrapper.beforePostInvoiceRequest. In the array of objects we get the receiptDTO and the request. We use our findOne method of the customerAgeDao to find the record in our user-defined table.
If we found a record we create a key-value pair object. The key is customerAge and the value the age the cashier set for this receipt. When we have set key and value we are adding our KeyValPair object to the document.
When everything is set and done we just adding the the modified request in the array.
Now when we are opening the SAPCustomerCheckout monitor (normally http://localhost:8080/SAPCustomerCheckoutB1i), search for a receipt which was created with our plugin and open the incoming message.


There it is! Our KeyValPair we set in our plugin!
Now we are going to use a scenario which is provided by SAP as an example for extending the standard SAP Customer Checkout scenarios.
You can download these package in the partner edge. I also included them into the git repository.
Click this link. Now you can download the package here:

After you have download this package open your B1i (normally: http://localhost:8080/B1iXcellerator) and click on the scenarios tab. Now choose the import link.

Now go to the setup and choose the scenario sap.CustomerCheckout and click on Data Mgt.

Now we choose the IncludeList.

Now we get all the possible extension points presented where we can extend the standard behaviour of the SAP Customer Checkout B1i scenarios.
Note whenever you intend to use the extension points. Consume the payload you get from the scenario and return the same structure. Otherwise the whole scenario may stop working.
The sap.CCO.ReceiptUDFV2 scenario step takes all the KeyValPairs in the documents section and set U_[key] = [value].
So you can add whatever KeyValPair you want and the combination of the standard SAP Customer Checkout scenarios with this example will save this into SAP Business One.
In the next chapter we will see, what we are going to achieve with this.
In the last chapter we will prepare our Business One to receive our customer age. Lets add a user-defined field. As I explained before we set the key customerAge. So name your UDF customerAge. The key of the keyValPair will always be the name of your UDF in Business One.

When everything works you will now have the customer age from your CCO which was set by the cashier in your SAP Business One!

We learned how to inject javascript code into the sales screen and how to determine which targetName to choose. Also we know now how to send data from the UI to a backend part of our plugin and to handle this data and how to response to the UI.
Furthermore we are now able to expand and modify the data which is sent from SAP Customer Checkout to B1i and how to use the extension points provided by the SAP Customer Checkout B1i scenarios.
That's all for this part. If you have any questions, please do not hesitate to drop me a line.
The code is, as always, hosted on github.
https://gitlab.com/ccoplugins/blogpluginpart4
The plugin is licensed under the MIT License.
Back to part II
Back to part III
Part IV - Gather data in CCO UI and sent this data to Business One
Introduction
Welcome to the fourth part of this blog series. If you are new to this blog series, please use the links above to follow the prerequisites for this part as we will dive directly into this topic.
In this part we will create a plugin, which will gather data directly from the cashier in the SAP Customer Checkout UI. We will use the retail UI for this part. The use case is to have an input field for the customer age for all casual customers. For this we will learn how to inject javascript into the salescreen, create html code, react on the receipt posting to send the data to our plugin via REST POST.
We will also create a user defined table to save the data from the frontend with the receipt key as reference.
When SAP Customer Checkout sends the receipts to the B1i we will use a plugin exit to expand the data with our customer age.
On the b1i site we will use the b1i sample extension scenarios provided at the partner edge but I will also include it in the git repository. The last thing we need to do is adding an UDF field in SAP Business One.
To summarize:
- Inject javascript code to create an input field
- create backend logic to receive the input data
- create a user-defined table to save the data
- intercept the receipt post to b1i to add the input data
- import b1i sample extensions
- add UDF in SAP Business One
Inject Javascript code
As always we create a maven project in which our base class extends the BasePlugin class provided by SAP Customer Checkout. If you need some more details you may read Part I again where I described this in much more detail.
Set Id, Name and Version of your plugin as shown in the screenshot.
To inject javascript code, we will use the annotation @JSInject which is provided by SAP Customer Checkout. This annotation needs to have the property targetScreen set. This determines in which UI screen our javascript will be injected. For our purpose it is the screen "sales".
You can determine the screen like this: start CCO and navigate to the screen you would like to inject your code. Look at the url in your browser:
So "sales" for the first example and "cashdeskclosing" for the second example.
Next thing is, we going to look for a possible place where we can add our input field. This would be the perfect place to place our input field.
Press F12 to open the google chrome developer tools. Click on this litte icon.
With this feature we can select certain parts of the html site to examine it's structure.
The corresponding div part is the customer area. Let's examine what is the structure of this div and determine the right position for our own input area.
The div customer area is split into the customerInfoContainer div and the salesDetailsMain div. So we will place our input are after the customerInfoContainer.
Implement the following method to inject javascript code:
@JSInject(targetScreen = "sales")

	public InputStream[] injectJS() {

		return new InputStream[] {this.getClass().getResourceAsStream("/resources/salesInject.js")};

	}
You may have noticed, that this method returns a stream of a resource from our project which is actually a javascript file. This means we need to create this javascript file.
Now we will add the javascript code. The code is split into three parts I will roughly explain.
// Add the input field

$(document).ready(function () {

    $('.customerInfoContainer').after($('<div style="position: relative; right: 0; top: 0; background-color: #FFF; padding: 5px; border: 1px solid #000; width: 25%; height: 68%; font-size: small; margin-left: 5px; margin-right: 5px; margin-top: 5px; float:left" id="customerAgeDiv">Age of Customer: <input type="number" id="customerAge"></div>'));

});

// monkey path the original execute method.

var origMethod = BasicReceiptActionCommand.prototype.execute;


// add our own code and call the original method we monkey patched.

BasicReceiptActionCommand.prototype.execute = function (a, b, c) {

    if (a.entity === "createReceipt") {

        var receiptKey = $('#receiptEntityKey').val();

        var requestBody = '{' +  "\"customerAge\" : " + $("#customerAge").val() + ' }';

        $.ajax({

            type: "POST",

            url: "PluginServlet?action=customerAge&receiptId="+encodeURIComponent(receiptKey),

            data: requestBody,

            contentType: "application/json",

            dataType: "json",

            success: function(result) {

                if (result && result["status"] == 1) {

                    $("#customerAge").val(0);

                }

            }

        });

    }

    origMethod.call(this, a, b, c);

};
In the first part we add our own div, which will hold the input field. With the jquery function .after we will determine where our div will be placed. This will be the customerInfoContainer we determined earlier.
The second part is something called "monkey patching". Most of the actions happening on the receipt will be run through the execute function of the BasicReceiptActionCommand. You can have a look at the javascript code with the developer tools of google chrome.
Our code does roughly the following. Save the original execute in a variable we call origMethod.
The third part is implementing our own execute method which is then called by SAP Customer Checkout. In our method we can implement our custom code. After that we call the original SAP Customer Checkout execute function we saved in the variable origMethod earlier.
In our custom code we first check, if SAP Customer Checkout wants to create the receipt.
if (a.entity === "createReceipt") {We also need to determine the current receiptkey and the entered customer age. The element where we get the entered value is #customerAge which is the id of our input fied (see <input type="number" id="customerAge">).
var receiptKey = $('#receiptEntityKey').val();

var requestBody = '{' +  "\"customerAge\" : " + $("#customerAge").val() + ' }';
As we want to send some data to our plugin we will send the data via POST. So we need to send the data as JSON in the http request body.
With the jquery function "ajax" we now send both the receipt key as URL parameter and the customer age in the JSON body. Please also consult the official jquery doc for further information.
        $.ajax({

            type: "POST",

            url: "PluginServlet?action=customerAge&receiptId="+encodeURIComponent(receiptKey),

            data: requestBody,

            contentType: "application/json",

            dataType: "json",

            success: function(result) {

                if (result && result["status"] == 1) {

                    $("#customerAge").val(0);

                }

            }

        });
If our request was sucessfull, we check if our plugin answers with a status == 1 so that we can reset our input field in the UI. We will learn a bit later how to handle a request from the UI and how to send a response from our plugin.
After our POST request we will call the original function we stored earlier in our own variable.
origMethod.call(this, a, b, c);Now we can build our plugin and we can see our newly created div element with our input field.
Create backend logic to receive the input data
The next thing we need to implement is some logic to handle the POST request we implemented on javascript side. For this we can use the plugin exit "PluginServlet.callback.post". There is also a servlet for get requests which is called "PluginServlet.callback.get". For our use-case we stick to post.
In the objects array we will get a request object and also a response object. The response object we can use to send data back to the ui. These objects are from the type HttpServletRequest and HttpServletResponse.
	@ListenToExit(exitName="PluginServlet.callback.post")

	public void pluginServletPost(Object caller, Object[] args) {


		HttpServletRequest request = (HttpServletRequest)args[0];

		HttpServletResponse response = (HttpServletResponse)args[1];


		RequestDelegate.getInstance().handleRequest(request, response);

	}
The RequestDelegate is a class we will implement now. I like to handle all the request and response stuff in a seperate class to keep my main plugin class nice and clean.
The request delegate is implemented as a singleton to make sure, that only one instance will ever handle the requests and we will not run into any concurrent problems.
/**

 * @author Robert Zieschang

 */

public class RequestDelegate {


    private static final Logger logger = Logger.getLogger(RequestDelegate.class);


    private CustomerAgeDao customerAgeDao;


    private static RequestDelegate instance = new RequestDelegate();

    public static synchronized RequestDelegate getInstance() {

        if (instance == null) {

            instance = new RequestDelegate();

        }

        return instance;

    }


    private RequestDelegate() {

        this.customerAgeDao = new CustomerAgeDao();

    }


    public void handleRequest(HttpServletRequest request, HttpServletResponse response) {

        String urlMethod = request.getMethod();

        String action = request.getParameter("action");

        JSONObject responseObj = new JSONObject();


        if ("POST".equals(urlMethod)) {

            JSONObject requestBody = this.getRequestBody(request);

            switch(action) {

                case "customerAge":

                    String receiptKey = request.getParameter("receiptId");

                    customerAgeDao.save(new CustomerAgeDto(receiptKey, requestBody.getInt("customerAge")));

                    responseObj.put("status", 1);

                    break;

            }

        } else if ("GET".equals(urlMethod)) {


        }


        if(!responseObj.isEmpty()) {

            try (OutputStreamWriter osw = new OutputStreamWriter(response.getOutputStream())) {

                osw.write(responseObj.toString());

            } catch (IOException e) {

                logger.severe("Error while Processing Request");

            }

        }

    }


    private JSONObject getRequestBody(HttpServletRequest request) {


        StringBuilder sb = new StringBuilder();

        try {

            BufferedReader br = request.getReader();

            String line = null;


            while ((line = br.readLine()) != null) {

                sb.append(line);

            }


        } catch (IOException e) {

            logger.severe("Error while parsing JSON Request body");

        }

        return JSONObject.fromObject(sb.toString());

    }

}
So what happens here is pretty straight forward. We have a private constructor. We access the instance of the request delegate via the getInstance() method which returns the instance or if not existing, creates a new one.
The handleRequest method is where we extract the url method (POST or GET) and also the action (see salesInject.js action=customerAge). This is used to distinguish between calls from the UI. You can use this to extend or implement further actions or request types.
        if ("POST".equals(urlMethod)) {

            JSONObject requestBody = this.getRequestBody(request);

            switch(action) {

                case "customerAge":

                    String receiptKey = request.getParameter("receiptId");

                    customerAgeDao.save(new CustomerAgeDto(receiptKey, requestBody.getInt("customerAge")));

                    responseObj.put("status", 1);

                    break;

            }

        } else if ("GET".equals(urlMethod)) {


        }
If the action was customerAge we also get the url parameter receiptId to save in our customerAgeDAO the receiptId and the customerAge the cashier set.
When everything worked fine, we set the status 1 in our respone object. Remember the success part in our salesInject.js?
            success: function(result) {

                if (result && result["status"] == 1) {

                    $("#customerAge").val(0);

                }

            }
For production use you may implement some further validation.
Create a user-defined table to save the data
In the RequestDelegate class you may have noticed the CustomerAgeDao and the CustomerAgeDto. The DAO is the data-access-object (our user defined table including all methods for accessing the data) and the DTO is the data-transfer-object we use for transfer the data through our plugin.
As we already learned how to do this, I will not go into the details. Have a look into part III if you want to know more.
public class CustomerAgeDao {


    private static final Logger logger = Logger.getLogger(CustomerAgeDao.class);


    private static final String TABLE_NAME = "HOK_CUSTOMERAGE";


    private static final String QUERY_CREATE_TABLE = "CREATE TABLE " + TABLE_NAME + " ("

            + "RECEIPTKEY varchar(100) not null PRIMARY KEY,"

            + "CUSTOMERAGE INT not null)";


    private static final String QUERY_INSERT_ROW = "INSERT INTO " + TABLE_NAME + " VALUES(?,?)";


    private static final String QUERY_UPDATE_ROW = "UPDATE " + TABLE_NAME

            + " SET RECEIPTKEY = ?2 WHERE CUSTOMERAGE = ?1";


    // query for find all

    private static final String QUERY_FIND_ALL = "SELECT RECEIPTKEY, CUSTOMERAGE FROM " + TABLE_NAME;


    // query for find one

    private static final String QUERY_FIND_ONE = "SELECT RECEIPTKEY, CUSTOMERAGE FROM " + TABLE_NAME

            + " where RECEIPTKEY = ?";


    // query to drop one

    private static final String QUERY_DROP_ONE = "DELETE FROM " + TABLE_NAME + " WHERE RECEIPTKEY = ?";


    public void setupTable() {

        CDBSession session = CDBSessionFactory.instance.createSession();

        try {

            session.beginTransaction();

            EntityManager em = session.getEM();


            Query q = em.createNativeQuery(QUERY_CREATE_TABLE);

            q.executeUpdate();


            session.commitTransaction();

            logger.info("Created table " + TABLE_NAME);


        } catch (Exception e) {

            session.rollbackDBSession();

            logger.info("Error or table " + TABLE_NAME + " already existing");

        } finally {

            session.closeDBSession();

        }

    }


    private void save(CustomerAgeDto customerAge, boolean isAlreadyInDB) {


        CDBSession session = CDBSessionFactory.instance.createSession();

        String query = isAlreadyInDB ? QUERY_UPDATE_ROW : QUERY_INSERT_ROW;


        try {

            session.beginTransaction();

            EntityManager em = session.getEM();


            Query q = em.createNativeQuery(query);

            q.setParameter(1, customerAge.getReceiptKey());

            q.setParameter(2, customerAge.getCustomerAge());


            q.executeUpdate();

            session.commitTransaction();


        } catch (Exception e) {

            session.rollbackDBSession();

            logger.info("Could not create CustomerAge");

            logger.info(e.getLocalizedMessage());

        } finally {

            session.closeDBSession();

        }

    }


    public List<CustomerAgeDto> findAll() {

        CDBSession session = CDBSessionFactory.instance.createSession();

        ArrayList<CustomerAgeDto> resultList = new ArrayList<>();


        try {

            session.beginTransaction();

            EntityManager em = session.getEM();


            Query q = em.createNativeQuery(QUERY_FIND_ALL);

            @SuppressWarnings("unchecked")

            List<Object[]> results = q.getResultList();


            if (results.isEmpty()) {

                // return an empty list rather than null

                return resultList;

            }


            for (Object[] resultRow : results) {

                resultList.add(new CustomerAgeDto((String) resultRow[0], (Integer) resultRow[1]));

            }


        } catch (Exception e) {

            logger.info("Error while getting results from table " + TABLE_NAME);


        } finally {

            session.closeDBSession();


        }


        return resultList;

    }


    public CustomerAgeDto findOne(String inReceiptKey) {

        CDBSession session = CDBSessionFactory.instance.createSession();

        CustomerAgeDto customerAge = new CustomerAgeDto();


        try {


            EntityManager em = session.getEM();

            Query q = em.createNativeQuery(QUERY_FIND_ONE);

            q.setParameter(1, inReceiptKey);


            @SuppressWarnings("unchecked")

            List<Object[]> results = q.getResultList();


            if (results.isEmpty()) {

                // return empty dto

                return customerAge;

            }


            customerAge.setReceiptKey((String) results.get(0)[0]);

            customerAge.setCustomerAge((Integer) results.get(0)[1]);


        } catch (Exception e) {

            logger.info("Error while getting " + inReceiptKey + " from table " + TABLE_NAME);


        } finally {

            session.closeDBSession();

        }


        return customerAge;

    }


    public void dropOne(String inReceiptKey) {

        CDBSession session = CDBSessionFactory.instance.createSession();


        try {

            session.beginTransaction();

            EntityManager em = session.getEM();

            Query q = em.createNativeQuery(QUERY_DROP_ONE);

            q.setParameter(1, inReceiptKey);

            q.executeUpdate();

            session.commitTransaction();


        } catch (Exception ex) {


        } finally {

            session.closeDBSession();

        }

    }


    public void dropAll() {

        List<CustomerAgeDto> list = this.findAll();


        for (CustomerAgeDto entry : list) {

            this.dropOne(entry.getReceiptKey());

        }

    }


    public void save(CustomerAgeDto customerAge) {

        CustomerAgeDto customerAgeInDb = this.findOne(customerAge.getReceiptKey());

        boolean isAlreadyInDb = customerAge.getReceiptKey().equals(customerAgeInDb.getReceiptKey());

        // check if entity is already in database, so that we update rather than insert.

        this.save(customerAge, isAlreadyInDb);


    }
public class CustomerAgeDto {
private String receiptKey;
private Integer customerAge;
public CustomerAgeDto() {
}
public CustomerAgeDto(String inReceipKey, Integer inCustomerAge) {
this.receiptKey = inReceipKey;
this.customerAge = inCustomerAge;
}
public String getReceiptKey() {
return receiptKey;
}
public void setReceiptKey(String receiptKey) {
this.receiptKey = receiptKey;
}
public Integer getCustomerAge() {
return customerAge;
}
public void setCustomerAge(Integer customerAge) {
this.customerAge = customerAge;
}
}Intercept the receipt post to b1i to add the input data
Lets wrap up. We created an input field in the UI. We sent the data to our plugin via the plugin servlet and we saved the data in a user defined table. Now we are implementing a method to intercept the receipt which is going to be sent to our B1i server.
	@ListenToExit(exitName="BusinessOneServiceWrapper.beforePostInvoiceRequest")

	public void enlargeB1iMessage(Object caller, Object[] args) {


		ReceiptDTO receiptDto = (ReceiptDTO) args[0];

		PostInvoiceType request = (PostInvoiceType) args[1];

		CustomerAgeDto customerAge = this.customerAgeDao.findOne(receiptDto.getKey());

		if (null != customerAge.getReceiptKey()) {

			GenericValues.KeyValPair keyValPair = new GenericValues.KeyValPair();

			keyValPair.setKey("customerAge");

			keyValPair.setValue(customerAge.getCustomerAge().toString());


			if (null == request.getGenericValues()) {

				request.getSale().getDocuments().setGenericValues(new GenericValues());

			}


            request.getSale().getDocuments().getGenericValues().getKeyValPair().add(keyValPair);

			args[1] = request;

		}

	}
So lets examine, what we are doing here. We listen to the exit BusinessOneServiceWrapper.beforePostInvoiceRequest. In the array of objects we get the receiptDTO and the request. We use our findOne method of the customerAgeDao to find the record in our user-defined table.
If we found a record we create a key-value pair object. The key is customerAge and the value the age the cashier set for this receipt. When we have set key and value we are adding our KeyValPair object to the document.
When everything is set and done we just adding the the modified request in the array.
Now when we are opening the SAPCustomerCheckout monitor (normally http://localhost:8080/SAPCustomerCheckoutB1i), search for a receipt which was created with our plugin and open the incoming message.
There it is! Our KeyValPair we set in our plugin!
Import b1i sample extensions
Now we are going to use a scenario which is provided by SAP as an example for extending the standard SAP Customer Checkout scenarios.
You can download these package in the partner edge. I also included them into the git repository.
Click this link. Now you can download the package here:
After you have download this package open your B1i (normally: http://localhost:8080/B1iXcellerator) and click on the scenarios tab. Now choose the import link.
Now go to the setup and choose the scenario sap.CustomerCheckout and click on Data Mgt.
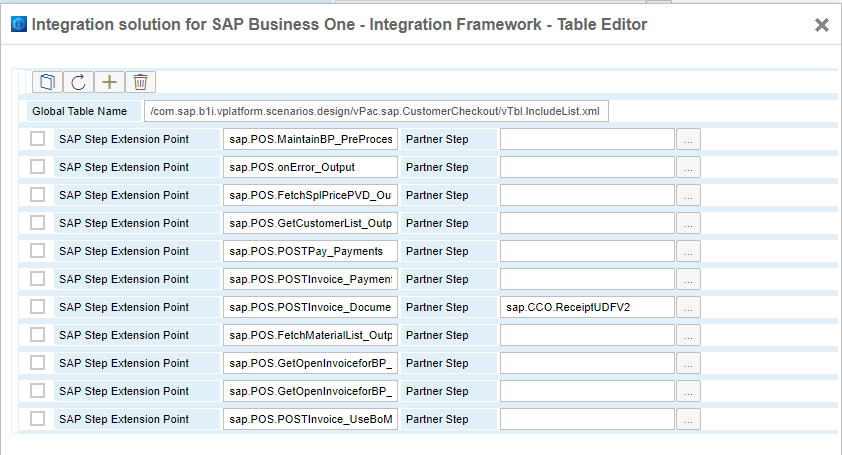
Now we choose the IncludeList.
Now we get all the possible extension points presented where we can extend the standard behaviour of the SAP Customer Checkout B1i scenarios.
Note whenever you intend to use the extension points. Consume the payload you get from the scenario and return the same structure. Otherwise the whole scenario may stop working.
The sap.CCO.ReceiptUDFV2 scenario step takes all the KeyValPairs in the documents section and set U_[key] = [value].
So you can add whatever KeyValPair you want and the combination of the standard SAP Customer Checkout scenarios with this example will save this into SAP Business One.
In the next chapter we will see, what we are going to achieve with this.
Add UDF in SAP Business One
In the last chapter we will prepare our Business One to receive our customer age. Lets add a user-defined field. As I explained before we set the key customerAge. So name your UDF customerAge. The key of the keyValPair will always be the name of your UDF in Business One.
When everything works you will now have the customer age from your CCO which was set by the cashier in your SAP Business One!
Wrap up
We learned how to inject javascript code into the sales screen and how to determine which targetName to choose. Also we know now how to send data from the UI to a backend part of our plugin and to handle this data and how to response to the UI.
Furthermore we are now able to expand and modify the data which is sent from SAP Customer Checkout to B1i and how to use the extension points provided by the SAP Customer Checkout B1i scenarios.
That's all for this part. If you have any questions, please do not hesitate to drop me a line.
The code is, as always, hosted on github.
https://gitlab.com/ccoplugins/blogpluginpart4
The plugin is licensed under the MIT License.
20 Comments
You must be a registered user to add a comment. If you've already registered, sign in. Otherwise, register and sign in.
Labels in this area
-
"TypeScript" "Development" "FeedBack"
1 -
ABAP
1 -
adobe analytics
1 -
Advanced Filter in SAP C4C
1 -
API Rules
1 -
Automation in C4C
1 -
c4c
1 -
C4C Analytics
1 -
C4C Broadcast
1 -
C4C Reporting
1 -
C4C Sales
2 -
C4C Service
1 -
C4C Service v2 Integration with S4 Hana utility
1 -
CAP development
12 -
Clean Core
10 -
clean-core
2 -
crm
4 -
CRM Business Transaction Event Framework
1 -
CRM Case Management
1 -
custom fields
1 -
custom fields and logic
1 -
Custom Key Metrics
1 -
Customer Data
2 -
datalayer
1 -
Datasource
1 -
Determination
1 -
Determinations
1 -
DocuSign
1 -
Enabling SDK Fields on Custom BO's OWL Screen
1 -
Enabling SDK Fields on standard OWL Screen
1 -
Enterprise Service Management (ESM)
1 -
ESM
1 -
Expert Insights
1 -
external terminal
1 -
google analytics
1 -
Introducing SAP Analytics Cloud
1 -
Introduction
1 -
javascript
1 -
KYMA
1 -
Kyma Functions
1 -
Logic
1 -
open SAP
1 -
PDI
10 -
PFCG
1 -
promotions
1 -
RAP development
1 -
RFM
1 -
Sales and Service Cloud Version 2
1 -
Sales Cloud
1 -
Sales Cloud v2
1 -
sap
1 -
SAP Cloud Platform Integration
1 -
SAP Community
1 -
SAP CPQ
1 -
SAP CRM Web UI
1 -
SAP Customer Checkout
3 -
SAP Customer Data Cloud
1 -
SAP Customer Data Platform
2 -
SAP Customer Experience
1 -
SAP CX
13 -
SAP CX Cloud
12 -
SAP CX extensions
12 -
SAP Emarsys Customer Engagement
1 -
SAP Emarsys Predict
1 -
SAP Emarsys Smart Insight
1 -
SAP Enterprise Service Management (ESM)
2 -
SAP ESM
1 -
SAP Integration Suite
1 -
SAP Odata
1 -
SAP Sales Cloud
2 -
SAP Sales Cloud v1
12 -
SAP Sales Cloud v2
13 -
SAP Service Cloud
13 -
SAP Service Cloud v2
12 -
SAP Service Cloud Version 2
1 -
SAP Utilities
1 -
Saving Search Queries on OWL Screen
1 -
Service and Social ticket configuration
1 -
Service Cloud v2
1 -
side by side extensibility
10 -
side-by-side extensions
2 -
Technical article
1 -
Ticket configuration in SAP C4C
1 -
Transport Management
1 -
Validation
1 -
Validations
1 -
web extend
1
Related Content
- Four questions to ask when adding CDC, CDP and Emarsys to your marketing toolset in CRM and CX Blogs by SAP
- How to migrate to the Commerce Cloud CCv2 (part 2 - media) in CRM and CX Blogs by Members
- Troubleshooting Guide for EFT Terminal Integration with SAP Customer Checkout via Pepper in CRM and CX Blogs by Members
- SAP Customer Checkout Manager migration to a new server in CRM and CX Blogs by Members
- SAP Customer Checkout Manager Umzug auf neuen Server in CRM and CX Blogs by Members
Top kudoed authors
| User | Count |
|---|---|
| 6 | |
| 4 | |
| 1 | |
| 1 | |
| 1 |