- SAP Community
- Products and Technology
- Technology
- Technology Blogs by SAP
- Using SAP Adaptive Server Enterprise (ASE) on Amaz...
- Subscribe to RSS Feed
- Mark as New
- Mark as Read
- Bookmark
- Subscribe
- Printer Friendly Page
- Report Inappropriate Content
- SAP Managed Tags:
- SAP Adaptive Server Enterprise
While Part 1 of this sequence provided an introduction to the SAP ASE on Amazon Web Services Market Place, this post will provide an introduction to deployment experience in the form of a walkthrough.
Amazon Market Place Access to the SAP ASE (Amazon Machine Image – AMI)
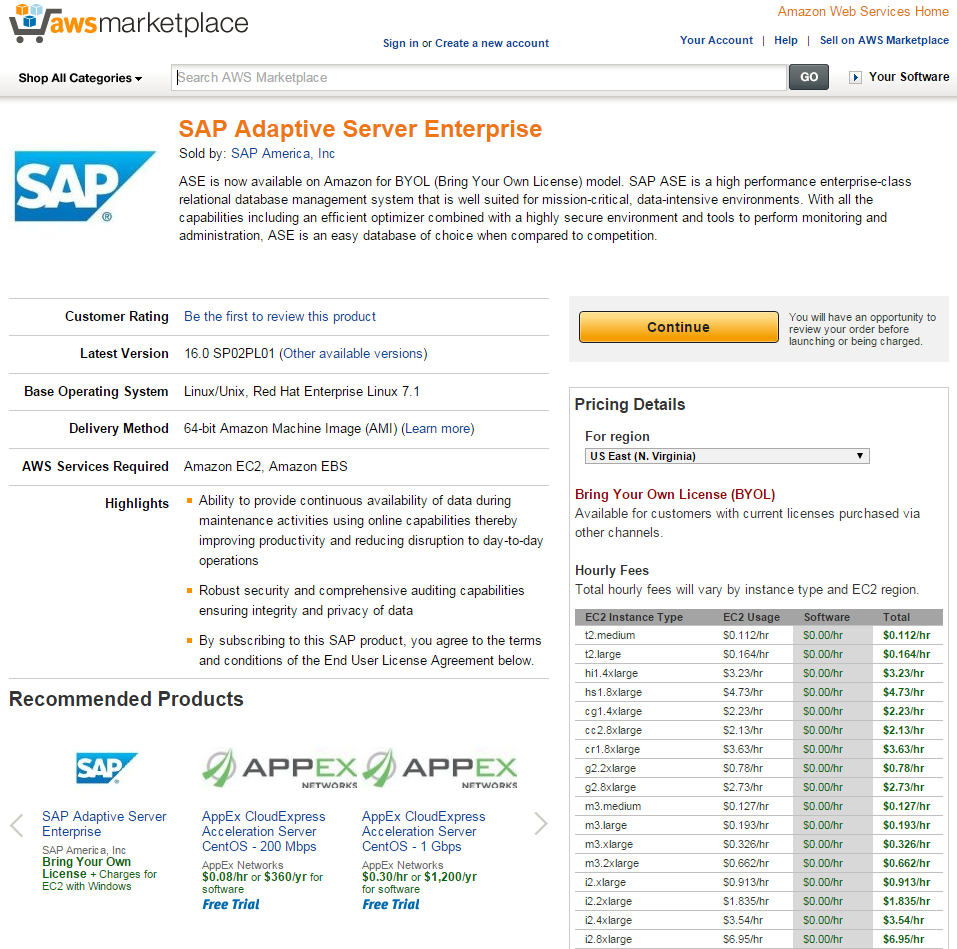
The SAP ASE AMI image can be accessed via a Web Brower. ASE supports multiple platforms in the market place, including Linux and Windows. In Figure 1 we show an example of the ASE Market Place page for the Linux AMI.

Figure 1
In Figure 1 please note the different regions that support ASE AMI (the image shows US East in N. Virginia). Also note the hourly utilization rates in the table, these rates might change based on the region selection. So while a customer brings their own license (BYOL), resource (compute, storage, and network) utilization rates will be metered based on these rates, by Amazon, separately.
A Quick Start walkthrough
Prior to the deployment users will require a valid Amazon Web Services Account. Users can log in or create a new account from this link as shown in Figure 2.

Figure 2
There are two ways to get to the desired ASE AMI for deployment. Either via a web search for the desired AMI leading to the page as shown in Figure 1 or after a log into the Amazon Web Services Management Console page as shown in Figure 3.

Figure 3
For this walk-through we shall use the Linux AMI, discovered from the Amazon AWS account (after a successful log in).
Amazon Deployment Walk-through
Log into the Amazon AWS Management Console as shown in Figure 4. If a user does not have an account then a new account (free) can be created by selecting the “I am a new user.” Radio button.

Figure 4
Once a user logs in, user will see the AWS Market Place link to the right as shown in Figure 3 (above). On clicking that link the user will see the page in Figure 5.

Figure 5
On this page the user can discover the AMI images for SAP Adaptive Server Enterprise using the “Search AWS Marketplace” text field. The search will yield the page shown in Figure 6.

Figure 6
On selecting the SAP Adaptive Server Enterprise link for version 16.0 SP02PL01, the user will see the page in Figure 1 (above). On clicking the Continue button the user will see the page in Figure 7.

Figure 7
Please note the available unique images in each region. On selecting the “Launch with EC2 Console” corresponding to the desired region of interest, the user will see the page in Figure 8 (a start of a EC2 workflow).

Figure 8
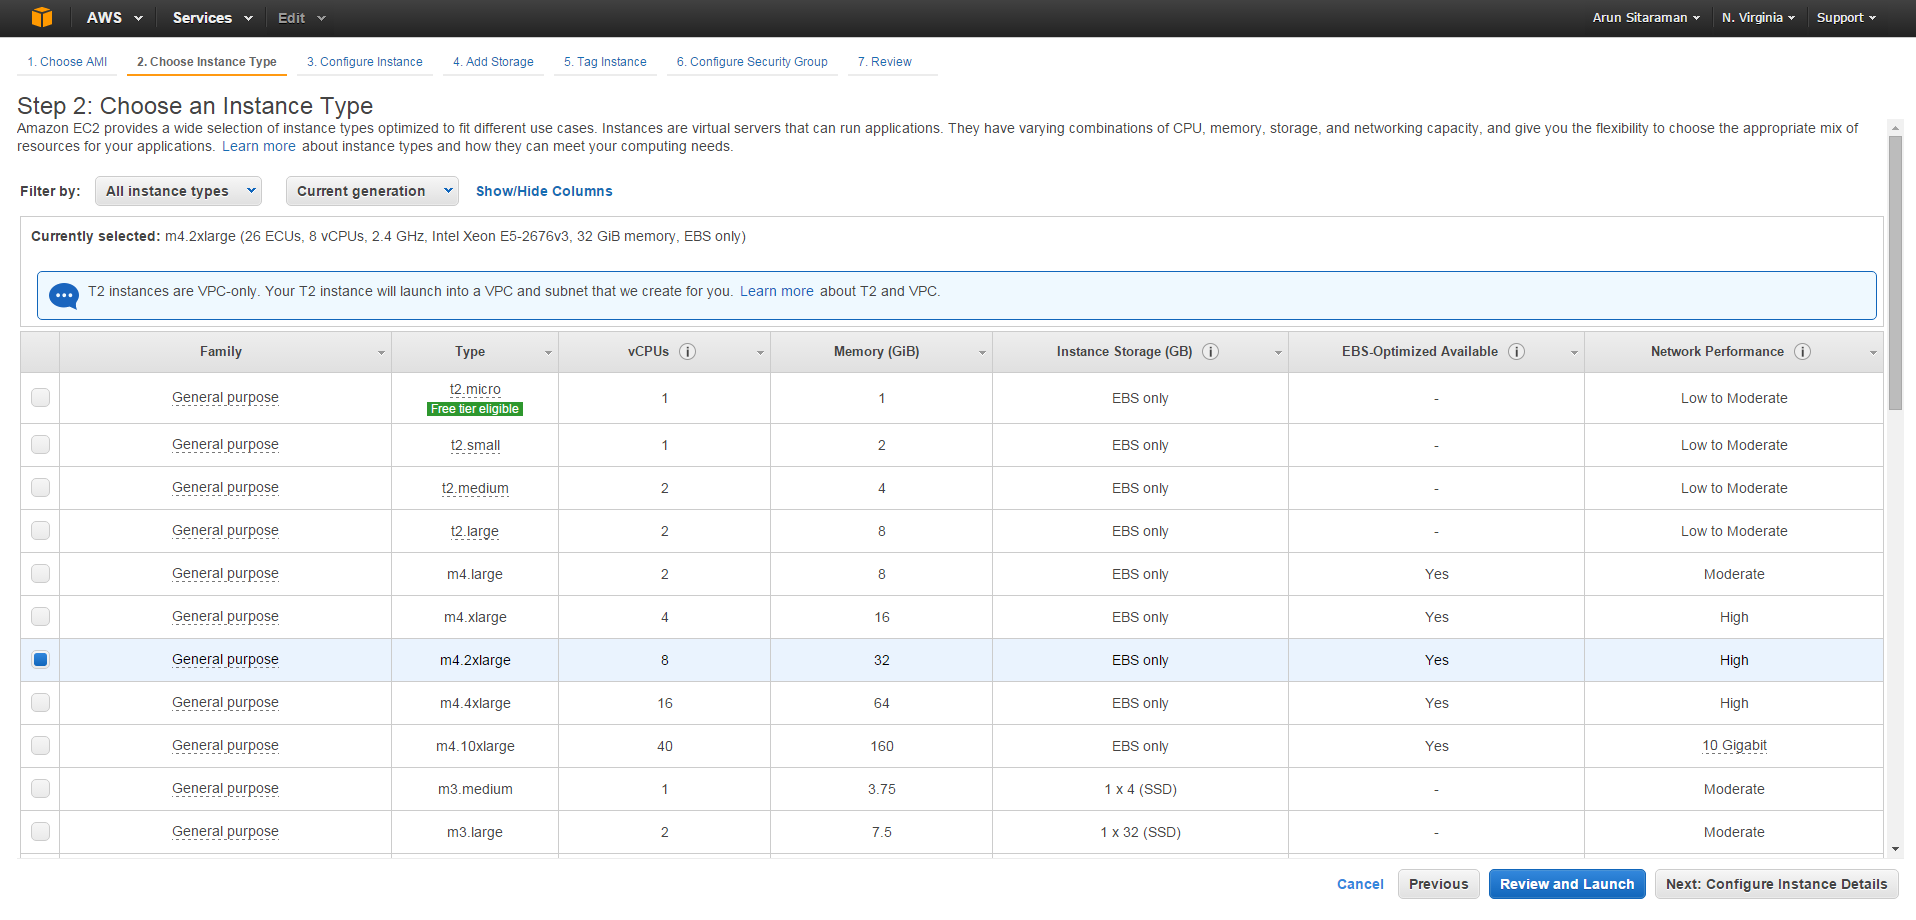
The user can select the image type based on the desired Compute, Storage, and Network capacities. The user can get more information about the mappings between virtual capacities to real capacities on Amazon Web Services site. In this example we choose the m4.2xlarge type, comprising 8 vCPUs (virtual CPUs), 32GB of memory and a pre-configured ElasticBlock Storage (EBS). On selecting the “Next: Configure Instance Details” the user will see the page in Figure 9.

Figure 9
In Figure 9 please note that users can configure auto scaling group to automatically scale the capacity. Although this example has chosen to select the default Virtual Private Cloud (VPC) and Subnet, users can create their own VPC and/or Subnet. Users can allow the workflow to choose a public IP for this (default, note this will be disassociated on the instance stopping or terminating) or opt to associate an Elastic IP address (EIP, which is a separate service and cost). Placement group provides a logical grouping of nodes into a cluster (we have chosen the default for this example). IAM role is for secure access (we have chosen the default for this example), users can create a role to manage application access. Shutdown behavior is stop (the alternative is terminate, which means the instance and data will be garbage collected). Enable Termination Protection will insure prevention of accidental termination from the Amazon EC2 management console (we have chosen the default for this example). With Monitoring enabled, users can monitor the ASE instance with Amazon Web Service monitoring framework “CloudWatch”. ASE instance is by default EBS-optimized, for better disk throughput and performance. With respect to tenancy (we have chosen the default for this example), the alternatives are to run this instance on dedicated hardware or dedicated host. With respect to network interfaces settings the defaults apply (except association of an IP such as an EIP), although users can add additional Ethernet interfaces (devices). On selecting “Next: Add Storage” button the user will see the page as in Figure 10.

Figure 10
The default root file system is provisioned as 10GB (we have chosen the default in this example), this can be altered by the user. The default media is SSD (we have chosen the default in this example), the user can choose Provisioned IOPs (higher performing SSD) or Magnetic from the drop down. Optionally the user can add additional volumes (now or later). Once the user clicks the “Next: Tag Instance” button the workflow will lead to the page as shown in Figure 11.

Figure 11
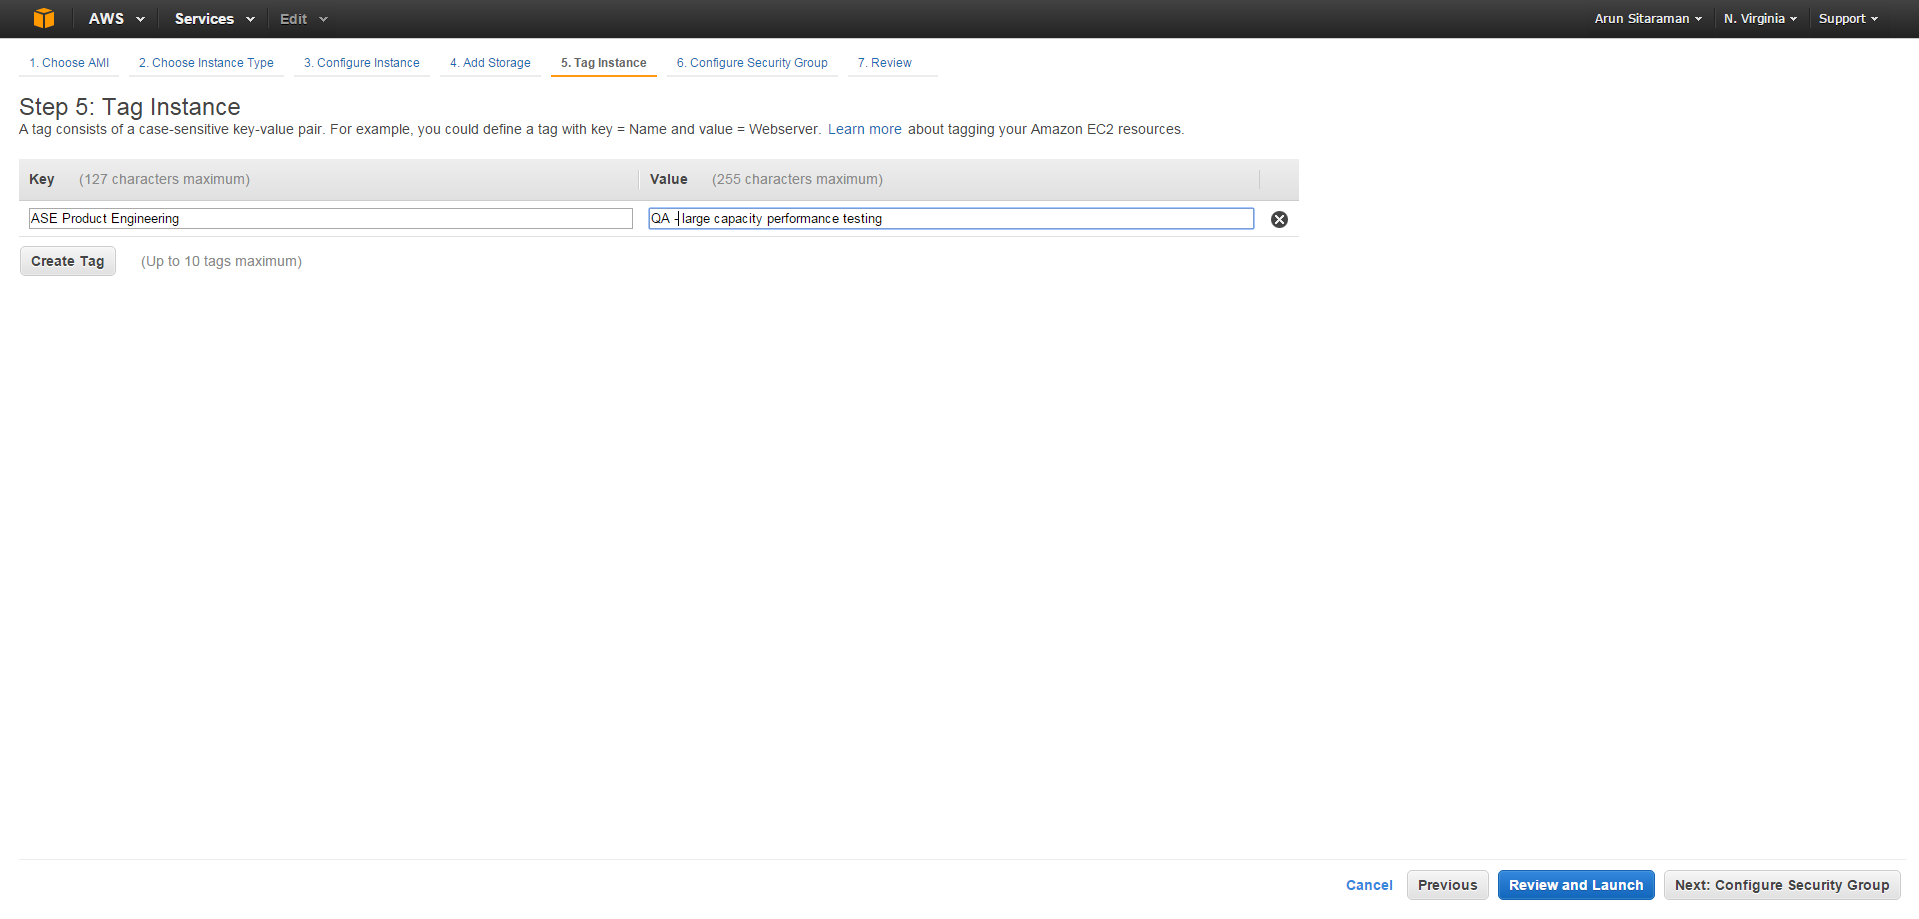
Tagging allows a user to easily identify an asset for a specific use. In the example in Figure 11 we have tagged this instance as part of the ASE Product Engineering department and for use in Quality Assurance. Users can create additional tags (we have chosen to create only one for this example). When user clicks the “Next: Configure Security Group” button the workflow will move to the page as seen in Figure 12.

Figure 12
Security groups defines the network access policies for the instance, similar to IP tables in Linux or Firewall policies in a router. This example shows the policy for a secure shell (SSH). Users can add additional rules for other types of access. Although this example is creating a new security group, users can select an existing security (which they would have created via the EC2 management console). When the user clicks the “Review and Launch” button the workflow moves to the Review and Launch Page as shown in Figure 13, where the user can finalize edits before launching the ASE instance.

Figure 13
When user clicks the “Launch” button the workflow will prompt the user to provide a security key pair name, as shown in Figure 14. The user has a choice of selecting an existing key pair or associating a new one. Amazon Web Services uses a public key cryptography model to govern secure access to the running instances. The key pair name is a reference to the generated the public key (maintained on the server) and the associated private key for secure access.

Figure 14
In this example we create a new key pair for the security key generation as shown in Figure 15.

Figure 15
When the user clicks the “Download Key Pair” button, the user is prompted to save the file safely for secure access to the instance (for example using putty for SSH access), as shown in Figure 16. Please note the caution in Figure 15.

Figure 16
Upon completing this procedure the instance is deployed and launched as shown in Figure 17.

Figure 17
Once the private key file is saved (.pem file), then that file can be used to access the instance in multiple ways as shown in Figure 18. Users can connect to the instance from the Amazon Web Services EC2 management console. On selecting the instance of interest and clicking the “Connect” button the user us provided with multiple options to connect to the instance.

Figure 18
For more information please read the links in the Resources section below. The Amazon Web Services version of the SAP Adaptive Server Enterprise support all features as in the on premise version.
Resources
SAP Database and Mobile Solutions on AWS:
https://aws.amazon.com/sap/solutions/database/
SAP Adaptive Server Enterprise (ASE) on Amazon Web Services (AWS):
Connect to your Amazon Web Services instance:
http://docs.aws.amazon.com/AWSEC2/latest/UserGuide/ec2-connect-to-instance-linux.html
Associate an Elastic Network Interface to an Amazon Web Services instance:
http://docs.aws.amazon.com/AWSEC2/latest/UserGuide/using-eni.html
Associate an Elastic IP address to an Amazon Web Services instance:
http://docs.aws.amazon.com/AWSEC2/latest/UserGuide/elastic-ip-addresses-eip.html
You must be a registered user to add a comment. If you've already registered, sign in. Otherwise, register and sign in.
-
ABAP CDS Views - CDC (Change Data Capture)
2 -
Advanced Event Mesh
1 -
ai
1 -
Analyze Workload Data
1 -
BS Reclassification
1 -
BTP
1 -
Business and IT Integration
2 -
Business application stu
1 -
Business Technology Platform
1 -
Business Trends
1,657 -
Business Trends
214 -
CAP
1 -
cf
1 -
Characteristics display
1 -
Classes
1 -
Cloud Foundry
1 -
Confluent
1 -
Customer COE Basics and Fundamentals
1 -
Customer COE Latest and Greatest
3 -
Customer Data Browser app
1 -
Data Analysis Tool
1 -
data migration
1 -
data transfer
1 -
Databricks
1 -
Datasphere
2 -
Event Information
1,396 -
Event Information
173 -
Expert
1 -
Expert Insights
178 -
Expert Insights
745 -
General
2 -
Getting Started
2 -
Google cloud
1 -
Google Next'24
1 -
GraphQL
1 -
Introduction
1 -
Kafka
1 -
Life at SAP
779 -
Life at SAP
43 -
MDG materials
1 -
MDGM
1 -
Migrate your Data App
1 -
MLFlow
1 -
MTA
1 -
Network Performance Analysis
1 -
NodeJS
1 -
PDF
1 -
POC
1 -
Product Updates
4,562 -
Product Updates
817 -
Replication Flow
1 -
REST API
1 -
RisewithSAP
1 -
SAP BTP
1 -
SAP BTP Cloud Foundry
1 -
SAP Cloud ALM
1 -
SAP Cloud Application Programming Model
2 -
SAP Datasphere
2 -
SAP Datasphere تحقيق أقصى استفادة من بيانات الأعمال
1 -
SAP MDG Data Quality Management
1 -
SAP MDG DQM
1 -
SAP s4hana cloud
1 -
SAP S4HANA Migration Cockpit
1 -
Technical article
1 -
Technology Updates
6,864 -
Technology Updates
988 -
Workload Fluctuations
1
- Which S/4HANA Extensibility Options should I use as a SAP customer? in Technology Blogs by Members
- SAP Master Data Governance: A Leader Among Users in Technology Blogs by SAP
- How-To: Use Script Tasks in SAP Build Process Automation in Technology Blogs by SAP
- how to expose FM - different between Enterprise Service and SEGW in Technology Q&A
- Publish & Protect: with SAP Advanced Event Mesh & Enterprise Blockchain & SAP BTP Kyma 🚀 in Technology Blogs by Members
| User | Count |
|---|---|
| 18 | |
| 12 | |
| 9 | |
| 8 | |
| 8 | |
| 7 | |
| 6 | |
| 6 | |
| 5 | |
| 5 |