
- SAP Community
- Products and Technology
- Technology
- Technology Blogs by SAP
- How to install Hybrid Application Toolkit (HAT) on...
Technology Blogs by SAP
Learn how to extend and personalize SAP applications. Follow the SAP technology blog for insights into SAP BTP, ABAP, SAP Analytics Cloud, SAP HANA, and more.
Turn on suggestions
Auto-suggest helps you quickly narrow down your search results by suggesting possible matches as you type.
Showing results for
Advisor
Options
- Subscribe to RSS Feed
- Mark as New
- Mark as Read
- Bookmark
- Subscribe
- Printer Friendly Page
- Report Inappropriate Content
11-13-2015
11:21 AM
Introduction
Let me complete my previous blog with some considerations regarding the installation of HAT on MAC OS X (El Capitan). I'm going to show here just the main differences between this installation and the one on Windows. The required steps are pretty much the same, but as you might know with Mac platforms you can also deploy your apps to iOS device. This requires the installation of a development tool named XCode. Further to that you need also to install the corresponding Command Line Developer Tools. Of course this is only needed if you want to develop apps for iOS: if you want to stick with Android apps you just need to install the Android SDK as explained later in this document. Here in this guide I'm going to describe how to install all the required tools for both development platforms: iOS and Android.
One could think that the installation of HAT and its prerequisites on MAC is harder than on Windows, but I can show here that it's even easier if we use the Terminal window to issue the installation instructions.
Let's start from the beginning.
Prerequisites
We are assuming here that Xcode is already installed and Command Line Developer Tools as well. You can get the first one from the Apple store or you can access the https://developer.apple.com/downloads/ site and download it from there, together with the Command Line Developer Tools.

If you have downloaded both packages from this developer site you can install them very quickly: for the first one, once mounted the .dmg file, you just need to drag & drop the Xcode app to your application folder.
The second tool can be installed by performing the following steps:
1) Double click on the .dmg image file in order to mount it
2) Double click on the installation package
3) At the Introduction screen click on Continue
4) At the License screen click on Continue
5) Click on Agree
6) At the Installation Type screen click on Install
7) Provide your credentials
😎 At the Summary screen click on Close
9) Command Line Developers Tool is installed
You can continue now with this guide
Let's get started!
This is what we are going to install today:
- Homebrew (Homebrew — The missing package manager for OS X) - Homebrew is a package manager which helps you to install some components you need direclty from the command line. It also symlinks their files into the /usr/local folder
- Cask(http://caskroom.io/) - Cask is a tool which extends Homebrew and allows you to install large binaries like big applications on your Mac direclty from the command line
- Oracle Java JDK - It's installed through Cask
- Apache Ant - It's a build tool required by Android development
- Android SDK - Required for Android Development
- Kapsel - Required for adding Kapsel plugins to your hybrid apps
- Configuration of some environment variables
- Bower (http://bower.io/) - It's a package manager specific for the web and it's required by the HAT installation procedure
- NodeJS (https://nodejs.org/en/) - Node.js is a JavaScript runtime built on Chrome's V8 JavaScript engine. Node.js uses an event-driven, non-blocking I/O model that makes it lightweight and efficient. Node.js' package ecosystem, npm, is the largest ecosystem of open source libraries in the world.
- ios-deploy - Required for deployment on iOS Simulator/Device
- ios-sim - Required to manage iOS Simulator
- Cordova (https://cordova.apache.org/) - Apache Cordova is an open-source mobile development framework. It allows you to use standard web technologies such as HTML5, CSS3, and JavaScript for cross-platform development, avoiding each mobile platforms' native development language. Applications execute within wrappers targeted to each platform, and rely on standards-compliant API bindings to access each device's sensors, data, and network status.
- Kapsel CLI - It's the Command Line Interface for Kapsel
- HAT - Hybrid Application Toolkit
Don't be afraid about the number of the components we are going to install because the entire process will be quite straightforward by using the Terminal window.
1) Open a Terminal window on your Mac
2) The first thing to install is Homebrew: this will allow us to install other components very smoothly. The command to install Homebrew is
ruby -e "$(curl -fsSL https://raw.githubusercontent.com/Homebrew/install/master/install)"
3) Now let's use Homebrew to install Cask, this will allow us to easily install Java JDK in the next step
brew install cask
4) Install Oracle Java JDK by using the command
brew cask install java
this will install automatically the latest version
5) If you are going to develop and deploy to Android platform you need Apache Ant. You can skip this step and the next one if you don't need to develop for
Android. This is the command to install Ant
brew install ant
It should be installed under the following path: /usr/local/Cellar/ant/1.9.6
6) Let's now install the Android SDK through the command
brew install android-sdk
It should be installed under the path /usr/local/Cellar/android-sdk/24.4.1
7) Once installed you need to configure it. Run:
android
The Android SDK manager starts and you can select here the required components you want to install. Here it's a list of just the ones required to make it working
- Click on the Install 10 packages button

- Accept the License
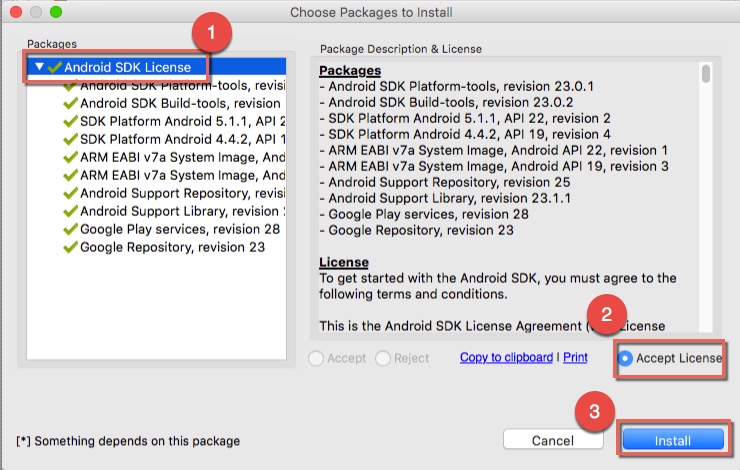
- The installation starts: when it finishes, close the Android SDK manager tool.
😎 Create a virtual device for Android development.
- Run the command android avd
- Click on the Device Definitions tab
- choose the device you want to use as a template for your emulator (i.e. Nexus 4)
- click on Create Device on the left side.
- Provide the following information and click on OK

- Then close the Android AVD Manager
9) Another required tool is NodeJS. You can install it by going on the product web site and downloading it from there, but I'm going to show you this quicker way to do it:
brew tap homebrew/boneyard
brew install homebrew/versions/node012
With this command I'm going to install a specific version of Node, in particular I'm going to install the latest build of the version 0.12 which, at the time I'm writing, is 0.12.7. I'm installing this specific version because this is the one supported and required by the HAT installation procedure.
10) Now it's the time to install the Kapsel plugins. Download the package from the SAP Store. I'm assuming that the package has been downloaded into the folder Desktop/temp of your Mac. From the terminal, run the following commands:
cd ~/Desktop/temp
tar xvzf SMPSDK30010P_1-21011833.gz
unzip ebf25343/modules/KapselSDK/KapselSDK.zip -d ~/KapselSDK
Now, in your home folder you should find a new subfolder named KapselSDK
11) Some environment variables must be defined in the system. According to the HAT installation guide, the best place to define these variables is the .bash_profile file that you should find in your Home folder. If this file is not present you need to create it. So
- run "cd" to go back to your home folder
- run "ls -la" to check if this file is present or not. if It's not present create it by running the command "touch .bash_profile"
- run "nano .bash_profile" to open the file with the nano editor
- copy and paste the following lines in the file
export JAVA_HOME=$(/usr/libexec/java_home)

export ANDROID_HOME="/usr/local/Cellar/android-sdk/24.4.1"

export ANT_HOME="/usr/local/Cellar/ant/1.9.6/libexec/"

export KAPSEL_HOME="/Users/virtual/KapselSDK"

export PATH=$PATH:/usr/local/bin/ant

ℹ NOTE: please pay attention to the two variables ANDROID_HOME and ANT_HOME where there is hard-coded the version numbers of the two softwares. You must change them according to your installed versions. Pay also attention to the variable KAPSEL_HOME where you have to replace the user named "virtual" with your user.
- press "CTRL-O" to save the file, confirm the name by hitting ENTER and then press "CTRL-X" to exit from the editor
- run "source .bash_profile" to apply the changes immediately
12) You can check that the changes have been applied by running the command "export".This will print out the complete list of the exported variables where you should be able to find the one you defined

13) Install ios-deploy, cordova, ios-sim and the Command Line Interface(CLI) for Kapsel with the following commands:
npm install -g ios-deploy@1.8.2
npm install -g cordova@5.2.0
npm install -g ios-sim
npm install -g ~/KapselSDK/cli
14) Finally we can start the installation of HAT. I'm always assuming that your HAT .zip package is located as well under he folder Desktop/temp of your Mac. These commands will extract the .zip file under the hat subfolder of your home directory and will make all the .sh files as executables. Then the setup procedure will be launched
unzip ~/Desktop/temp/SAP_HAT_local_1_9_7.zip -d ~/
mv ~/SAP_HAT_local-1.9.7/ ~/hat
cd ~/hat
chmod +x *.sh
./setup.sh
15) The installation starts. Some other required components and libraries will be installed. When the web page shows up you can close the splash screen and select both the platforms on the top of the screen. Then click on the Check All button

16) From this moment on it continues at the same way I showed in my blog for HAT Installation on Windows platform.
Have fun!
- SAP Managed Tags:
- SAPUI5,
- SAP Enterprise Portal
8 Comments
You must be a registered user to add a comment. If you've already registered, sign in. Otherwise, register and sign in.
Labels in this area
-
ABAP CDS Views - CDC (Change Data Capture)
2 -
AI
1 -
Analyze Workload Data
1 -
BTP
1 -
Business and IT Integration
2 -
Business application stu
1 -
Business Technology Platform
1 -
Business Trends
1,658 -
Business Trends
94 -
CAP
1 -
cf
1 -
Cloud Foundry
1 -
Confluent
1 -
Customer COE Basics and Fundamentals
1 -
Customer COE Latest and Greatest
3 -
Customer Data Browser app
1 -
Data Analysis Tool
1 -
data migration
1 -
data transfer
1 -
Datasphere
2 -
Event Information
1,400 -
Event Information
67 -
Expert
1 -
Expert Insights
177 -
Expert Insights
307 -
General
1 -
Google cloud
1 -
Google Next'24
1 -
GraphQL
1 -
Kafka
1 -
Life at SAP
780 -
Life at SAP
13 -
Migrate your Data App
1 -
MTA
1 -
Network Performance Analysis
1 -
NodeJS
1 -
PDF
1 -
POC
1 -
Product Updates
4,576 -
Product Updates
350 -
Replication Flow
1 -
REST API
1 -
RisewithSAP
1 -
SAP BTP
1 -
SAP BTP Cloud Foundry
1 -
SAP Cloud ALM
1 -
SAP Cloud Application Programming Model
1 -
SAP Datasphere
2 -
SAP S4HANA Cloud
1 -
SAP S4HANA Migration Cockpit
1 -
Technology Updates
6,873 -
Technology Updates
436 -
Workload Fluctuations
1
Related Content
- SAP CAI Chatbot integration in Alexa and Telegram in Technology Blogs by Members
- Deployment of Seamless M4T v2 models on SAP AI Core in Technology Blogs by SAP
- Supporting Multiple API Gateways with SAP API Management – using Azure API Management as example in Technology Blogs by SAP
- SAP LICENSE RENEWAL FROM BASIS END #ATR in Technology Blogs by Members
- Consuming SAP with SAP Build Apps - Mobile Apps for iOS and Android in Technology Blogs by SAP
Top kudoed authors
| User | Count |
|---|---|
| 25 | |
| 17 | |
| 11 | |
| 11 | |
| 9 | |
| 9 | |
| 9 | |
| 8 | |
| 8 | |
| 7 |