
- SAP Community
- Products and Technology
- Technology
- Technology Blogs by SAP
- Creating an Offline CRUD hybrid mobile app in SAP ...
Technology Blogs by SAP
Learn how to extend and personalize SAP applications. Follow the SAP technology blog for insights into SAP BTP, ABAP, SAP Analytics Cloud, SAP HANA, and more.
Turn on suggestions
Auto-suggest helps you quickly narrow down your search results by suggesting possible matches as you type.
Showing results for
Product and Topic Expert
Options
- Subscribe to RSS Feed
- Mark as New
- Mark as Read
- Bookmark
- Subscribe
- Printer Friendly Page
- Report Inappropriate Content
05-22-2018
5:00 PM
Updated 3 March 2021: added steps to avoid CORS issues on iOS
Updated 5 January 2021: updated as the Neo trial landscape is no longer available
Updated 24 March 2020: added information regarding multiple offline stores
Updated 21 February 2020: as the old Mobile Services sample OData service has been deprecated, I've updated the destination configuration.
Important note: although hybrid apps are a valid way to implement offline apps, we strongly recommend using more modern mobile technologies instead.
As a Product Owner, it is always good to see your product reach a new milestone. Last week, you’ve seen the announcement of Hybrid Application Toolkit release 1805 in Britt’s blog. In this release, we’ve made some fundamental changes in the way we build hybrid apps in the cloud from SAP Web IDE.
It is not my intention to repeat Britt’s blog; but let me just highlight the most important part of this release: Developers have a lot more control on what is packaged into a hybrid app. This opens the door to more possibilities and allows developers to more easily resolve challenges by themselves.
One of the hot topics we did not completely cover in this release is the ability to create offline apps. Many developers have been asking for this. In December 2017, I’ve announced our plans to ‘end-of-maintenance’ the HAT local add-on. We have provided you one offline specific template in SAP Web IDE (with that I mean the Eclipse Orion based version) that could only be used in conjunction with the HAT local add-on. The template is not available in SAP Web IDE Full-Stack. Meanwhile, our colleagues from SAP Web IDE have shut down the old SAP Web IDE and you are advised to migrate projects to the Full-Stack version. So how do you build offline hybrid apps in SAP Web IDE Full-Stack, if we don’t provide the template anymore?
Before answering, let’s look back into the history of this toolkit. When we started, we had no cloud build feature. Instead, we were relying on the locally installed tools for developing Cordova apps. There were templates in Web IDE that kept evolving over time. At some point we’ve decided to grab a snapshot of a UI5 Master Detail template and adapt it to support offline. This template was shipped with HAT, the Web IDE plugin. We then tried to keep up with changes in the original template. At some point, the original template was replaced with a Fiori Master-Detail Application template. We did not further update our offline template, unless really needed.
Although we could have created new mobile specific templates in HAT, we actually wanted the opposite: any template should by default support mobile; hence there should not be mobile variants at all. The functionality we’ve provided last year was actually doing this. When the HAT plugin in Web IDE was active, a newly created project was automatically enabled for mobile. We were adding some magic in the background to make this happen. However, although we’ve tried to make it easier, in reality things got a lot more difficult (especially troubleshooting).
We do not plan to provide you an offline template in SAP Web IDE Full-Stack. The main reason is that every app is unique and requires specific customization around the topic of offline. It is very difficult to provide you this as part of a one-fits-all template. Instead, we will give you guidelines on how to implement offline functionality in your app and provide you with an example below.
Before we start creating the example app, let us first ensure we can access the Mobile Service Sample Service from SAP Web IDE. In your SAP Cloud Platform cockpit, go to Connectivity > Destinations and create a new destination as shown below. Make sure you add the additional properties as indicated. The url is not completely visible is the screenshot. Please enter https://hcpms-<your account number>trial.hanatrial.ondemand.com/mobileservices/origin/hcpms/ESPM.svc/v2. I was using a trial account for this blog post. However, the Neo trial landscape is no longer available. Please adapt the url for your productive environment.
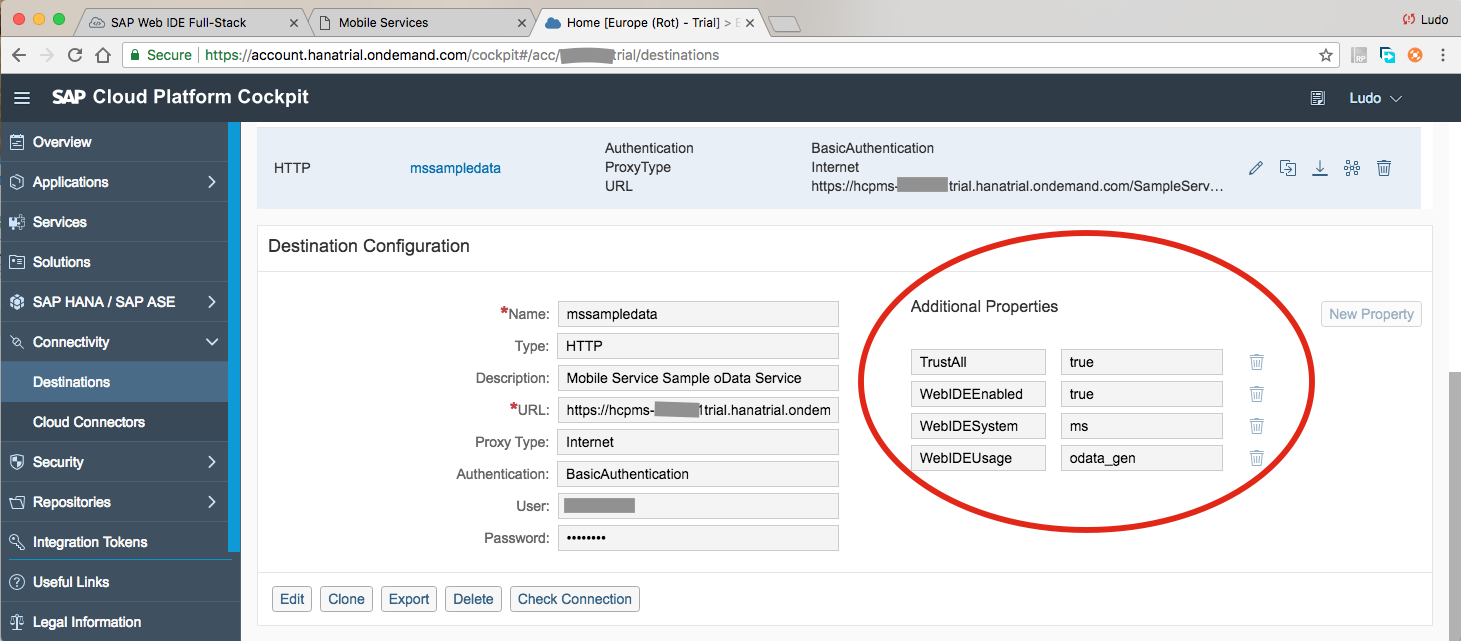
After saving the destination settings, it can take up to a few minutes to have the new destination active.
Update 21/02/2020: for Authentication, please use App2AppSSO.
Now let’s start creating the app from scratch in SAP Web IDE Full-Stack. You can find this version of SAP Web IDE in your SAP Cloud Platform cockpit’s services list:

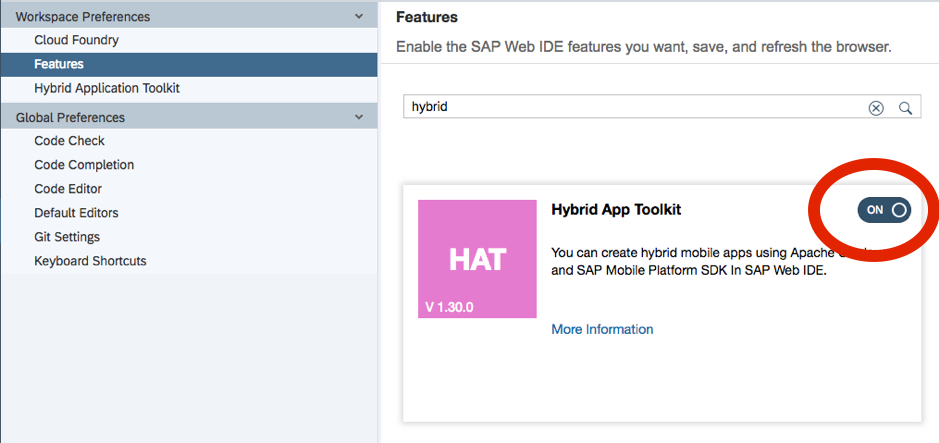
Although not required at this point, please make sure you have activated Hybrid Application Toolkit. Once you are in SAP Web IDE Full-Stack, go to the preferences and ensure the feature Hybrid App Toolkit is activated. Don't forget to save your selection and reload SAP Web IDE.
You will use the Cloud Build feature based on Mobile Services. Customers who have access a productive environment could see the following in the Hybrid Application Toolkit preferences (depending on your subscription):

If you don't see the Cloud Build Service mentioned in the preference, you will be using Mobile Services by default. If you do see the radio buttons, please ensure the radio button regarding Cloud Build Service is enabled for Mobile Services (not the deprecated one for SAP Fiori).
In SAP Web IDE, please select File > New > Project from Template. To avoid possible issues with the latest innovation version, I have selected a CRUD Master-Detail template based on SAPUI5 version 1.52. Feel free to use a different version.

In the next step, fill in the details.

In this example I am using the Mobile Service Sample Service to consume OData from a Service URL. We have exposed this service to SAP Web IDE through the destination we have created earlier.

In the Template Customization step, I have selected the following:

Once finished, you can run the application from SAP Web IDE in your web browser. It will show you the data from the data source (read) and you can create new entries (create), change it (update) and remove entries (delete). Also referred to as "CRUD".
Right-click on your project to bring up the context menu and select Mobile > Enable as Hybrid Mobile Project.

This step will add a ‘mobile’ folder to your project, containing some source files only relevant for when your app runs on a device or emulator (as Packaged app, or Developer Companion app).
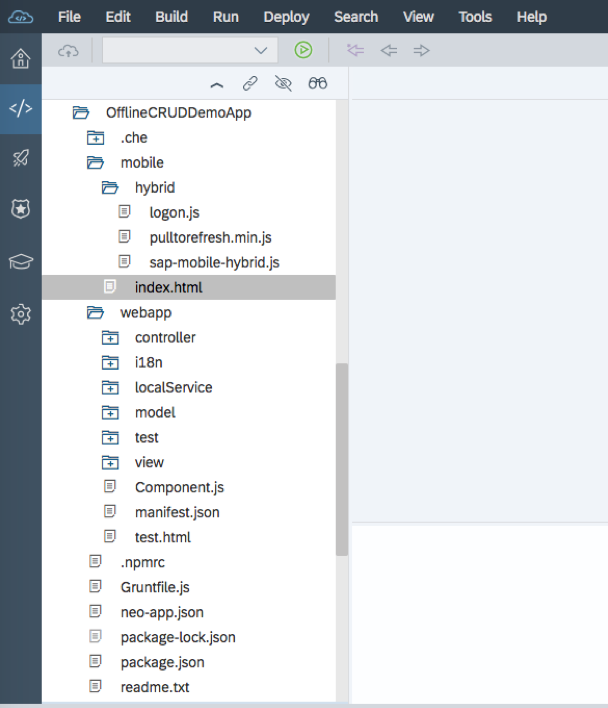
Take note that during the cloud build process, the contents of the webapp folder and the mobile folder will be merged into the www folder of your Cordova project. The index.html file in the mobile folder will replace the one in your webapp project (if your project has one).
We’ve decided to use this approach, so you can still deploy the webapp to SAP Cloud Platform.
You can create a Packaged app based on this project by selecting in the context menu: Mobile > Build Packaged App.

In the first step of the build wizard, you can change the app’s name as visible on your device’s home page. You can also select an app icon and images for the splash screen.
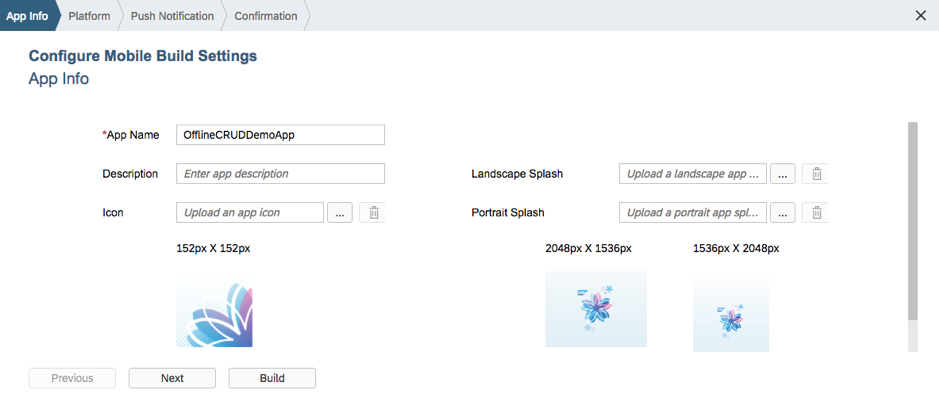
In the next step, you indicate for which platform you want to build your app. You'll need to provide a valid the signing profile. For Android devices, you can simply generate one on our service. The provisioning profile for iOS is a bit more tricky. I recommend creating a wildcard App ID on developer.apple.com and include that in the profile which allows you to install the application on your device. Note that this is wildcard App ID is only for development; not for production. You'll then need to export your certificate and provisioning profile and import it here.
Currently, we only have two UI5 versions to select from. We will gradually add more versions.

At this point you can hit the Build button. Once the Cloud Build Service is finished generating your app, a QR code and hyperlink will be displayed, so you can download the app onto your device.

During this build process, Hybrid Application Toolkit will automatically create a new application on Mobile Service, and also create the related Cloud Platform destination for you.
Although not related to the offline topic, I have received several queries on how to add Cordova plugins. So let's quickly discuss this.
In case you want to make use of one or more of the more than 2300 publicly available Cordova plugins in your project, open the context menu and choose Mobile > Select Cordova plugins. You can browse and search for plugins. Once you are done, make sure to save your selection.

When you trigger a new build, the plugins will automatically be added in your Cordova app.
Note that there is a tab called "Default (34)", which does not allow you to make a selection. It merely lists down the plugins we add to your app by default. You'll notice most of the Kapsel plugins are listed there. You don't need to select them. They will be part of your app by default.
Before we discuss the offline capabilities, I want to highlight one thing regarding Developer Companion: since this type of app is typically an online app, we cannot use Developer Companion for developing offline apps. Offline will only work for Packaged Apps.
Users who have already created offline apps before using our cloud build service are probably familiar with the way to add the Kapsel Offline OData plugin to the project. This is actually triggered by adding a “sap.mobile” section that defines ‘stores’ in the project’s manifest.json. We have kept this in the new delivery, so that existing projects can more easily transition. The content of this section is actually not important anymore. What matters is that this section is there. Before the HAT 1805 release, the content was used in the build process. As long as you specify the bare minimum, you are fine:

As a result, your Packaged app built with Cloud Build Service includes the SAP Kapsel Offline OData plugin. Now we need to add some more code to make use of this.
The file mobile/hybrid/sap-mobile-hybrid.js contains most of the bootstrap code for the hybrid app. You are free to make changes here. We are going to add a function to create and open the offline store that will be used to store the data relevant for the app on the device.
An important piece to mention here is the serviceRoot specified in the properties. The serviceRoot is basically the location where the offline store will fetch its data, indirectly through Mobile Service. In this particular example I am using the Mobile Service Sample Service; but I could easily change this to use a different destination. The Cloud Platform destination used here was automatically generated by HAT, after triggering the build previously. Also note that the above code assumes one single data source and hence, one single offline store. If your app needs to consume data from multiple sources, you’ll need to open multiple offline stores here.
Updated 19 March 2020: the switch to WKWebView as mentioned in this blog post requires an additional temporary workaround. This is the call to disable Xhook.
In the same file, the appLogon function needs to be adjusted a little bit. Once the logon is done, we call the newly added openStore function, instead of the startApp function.
Modification of the datasource uri in the manifest file is no longer required. You can use the same project for running it as online as well as standalone offline app. For existing projects that were mobile enabled, it is advised to remove the 'mobile' folder from the project (you might want to save a copy) and re-enable for mobile. New projects will automatically get the latest code needed when the project is enabled for mobile.
With the introduction of iOS 14, the security aspects were further enhanced. To avoid having your application running into cross origin issues, we need to change the settings in the SAP Mobile Services cockpit for Cross Domain Access. This is especially relevant if your app is using the User API (we had a few users facing this).
Please refer to the screenshot below. Please open the SAP BTP Mobile Services Admin Cockpit. Go to Settings -> Security -> Cross Domain Access. Set Origin field to “<AdminAPI>,null”.
Trigger a new cloud build and download your app on your device. After the authentication screen and passcode screen, the screen will go blank for a while. We should actually show something here, so the end-user knows what is happening. This is an improvement to be added later. At this point, the offline store is being synchronised with the backend database. Once this is done, the UI will show up and display the data (this can take around 15 seconds).
You can put your device into airplane mode and continue accessing the data.
Congrats! You’ve built an offline app.
The application template is actually already allowing modifications, removal and adding new data entries. But how do we handle this when the device is not connected to the network? The data is simply stored in the on-device offline store. When network connectivity returns, we can synchronise the changes between backend database and on-device store.
To get the latest changes from the backend, we use the refresh function. To upload locally made changes to the backend, we use the flush function.
For the refresh, the most obvious way of implementing this, is as part of the pull-to-refresh. The flush should be triggered once the network connection is back. But for the sake of this demo and making it easier to test, I’ll just add two buttons to the footer bar: a Refresh and a Flush button.
Let’s open the file webapp/view/Master.view.xml and add the following buttons in the customFooterContent.

Now open the file webapp/controller/Master.controller.js and add the following code for handling the button press:
I have added the type check to make sure these calls are only done for a hybrid app. The web app should not call these functions.

We will add the functions called in the file mobile/hybrid/sap-mobile-hybrid.js
The refresh and flush functions are asynchronous and will take some time. For demo purposes, I’ve kept the implementation rather simple and added some console logging to have an idea of what is going on. For your enterprise mobile applications, you should implement a way to inform the user about progress and update the UI when needed.
After saving all your code changes, please trigger another cloud build. The result will be an app that allows you to work with your data in online, as well as offline mode. You trigger a refresh to update the on-device store. You can flush the changes made in the on-device store to the data service.
There is one important aspect that I will not discuss in this blog: data conflicts. How do you handle errors when data on the service has changed, while your device was offline, and your user also made changes on the same data?
I think this topic is worth a separate blog post.
Over the past months we have received queries from several users asking about the use of multiple data sources. Customers can have heterogeneous landscapes where data is stored in various systems. When you are building a mobile app that is supposed to work in all kinds of network conditions, you have to use an offline store. Your app might need data from multiple systems. Every data source requires its own offline store. So if you are using data from 'X' number of data sources in your app, you'll need to initialise and open 'X' number of offline stores.
I have seen customers using one single offline store, while their application needs data from multiple sources. To prevent errors in retrieving data, there were various checks in the code to ensure the device was having a network connection. This approach is not recommended. Instead, you should add additional stores. This could require a different way of exposing the data as well.
You might be asking, "Is there a limit to the size or amount of stores ?". The answer simply depends on the amount of storage available on the device. You can have 'N' number of stores, as long as the size of the total storage space required doesn't exceed the storage space on device. The question will be: how much storage space do my target devices have available at a minimum, so my app can work well on all those devices ? In other words and as a practical example: I can have 64GB available on my device, but my colleague has only 2GB free. The answer will be 'less than 2GB' in that case.
In the example code shown above, I've created one 'openStore' function, with a specific serviceRoot and definingRequests, and callback functions for success and failure. You can add more 'openStore' functions where needed. You will also need to implement flush (if required) and refresh functions for each of the stores created. The key will be the serviceRoot and definingRequests. This is where most developers struggle. If the path doesn't match, the initialisation will fail. Please check the troubleshooting section below to resolve this.
Take note that once you add the additional data source to the manifest.json file, the UI5 application will try to fetch metadata from this source when the app initialises; no matter whether there is a network or not; and this could trigger an authentication flow, which you might want to avoid under bad network conditions.
With this blog post I’ve shown you how to create an offline app in SAP Web IDE Full-Stack. The example code provided is very basic. There is surely room for improvement to get this to production level apps. My goal was to show you the basics here, to get you started quickly. I hope this blog post is useful to you and I encourage you to try it out yourself.
Our online documentation is here.
After providing support to several users, I'm adding this section to help you in resolving issues you might be facing.
Although I have verified and tested the above flow several times and received confirmation from several users that this works, the results for you might be different. This might be due to interruptions in service availability or changes on the various systems involved. Also take note that I have not tested other scenarios (e.g. on-premise, with Cloud Connector) myself.
For users who are trying to add offline capability to their own app and it fails: please try reproducing exactly the same as described above. Once you have this working, it will be a good reference for your own application. Adding offline capabilities to a hybrid app is not trivial.
In case you are running into issues, please raise a (BCP) ticket for component CA-WDE-MOB. You can also comment down below, but take note that I will not be monitoring this blog very frequently.
Also, please check my latest blog post "What's new with Hybrid Application Toolkit in 2019" for the latest updates, tips and tricks, ways to resolve issues.
If you found this posting useful, please let me know by hitting the like button.
Thank you!
Updated 5 January 2021: updated as the Neo trial landscape is no longer available
Updated 24 March 2020: added information regarding multiple offline stores
Updated 21 February 2020: as the old Mobile Services sample OData service has been deprecated, I've updated the destination configuration.
Important note: although hybrid apps are a valid way to implement offline apps, we strongly recommend using more modern mobile technologies instead.
When you start developing a new mobile app, we strongly recommend that you consider developing this with either MDK (Mobile Development Kit) for cross platform applications, or our native SDKs (SAP Cloud Platform SDK for iOS or SAP Cloud Platform SDK for Android).
A new milestone and a bit of background
As a Product Owner, it is always good to see your product reach a new milestone. Last week, you’ve seen the announcement of Hybrid Application Toolkit release 1805 in Britt’s blog. In this release, we’ve made some fundamental changes in the way we build hybrid apps in the cloud from SAP Web IDE.
It is not my intention to repeat Britt’s blog; but let me just highlight the most important part of this release: Developers have a lot more control on what is packaged into a hybrid app. This opens the door to more possibilities and allows developers to more easily resolve challenges by themselves.
One of the hot topics we did not completely cover in this release is the ability to create offline apps. Many developers have been asking for this. In December 2017, I’ve announced our plans to ‘end-of-maintenance’ the HAT local add-on. We have provided you one offline specific template in SAP Web IDE (with that I mean the Eclipse Orion based version) that could only be used in conjunction with the HAT local add-on. The template is not available in SAP Web IDE Full-Stack. Meanwhile, our colleagues from SAP Web IDE have shut down the old SAP Web IDE and you are advised to migrate projects to the Full-Stack version. So how do you build offline hybrid apps in SAP Web IDE Full-Stack, if we don’t provide the template anymore?
Before answering, let’s look back into the history of this toolkit. When we started, we had no cloud build feature. Instead, we were relying on the locally installed tools for developing Cordova apps. There were templates in Web IDE that kept evolving over time. At some point we’ve decided to grab a snapshot of a UI5 Master Detail template and adapt it to support offline. This template was shipped with HAT, the Web IDE plugin. We then tried to keep up with changes in the original template. At some point, the original template was replaced with a Fiori Master-Detail Application template. We did not further update our offline template, unless really needed.
Although we could have created new mobile specific templates in HAT, we actually wanted the opposite: any template should by default support mobile; hence there should not be mobile variants at all. The functionality we’ve provided last year was actually doing this. When the HAT plugin in Web IDE was active, a newly created project was automatically enabled for mobile. We were adding some magic in the background to make this happen. However, although we’ve tried to make it easier, in reality things got a lot more difficult (especially troubleshooting).
We do not plan to provide you an offline template in SAP Web IDE Full-Stack. The main reason is that every app is unique and requires specific customization around the topic of offline. It is very difficult to provide you this as part of a one-fits-all template. Instead, we will give you guidelines on how to implement offline functionality in your app and provide you with an example below.
Creating an offline app based on the Fiori CRUD Master-Detail template
Prerequisites
Before we start creating the example app, let us first ensure we can access the Mobile Service Sample Service from SAP Web IDE. In your SAP Cloud Platform cockpit, go to Connectivity > Destinations and create a new destination as shown below. Make sure you add the additional properties as indicated. The url is not completely visible is the screenshot. Please enter https://hcpms-<your account number>trial.hanatrial.ondemand.com/mobileservices/origin/hcpms/ESPM.svc/v2. I was using a trial account for this blog post. However, the Neo trial landscape is no longer available. Please adapt the url for your productive environment.
After saving the destination settings, it can take up to a few minutes to have the new destination active.
Update 21/02/2020: for Authentication, please use App2AppSSO.
Now let’s start creating the app from scratch in SAP Web IDE Full-Stack. You can find this version of SAP Web IDE in your SAP Cloud Platform cockpit’s services list:
Although not required at this point, please make sure you have activated Hybrid Application Toolkit. Once you are in SAP Web IDE Full-Stack, go to the preferences and ensure the feature Hybrid App Toolkit is activated. Don't forget to save your selection and reload SAP Web IDE.
You will use the Cloud Build feature based on Mobile Services. Customers who have access a productive environment could see the following in the Hybrid Application Toolkit preferences (depending on your subscription):
If you don't see the Cloud Build Service mentioned in the preference, you will be using Mobile Services by default. If you do see the radio buttons, please ensure the radio button regarding Cloud Build Service is enabled for Mobile Services (not the deprecated one for SAP Fiori).
Creating a new project from a template
In SAP Web IDE, please select File > New > Project from Template. To avoid possible issues with the latest innovation version, I have selected a CRUD Master-Detail template based on SAPUI5 version 1.52. Feel free to use a different version.
In the next step, fill in the details.
In this example I am using the Mobile Service Sample Service to consume OData from a Service URL. We have exposed this service to SAP Web IDE through the destination we have created earlier.
In the Template Customization step, I have selected the following:
Once finished, you can run the application from SAP Web IDE in your web browser. It will show you the data from the data source (read) and you can create new entries (create), change it (update) and remove entries (delete). Also referred to as "CRUD".
Mobile enable the project
Right-click on your project to bring up the context menu and select Mobile > Enable as Hybrid Mobile Project.
This step will add a ‘mobile’ folder to your project, containing some source files only relevant for when your app runs on a device or emulator (as Packaged app, or Developer Companion app).
Take note that during the cloud build process, the contents of the webapp folder and the mobile folder will be merged into the www folder of your Cordova project. The index.html file in the mobile folder will replace the one in your webapp project (if your project has one).
We’ve decided to use this approach, so you can still deploy the webapp to SAP Cloud Platform.
Creating a hybrid app from this project
You can create a Packaged app based on this project by selecting in the context menu: Mobile > Build Packaged App.
In the first step of the build wizard, you can change the app’s name as visible on your device’s home page. You can also select an app icon and images for the splash screen.
In the next step, you indicate for which platform you want to build your app. You'll need to provide a valid the signing profile. For Android devices, you can simply generate one on our service. The provisioning profile for iOS is a bit more tricky. I recommend creating a wildcard App ID on developer.apple.com and include that in the profile which allows you to install the application on your device. Note that this is wildcard App ID is only for development; not for production. You'll then need to export your certificate and provisioning profile and import it here.
Currently, we only have two UI5 versions to select from. We will gradually add more versions.
At this point you can hit the Build button. Once the Cloud Build Service is finished generating your app, a QR code and hyperlink will be displayed, so you can download the app onto your device.
During this build process, Hybrid Application Toolkit will automatically create a new application on Mobile Service, and also create the related Cloud Platform destination for you.
Adding Cordova plugins (optional)
Although not related to the offline topic, I have received several queries on how to add Cordova plugins. So let's quickly discuss this.
In case you want to make use of one or more of the more than 2300 publicly available Cordova plugins in your project, open the context menu and choose Mobile > Select Cordova plugins. You can browse and search for plugins. Once you are done, make sure to save your selection.
When you trigger a new build, the plugins will automatically be added in your Cordova app.
Note that there is a tab called "Default (34)", which does not allow you to make a selection. It merely lists down the plugins we add to your app by default. You'll notice most of the Kapsel plugins are listed there. You don't need to select them. They will be part of your app by default.
Adding the offline capabilities
Before we discuss the offline capabilities, I want to highlight one thing regarding Developer Companion: since this type of app is typically an online app, we cannot use Developer Companion for developing offline apps. Offline will only work for Packaged Apps.
Users who have already created offline apps before using our cloud build service are probably familiar with the way to add the Kapsel Offline OData plugin to the project. This is actually triggered by adding a “sap.mobile” section that defines ‘stores’ in the project’s manifest.json. We have kept this in the new delivery, so that existing projects can more easily transition. The content of this section is actually not important anymore. What matters is that this section is there. Before the HAT 1805 release, the content was used in the build process. As long as you specify the bare minimum, you are fine:
	},

	"sap.mobile": {

		"definingRequests": {},

		"stores": [

		]
As a result, your Packaged app built with Cloud Build Service includes the SAP Kapsel Offline OData plugin. Now we need to add some more code to make use of this.
Initializing the offline store
The file mobile/hybrid/sap-mobile-hybrid.js contains most of the bootstrap code for the hybrid app. You are free to make changes here. We are going to add a function to create and open the offline store that will be used to store the data relevant for the app on the device.
    openStore: function() {

        console.log("In openStore");

        jQuery.sap.require("sap.ui.thirdparty.datajs");  //Required when using SAPUI5 and the Kapsel Offline Store

        var properties = {

            "name": "store_mainService",

            "host": sap.hybrid.kapsel.appContext.registrationContext.serverHost,

            "port": sap.hybrid.kapsel.appContext.registrationContext.serverPort,

            "https": sap.hybrid.kapsel.appContext.registrationContext.https,

            "serviceRoot": fiori_client_appConfig.appID + "_" + mobile_appRoutes[0].destination,


		"definingRequests": {

			"supplierset": "/Suppliers?$expand=Products"

		}

        };


        store = sap.OData.createOfflineStore(properties);


        var openStoreSuccessCallback = function() {

            console.log("In openStoreSuccessCallback");

            sap.OData.applyHttpClient();  //Offline OData calls can now be made against datajs.

            sap.Xhook.disable(); // temporary workaround to ensure the offline app can work in WKWebView

            sap.hybrid.startApp();

        }


        var openStoreErrorCallback = function(error) {

            console.log("In openStoreErrorCallback");

            alert("An error occurred" + JSON.stringify(error));

        }


        store.open(openStoreSuccessCallback, openStoreErrorCallback);

    },
An important piece to mention here is the serviceRoot specified in the properties. The serviceRoot is basically the location where the offline store will fetch its data, indirectly through Mobile Service. In this particular example I am using the Mobile Service Sample Service; but I could easily change this to use a different destination. The Cloud Platform destination used here was automatically generated by HAT, after triggering the build previously. Also note that the above code assumes one single data source and hence, one single offline store. If your app needs to consume data from multiple sources, you’ll need to open multiple offline stores here.
Updated 19 March 2020: the switch to WKWebView as mentioned in this blog post requires an additional temporary workaround. This is the call to disable Xhook.
In the same file, the appLogon function needs to be adjusted a little bit. Once the logon is done, we call the newly added openStore function, instead of the startApp function.
		if ('serverHost' in context && 'serverPort' in context && 'https' in context) {

			// start SCPms logon

			sap.hybrid.kapsel.doLogonInit(context, appConfig.appID, sap.hybrid.openStore);
Modification of the datasource uri in the manifest file is no longer required. You can use the same project for running it as online as well as standalone offline app. For existing projects that were mobile enabled, it is advised to remove the 'mobile' folder from the project (you might want to save a copy) and re-enable for mobile. New projects will automatically get the latest code needed when the project is enabled for mobile.
Avoid cross origin (CORS) issues on iOS
With the introduction of iOS 14, the security aspects were further enhanced. To avoid having your application running into cross origin issues, we need to change the settings in the SAP Mobile Services cockpit for Cross Domain Access. This is especially relevant if your app is using the User API (we had a few users facing this).
Please refer to the screenshot below. Please open the SAP BTP Mobile Services Admin Cockpit. Go to Settings -> Security -> Cross Domain Access. Set Origin field to “<AdminAPI>,null”.

Read-only offline app.
Trigger a new cloud build and download your app on your device. After the authentication screen and passcode screen, the screen will go blank for a while. We should actually show something here, so the end-user knows what is happening. This is an improvement to be added later. At this point, the offline store is being synchronised with the backend database. Once this is done, the UI will show up and display the data (this can take around 15 seconds).
You can put your device into airplane mode and continue accessing the data.
Congrats! You’ve built an offline app.
It is nice to be able to Read data when offline, but how about Create, Update and Delete?
The application template is actually already allowing modifications, removal and adding new data entries. But how do we handle this when the device is not connected to the network? The data is simply stored in the on-device offline store. When network connectivity returns, we can synchronise the changes between backend database and on-device store.
To get the latest changes from the backend, we use the refresh function. To upload locally made changes to the backend, we use the flush function.
For the refresh, the most obvious way of implementing this, is as part of the pull-to-refresh. The flush should be triggered once the network connection is back. But for the sake of this demo and making it easier to test, I’ll just add two buttons to the footer bar: a Refresh and a Flush button.
Let’s open the file webapp/view/Master.view.xml and add the following buttons in the customFooterContent.
	<semantic:customFooterContent>

	    <Button text="Refresh" width="80px" id="__button1" press="onRefreshButton"/>

	    <Button text="Flush" width="70px" id="__button0" press="onFlushButton"/>

	</semantic:customFooterContent>
Now open the file webapp/controller/Master.controller.js and add the following code for handling the button press:
		onRefreshButton: function() {

			if (typeof sap.hybrid !== 'undefined') {

				sap.hybrid.refreshStore();

			}

		},


		onFlushButton: function() {

			if (typeof sap.hybrid !== 'undefined') {

				sap.hybrid.flushStore();

			}

		},
I have added the type check to make sure these calls are only done for a hybrid app. The web app should not call these functions.
We will add the functions called in the file mobile/hybrid/sap-mobile-hybrid.js
	refreshStore: function() {

		console.log("Offline events: refreshStore");

		if (!store) {

			console.log("The store must be open before it can be refreshed");

			return;

		}

		store.refresh(sap.hybrid.refreshStoreCallback, sap.hybrid.errorCallback, null, sap.hybrid.progressCallback);

	},


	refreshStoreCallback: function() {

		console.log("Offline events: refreshStoreCallback");

	},


	flushStore: function() {

		console.log("Offline events: flushStore");

		if (!store) {

			console.log("The store must be open before it can be flushed");

			return;

		}

		store.flush(sap.hybrid.flushStoreCallback, sap.hybrid.errorCallback, null, sap.hybrid.progressCallback);

	},


	flushStoreCallback: function() {

		console.log("Offline events: flushStoreCallback");

	},


	errorCallback: function(error) {

		console.log("Offline events: errorCallback");

		alert("An error occurred: " + JSON.stringify(error));

	},


	progressCallback: function(progressStatus) {

		// console.log("Offline events: progressCallback");


		var status = progressStatus.progressState;

		var lead = "unknown";

		if (status === sap.OfflineStore.ProgressState.STORE_DOWNLOADING) {

			lead = "Downloading ";

		} else if (status === sap.OfflineStore.ProgressState.REFRESH) {

			lead = "Refreshing ";

		} else if (status === sap.OfflineStore.ProgressState.FLUSH_REQUEST_QUEUE) {

			lead = "Flushing ";

		} else if (status === sap.OfflineStore.ProgressState.DONE) {

			lead = "Complete ";

		} else {

			alert("Unknown status in progressCallback");

		}

		console.log(lead + "Sent: " + progressStatus.bytesSent + "  Received: " + progressStatus.bytesRecv + "   File Size: " +

			progressStatus.fileSize );

	},
The refresh and flush functions are asynchronous and will take some time. For demo purposes, I’ve kept the implementation rather simple and added some console logging to have an idea of what is going on. For your enterprise mobile applications, you should implement a way to inform the user about progress and update the UI when needed.
After saving all your code changes, please trigger another cloud build. The result will be an app that allows you to work with your data in online, as well as offline mode. You trigger a refresh to update the on-device store. You can flush the changes made in the on-device store to the data service.
What about data conflicts?
There is one important aspect that I will not discuss in this blog: data conflicts. How do you handle errors when data on the service has changed, while your device was offline, and your user also made changes on the same data?
I think this topic is worth a separate blog post.
Using multiple stores or multiple data sources
Over the past months we have received queries from several users asking about the use of multiple data sources. Customers can have heterogeneous landscapes where data is stored in various systems. When you are building a mobile app that is supposed to work in all kinds of network conditions, you have to use an offline store. Your app might need data from multiple systems. Every data source requires its own offline store. So if you are using data from 'X' number of data sources in your app, you'll need to initialise and open 'X' number of offline stores.
I have seen customers using one single offline store, while their application needs data from multiple sources. To prevent errors in retrieving data, there were various checks in the code to ensure the device was having a network connection. This approach is not recommended. Instead, you should add additional stores. This could require a different way of exposing the data as well.
You might be asking, "Is there a limit to the size or amount of stores ?". The answer simply depends on the amount of storage available on the device. You can have 'N' number of stores, as long as the size of the total storage space required doesn't exceed the storage space on device. The question will be: how much storage space do my target devices have available at a minimum, so my app can work well on all those devices ? In other words and as a practical example: I can have 64GB available on my device, but my colleague has only 2GB free. The answer will be 'less than 2GB' in that case.
In the example code shown above, I've created one 'openStore' function, with a specific serviceRoot and definingRequests, and callback functions for success and failure. You can add more 'openStore' functions where needed. You will also need to implement flush (if required) and refresh functions for each of the stores created. The key will be the serviceRoot and definingRequests. This is where most developers struggle. If the path doesn't match, the initialisation will fail. Please check the troubleshooting section below to resolve this.
Take note that once you add the additional data source to the manifest.json file, the UI5 application will try to fetch metadata from this source when the app initialises; no matter whether there is a network or not; and this could trigger an authentication flow, which you might want to avoid under bad network conditions.
Conclusion
With this blog post I’ve shown you how to create an offline app in SAP Web IDE Full-Stack. The example code provided is very basic. There is surely room for improvement to get this to production level apps. My goal was to show you the basics here, to get you started quickly. I hope this blog post is useful to you and I encourage you to try it out yourself.
Our online documentation is here.
Troubleshooting
After providing support to several users, I'm adding this section to help you in resolving issues you might be facing.
- You can test the URL used for OData access in the Mobile Service admin cockpit. Select the application and go to Connectivity. Make sure you can Ping the destination. Use the OData application destination test (the icon on the left side of Ping). Specify the relative path as used by your app and click next. You should be able to view data available in the service. If this is not working, then your app will not be able to retrieve data either. Resolve this first before continuing to debug your app.
- When the offline store is initialised on your device, it will be based on the serviceRoot provided. If you want to make changes to the serviceRoot, you have to delete the existing offline store from your device. Otherwise it will still exist when you restart the app, using the serviceRoot it was initialised with. On iOS, you can remove the store by deleting the app. On Android, removing the app is not sufficient. You also need to clear the app data and cache.
- A common issue for several users is that the initialisation of the offline store fails. In the example code I am using an alert to indicate this. In case of doubts, you can put a breakpoint on the success callback and error callback to see what is happening.
- In the file mobile/index.html there is some code to adjust your app's XMLHttpRequests to use URLs that work locally. Please check whether the URL used matches with the serviceRoot you've defined. If the path doesn't match, the app will not use the on-device store.
- The offline store communicates with Mobile Service over a dedicated channel called Mobilink. You won't be seeing data exchange in the (web) app's logs, as this is handled via native code. Using the Trace functionality in Mobile Service admin cockpit (see Analytics), you will be able to generate a HAR file and get detailed information about the communication between the client app and Mobile Service AND ALSO between Mobile Service and your backend. Check for error messages in the traces to understand why there are failures happening.
Reporting issues
Although I have verified and tested the above flow several times and received confirmation from several users that this works, the results for you might be different. This might be due to interruptions in service availability or changes on the various systems involved. Also take note that I have not tested other scenarios (e.g. on-premise, with Cloud Connector) myself.
For users who are trying to add offline capability to their own app and it fails: please try reproducing exactly the same as described above. Once you have this working, it will be a good reference for your own application. Adding offline capabilities to a hybrid app is not trivial.
In case you are running into issues, please raise a (BCP) ticket for component CA-WDE-MOB. You can also comment down below, but take note that I will not be monitoring this blog very frequently.
Also, please check my latest blog post "What's new with Hybrid Application Toolkit in 2019" for the latest updates, tips and tricks, ways to resolve issues.
If you found this posting useful, please let me know by hitting the like button.
Thank you!
- SAP Managed Tags:
- SAP Mobile Services,
- OData,
- SAP Mobile Platform SDK,
- SAP Web IDE,
- SAP Web IDE, hybrid app toolkit add-on,
- Mobile
Labels:
426 Comments
- « Previous
-
- 1
- …
- 5
- 6
- 7
- 8
- 9
- Next »
You must be a registered user to add a comment. If you've already registered, sign in. Otherwise, register and sign in.
Labels in this area
-
ABAP CDS Views - CDC (Change Data Capture)
2 -
AI
1 -
Analyze Workload Data
1 -
BTP
1 -
Business and IT Integration
2 -
Business application stu
1 -
Business Technology Platform
1 -
Business Trends
1,658 -
Business Trends
122 -
CAP
1 -
cf
1 -
Cloud Foundry
1 -
Confluent
1 -
Customer COE Basics and Fundamentals
1 -
Customer COE Latest and Greatest
3 -
Customer Data Browser app
1 -
Data Analysis Tool
1 -
data migration
1 -
data transfer
1 -
Datasphere
2 -
Event Information
1,400 -
Event Information
78 -
Expert
1 -
Expert Insights
177 -
Expert Insights
384 -
General
1 -
Google cloud
1 -
Google Next'24
1 -
GraphQL
1 -
Kafka
1 -
Life at SAP
780 -
Life at SAP
16 -
Migrate your Data App
1 -
MTA
1 -
Network Performance Analysis
1 -
NodeJS
1 -
PDF
1 -
POC
1 -
Product Updates
4,571 -
Product Updates
425 -
Replication Flow
1 -
REST API
1 -
RisewithSAP
1 -
SAP BTP
1 -
SAP BTP Cloud Foundry
1 -
SAP Cloud ALM
1 -
SAP Cloud Application Programming Model
1 -
SAP Datasphere
2 -
SAP S4HANA Cloud
1 -
SAP S4HANA Migration Cockpit
1 -
Technology Updates
6,870 -
Technology Updates
520 -
Workload Fluctuations
1
Related Content
- Custom field added by extending Manage Service Entry Sheet are not getting updated in Technology Q&A
- Create Button not working in Manage Sales order Version 2 F3893 application in Technology Q&A
- SAP Sapphire 2024: Update on Application Development, Automation and Integration in Technology Blogs by SAP
- Be a Cockroach: A Simple Guide to AI and SAP Full-Stack Development - Part II in Technology Blogs by Members
- Calls for Public CAP-API using BTP Scheduler not working in Technology Q&A
Top kudoed authors
| User | Count |
|---|---|
| 12 | |
| 11 | |
| 7 | |
| 7 | |
| 6 | |
| 5 | |
| 5 | |
| 5 | |
| 5 | |
| 5 |