
- SAP Community
- Products and Technology
- Enterprise Resource Planning
- ERP Blogs by Members
- Uploading Customer Master Texts through LSMW.
Enterprise Resource Planning Blogs by Members
Gain new perspectives and knowledge about enterprise resource planning in blog posts from community members. Share your own comments and ERP insights today!
Turn on suggestions
Auto-suggest helps you quickly narrow down your search results by suggesting possible matches as you type.
Showing results for
Former Member
Options
- Subscribe to RSS Feed
- Mark as New
- Mark as Read
- Bookmark
- Subscribe
- Printer Friendly Page
- Report Inappropriate Content
2014 Feb 27
6:06 AM
15,979
- SAP Managed Tags:
- SD (Sales and Distribution)
Uploading long text for Customer Master through LSMW
Requirement: Loading the long text for Customer Master data in SAP.
The flat file in our example contains the long text for General Data tab in Customer Master Data. The same LSMW can be used to upload the texts in Company Code Data and also in the Sales Area Data tabs. The header record contains the Customer information (Table name, Customer Number and Text ID) and is identified by the starting character ‘H’. The item records contain the long text to be uploaded for the Customer and the starting character ‘I’ identifies the record. See the screenshot below:

Enter the T code LSMW and press Enter.
On the Screen "Legacy System Migration Workbench" click on create icon  or Press (Shift + F1)
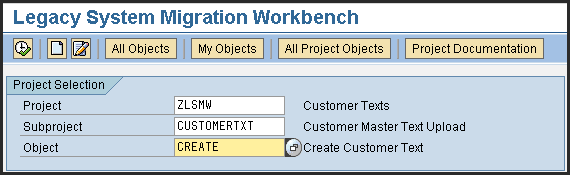
Enter the Project, Subproject and Object and their descriptions as shown in the below screen shot and press Execute icon  or F8.

Once executed we will reach the below screen and we need to follow the below steps:

- 1. Maintain Object Attributes
Now select the Maintain Object Attributes radio button and press execute  .
.
On the screen LSMW Workbench: Display Object Attributes click on the icon  and select the Standard Batch/Direct Input.
On the field Object Enter "2000" (SAP script Texts) and Method as "0000" or you can select from the drop down menu.

After selecting the
Object : 2000
Method : 0000 (Defaults to 0000 automatically), save the changes and press back icon or F3.
You will reach the below screen with radio button selected on "Maintain Source Structures", now click on execute.

- 2. Maintain Source Structures
Create two structures one for Header and one for Item. The item structure will be at lower level for the Header and save. Press back and select the radio button "Maintain Source Fields".

Press back button and select the radio button "Maintain Source Fields" and click on Execute.
- 3. Maintain Source Fields
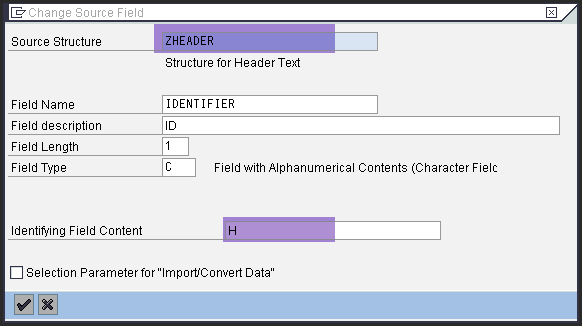
Define the fields as per the flat file structure. In both the structures the first field must be identifier. Create the identifier field of character 1 and specify the identifying field content 'H' for header structure and 'I' for item stricture as shown below.

Header Structure
Item Level Structure.

Here the Field LINE of item structure is char 132, so each text line from the input file must be less than or equal to the length 132. Save the changes and press back button. Now we have to maintain the Structure Relations.
Select the radio button "Maintain Structure Relations" and click on execute
- 4. Maintain Structure Relations
Assign the header source structures to all the Header target structure and Item source structure to all Item target structure.
Select the header texts and click on the icon "Relationships" and select the header structure as shown below.

Your screen should look like the below screen shot after assigning all the header and Item structures.

Save the changes and go back by pressing F3 or the Back icon.
Now select the radio button " Maintain Field Mapping and Conversion Rules " and press execute.
- 5. Maintain Field Mapping and Conversion Rules
Map the source fields to the target fields
Header mapping

Item mapping

Save the changes and press the back button.
Now we need to specify the files. Select the radio button "Specify Files" and press execute.
- 6. Specify Files
Place the cursor on Legacy data On the PC Front end and click create button
Enter the input file details

Select the delimiter 'Tabulator', if the fields in the input file are separated by tab. Save the changes and press back button.
- 7. Assign Files
Select the Assign files and click on execute
Now we need Assign the input file to both the structures, Select the header structure and click on Assignment icon and also select the Item structure and click on Assignment icon . See the below screen shot which should look like this after assigning the files both at header and item level.

Save the changes and press the back button.
- 8. Read Data
Execute the Read data.

Once again execute to show the read data as below.

Press back twice to reach the below screen and now we need to execute the "Display Read Data"

- 9. Display Read Data
Execute the Display Read Data and click continue on the Popup.

The system displays the read data from the flat file as shown in the below screen shot.

Press back to reach the main screen.
- 10. Convert Data - Execute the convert data
Now execute the Convert data step. Once again click on execute, So that the system shows the converted data as in the below screenshot.
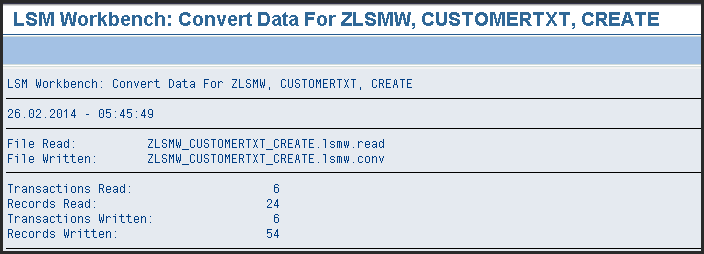
Press the back button twice to reach the LSMW menu in order to execute the next step i.e., Display Converted Data.
- 11. Display Converted Data.
Press execute on the Display Converted Data and on the popup select continue,

So, that the system displays the converted data as below.

Press back to reach the LSMW menu and execute the last step " Start Direct Input Program"
- 12. Start Direct Input Program
Click on Execute, once again click on execute

Result: The Long text will be updated for the selected customers.
Transaction XD03 to view the Customer text uploaded through LSMW.
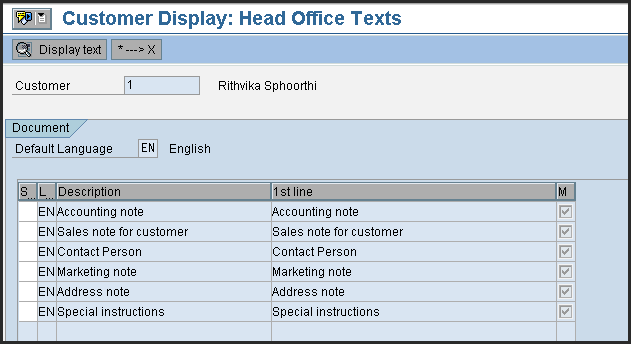
Double click on the text line to display the uploaded text in the editor mode.
End of LSMW for Customer Master Texts.
21 Comments
You must be a registered user to add a comment. If you've already registered, sign in. Otherwise, register and sign in.
Labels in this area
-
"mm02"
1 -
$session in CDS
1 -
A_PurchaseOrderItem additional fields
1 -
ABAP
5 -
abap cds
1 -
ABAP CDS VIEW
2 -
ABAP CDS Views
2 -
ABAP CDS Views - BW Extraction
1 -
ABAP CDS Views - CDC (Change Data Capture)
2 -
ABAP DDIC CDS view
1 -
ABAP Development
2 -
ABAP Extensibility
1 -
ABAP Programming
1 -
abapGit
1 -
ACCOSTRATE
1 -
ACDOCP
1 -
Adding your country in SPRO - Project Administration
1 -
Adobe form binding
1 -
Adobe forms
1 -
Adobe Printing
1 -
Advance Return Management
1 -
Advanced Intercompany Sales (5D2)
1 -
Advanced SAP Techniques
1 -
ADVANCED VARIANT CONFIGURATION
1 -
AI and RPA in SAP Upgrades
1 -
API and Integration
1 -
Application Development for SAP HANA Cloud
1 -
Approval Workflows
1 -
Ariba
1 -
ARM
1 -
Artificial Intelligence (AI)
1 -
ASN
1 -
ASSET MANAGEMENT
1 -
Assigned budget
1 -
Associations in CDS
1 -
Associations in CDS Views
2 -
Attachment List
1 -
auditlog
1 -
authorization
1 -
Auto PO from GR
1 -
Availability date
1 -
Azure Center for SAP Solutions
1 -
AzureSentinel
2 -
BADI
1 -
Bank
1 -
BAPI_SALESORDER_CREATEFROMDAT2
1 -
Billing
1 -
BRF+
1 -
BRFPLUS
1 -
Budget for PRs
1 -
Bundled Cloud Services
1 -
business participation
1 -
Business Partner Master Data
1 -
Business Processes
1 -
business trends
1 -
Business Trends
1 -
Capacity Planning
1 -
CAPM
1 -
Carbon
1 -
CDS Annotations
2 -
CDS View with Parameter
2 -
Cental Finance
1 -
Central finance
1 -
CFIN
2 -
CFIN Document Splitting
1 -
Charge calculation
1 -
Classical MRP
1 -
Cloud ALM
1 -
Cloud Integration
1 -
COGS SPLIT
1 -
Commitment Cost
1 -
Commitments by Cost Center
1 -
condition contract management
1 -
Condition Records
1 -
Condition technique
1 -
Connection - The default connection string cannot be used.
1 -
Consignment Process using MRP Area
1 -
Controlling
1 -
COPA
1 -
Copy Control
1 -
Copy Inspection Results
1 -
cost distribution TM
1 -
Cost plan
1 -
CPI
1 -
Custom Table Creation
1 -
Customer Screen in Production Order
1 -
Customizing
1 -
Data Analytics
1 -
Data Analytics & AI
1 -
Data Quality Management
1 -
Date required
1 -
Decisions
1 -
desafios4hana
1 -
Developing with SAP Integration Suite
3 -
Direct Outbound Delivery
1 -
DMEEX
1 -
DMOVE2S4
1 -
DMS
1 -
DMS attachment Service SAP Object Link Tables
1 -
DTW
1 -
EAM
1 -
ECTR
1 -
EDI
3 -
EDI 850
1 -
EDI 856
1 -
edocument
1 -
EHS Product Structure
1 -
Emergency Access Management
1 -
Employee Central Integration (Inc. EC APIs)
1 -
Energy
1 -
EPC
1 -
ERP
1 -
Expert Insights
1 -
Expert Insights
1 -
Extended Warehouse Management(EWM)
1 -
Finance
1 -
Financial Operations
1 -
Find
1 -
FINSSKF
1 -
fiori
1 -
FIORI MY-INBOX
1 -
Flexible Workflow
1 -
Forms & Templates
1 -
Freight Cost
1 -
FS
1 -
FTP
1 -
Functional Specification
1 -
Gas
1 -
Gen AI enabled SAP Upgrades
1 -
General
1 -
generate_xlsx_file
1 -
Getting Started
1 -
GR Blocked stock
1 -
hardware specification
1 -
HomogeneousDMO
1 -
How to add new Fields in the Selection Screen Parameter in FBL1H Tcode
1 -
IDOC
2 -
Incompletion Log in Sales Order
1 -
INS
1 -
Inspection lot
1 -
Inspection Plan
1 -
Inspection Points
1 -
Integrated solution
1 -
Integration
1 -
Intercompany
1 -
Introducing SAP Analytics Cloud
1 -
Just Ask
1 -
KE24
1 -
KEDR COPA Derivation
1 -
LE
1 -
Learning Content
2 -
Ledger Combinations in SAP
1 -
Life at SAP
1 -
LogicApps
2 -
LOVC
1 -
low touchproject
1 -
MAINTENANCE
1 -
Management
1 -
Manufacturing
1 -
Material creation
1 -
Material Management
1 -
MD01N
1 -
MD04
1 -
MD61
1 -
MDG Derivation
1 -
methodology
1 -
Microsoft
2 -
MicrosoftSentinel
2 -
Migration
1 -
Migration Cockpit
1 -
mm purchasing
1 -
MRP
1 -
MRP Live
1 -
MS Teams
3 -
MT940
1 -
Newcomer
1 -
Notifications
1 -
Oil
1 -
Oil & Gas
1 -
open connectors
1 -
Order Change Log
1 -
ORDERS
2 -
OSS Note 390635
1 -
outbound delivery
1 -
Output management in S4HANA
1 -
outsourcing
1 -
Overall budget exceeded error VS Annual budget exceeded error
1 -
OVR
1 -
Payment medium
1 -
PCE
1 -
Permit to Work
1 -
PIR Consumption Mode
1 -
PIR's
1 -
PIRs
1 -
PIRs Consumption
1 -
PIRs Reduction
1 -
Plan Independent Requirement
1 -
PLM
1 -
POSTMAN
1 -
poultry in s4hana
1 -
Premium Plus
1 -
pricing
1 -
Pricing Conditions
1 -
Primavera P6
1 -
Process Excellence
1 -
Process Management
1 -
Process Order Change Log
1 -
Process purchase requisitions
1 -
Product Information
1 -
Product Updates
1 -
Production Order Change Log
1 -
Production Planning & Control
1 -
PROJECT SYSTEM
1 -
Purchase Blanket Agreement
1 -
purchase order
1 -
Purchase requisition
1 -
Purchasing Lead Time
1 -
QA32
1 -
Quality Inspection
1 -
QUERY SQL
1 -
Query View
1 -
Redwood for SAP Job execution Setup
1 -
Requirement Modeling
1 -
RFNO
1 -
RICEFW
1 -
RISE with SAP
1 -
RisewithSAP
1 -
Rizing
1 -
S4 Cost Center Planning
2 -
S4 HANA
1 -
s4 hana public cloud
1 -
s4hana
3 -
S4HANA Private Cloud
1 -
S4Hana Production Planning
1 -
S4HANACloud audit
1 -
Sales and Distribution
1 -
Sales Commission
1 -
sales order
1 -
SAP
2 -
SAP ABAP RAP
1 -
SAP Basis
1 -
SAP Best Practices
1 -
SAP BTP Cloud Foundry
1 -
SAP Build
1 -
SAP Build Apps
1 -
SAP Business One
2 -
SAP Business One Service Layer
1 -
SAP CI
1 -
SAP Cloud ALM
1 -
SAP Cloud Integration
1 -
sap cpi
1 -
SAP CPI (Cloud Platform Integration)
1 -
SAP Data Quality Management
2 -
SAP Digital Manufacturing for execution
1 -
sap DMS
1 -
SAP ECC
1 -
SAP ERP
2 -
SAP EWM
1 -
SAP Fiori Application
1 -
SAP Fiori Elements
1 -
SAP FSCM
1 -
sap gui
1 -
SAP Integration Suite
1 -
SAP Integrations
1 -
SAP IS-OIL
1 -
SAP Maintenance resource scheduling
2 -
SAP Master data goverance
1 -
SAP MDG
1 -
SAP MDG Data Quality Management
1 -
SAP MDG DQM
1 -
SAP MDM
1 -
SAP Mentors
1 -
SAP MM
1 -
SAP Note 390635
1 -
SAP PLM
1 -
SAP Project System
1 -
SAP RAP
1 -
SAP S4HANA
2 -
SAP S4HANA Cloud private edition
1 -
SAP S4HANA Public Cloud Finance
1 -
SAP Security
1 -
SAP Signavio
1 -
SAP Subcontracting Process
1 -
SAP Treasury and Risk Management
1 -
SAP Upgrade Automation
1 -
SAP WCM
1 -
SAP Work Clearance Management
1 -
SAPDatasphere
1 -
Schedule Agreement
1 -
SCM-EWM
1 -
SCM-EWM-PMR
1 -
SD
1 -
SD (Sales and Distribution)
1 -
SD Pricing
1 -
SDM
1 -
Security
2 -
Settlement Management
1 -
soar
2 -
software specification
1 -
Sourcing and Procurement
1 -
SSIS
1 -
Standard network determination according to organization parameters
1 -
Stock Transfer order
1 -
Storage location
1 -
String operations In CDS
1 -
SU01
1 -
SUM2.0SP17
1 -
SUMDMO
1 -
supply chain
1 -
Teams
2 -
Technology Updates
1 -
Time Management
1 -
Transpo
1 -
Update Bill of Materials
1 -
upgrade
1 -
User Administration
1 -
User Participation
1 -
Utilities
1 -
va01
1 -
vendor
1 -
Vendor Rebates
1 -
vl01n
1 -
vl02n
1 -
Warehouse Management
1 -
WCM
1 -
Work Center
1 -
X12 850
1 -
xlsx_file_abap
1 -
xml
1 -
xml_pretty_print
1 -
xmlviews
1 -
YTD|MTD|QTD in CDs views using Date Function
1
- « Previous
- Next »
Related Content
- Customer Hierarchies in Sales material listing and exclusion in Enterprise Resource Planning Blogs by SAP
- KNVK Custom extractor not able to identify delta records in Enterprise Resource Planning Q&A
- Upload customer with BP Group Int num range & customer with Ext num range in Data Migration Cockpit in Enterprise Resource Planning Q&A
- Unable to retrieve data from OData API for Reports from SAP Business ByDesing to SAP Analytics Cloud in Enterprise Resource Planning Q&A
- Solution Order Management in SAP S/4HANA Cloud Public Edition 2408 in Enterprise Resource Planning Blogs by SAP
Top kudoed authors