
- SAP Community
- Products and Technology
- Enterprise Resource Planning
- ERP Blogs by Members
- Part#2. Create a Basic CDS view
Enterprise Resource Planning Blogs by Members
Gain new perspectives and knowledge about enterprise resource planning in blog posts from community members. Share your own comments and ERP insights today!
Turn on suggestions
Auto-suggest helps you quickly narrow down your search results by suggesting possible matches as you type.
Showing results for
ANNOUNCEMENT: We're aware of an issue causing some images not to display on the site. We're working to fix this issue and will announce here when the matter has been resolved.
kumarsanjeev
Explorer
Options
- Subscribe to RSS Feed
- Mark as New
- Mark as Read
- Bookmark
- Subscribe
- Printer Friendly Page
- Report Inappropriate Content
2019 Oct 22
8:12 AM
75,615
- SAP Managed Tags:
- ABAP Development,
- OData,
- SAP S/4HANA
This is the second blog post on the CDS detailed explanations after the Introduction post. Refer to the Introduction and blog post indexes here: https://blogs.sap.com/2019/10/21/part1.-sap-cds-views-demystification/
Whenver a CDS view is created and activated, these 2 objects gets generated. As I mentioned in the introduction, this enables Code-to-Data paradigm shift.
BASIC CDS VIEW:
For all the view I create, I will use FLIGHT demo tables and data to showcase the CDS technology.


A simple view will be created. All the statements starting with ‘@’ at the start of the view are called ‘ANNOTATIONS’ and they play a very important role in design and development of the CDS view. They are the ‘Building Blocks’ behind the CDS views configuration. They also define how the CDS view will behave in different scenarios. I will talk about different kind and mostly used annotations.

Now let’s talk about the default annotations while creating the Basic view
Within first annotation, provide the SQL view name. This is the DDIC SQL view which gets generated once the CDS view is activated and can be seen in tcode SE11. This name must be of less than or equal to 16 characters as per DDIC SE11 view name limitations. Also, the CDS view name and the SQL view name can NOT be same. So choose a logical name, probably something similar to the CDS view name to keep it consistent.
This annotation defines the behavior of the filtering the data i.e. this first compare the filter conditions and if they match then only the data is fetched. If the CDS view has join conditions, they are executed only after the filter conditions are matched. In DDIC views data if first fetched and then filtered.
Another important annotation of CDS views. As you know all the DB tables in SAP do have Keys defined and the CDS Views are always created on top of those DB tables. Now any DB table can have multiple keys defined and you might not want those keys to be the key fields of your view. So if you set this annotation as true, the only fields you define as Key Fields within your CDS view by adding word ‘Key’ in front of those fields will be the Key fields for the CDS view and the DDIC SQL view which gets generated.
If you set this as ‘False’ the DB table key fields will be defined as Key fields for the views as well, regardless of you adding word ‘Key’ in front of fewer fields.
This annotation is used to add ‘Security’ piece to the CDS view. When CDS view is ready to be rolled out to a bigger audience within or outside the organization, it is very important to restrict the data based on the authority. We will look into creation of authorization objects in the later part. For now let’s keep it #NOT_REQUIRED
This annotation is used to apply business labels other than labels attached in the DB tables, to the fields within the CDS view. This annotation will override the DB table business label and provides what you specify with this annotation.
Let’s add the fields to the CDS view by right click. You can either choose to insert all fields or one by one;

Add the below fields to the CDS view;

I made the field ‘Client’ or ‘MANDT’ disabled due to the reason that this CDS view is created in the ABAP system and the client is handled by the system itself. Now activate the CDS view.
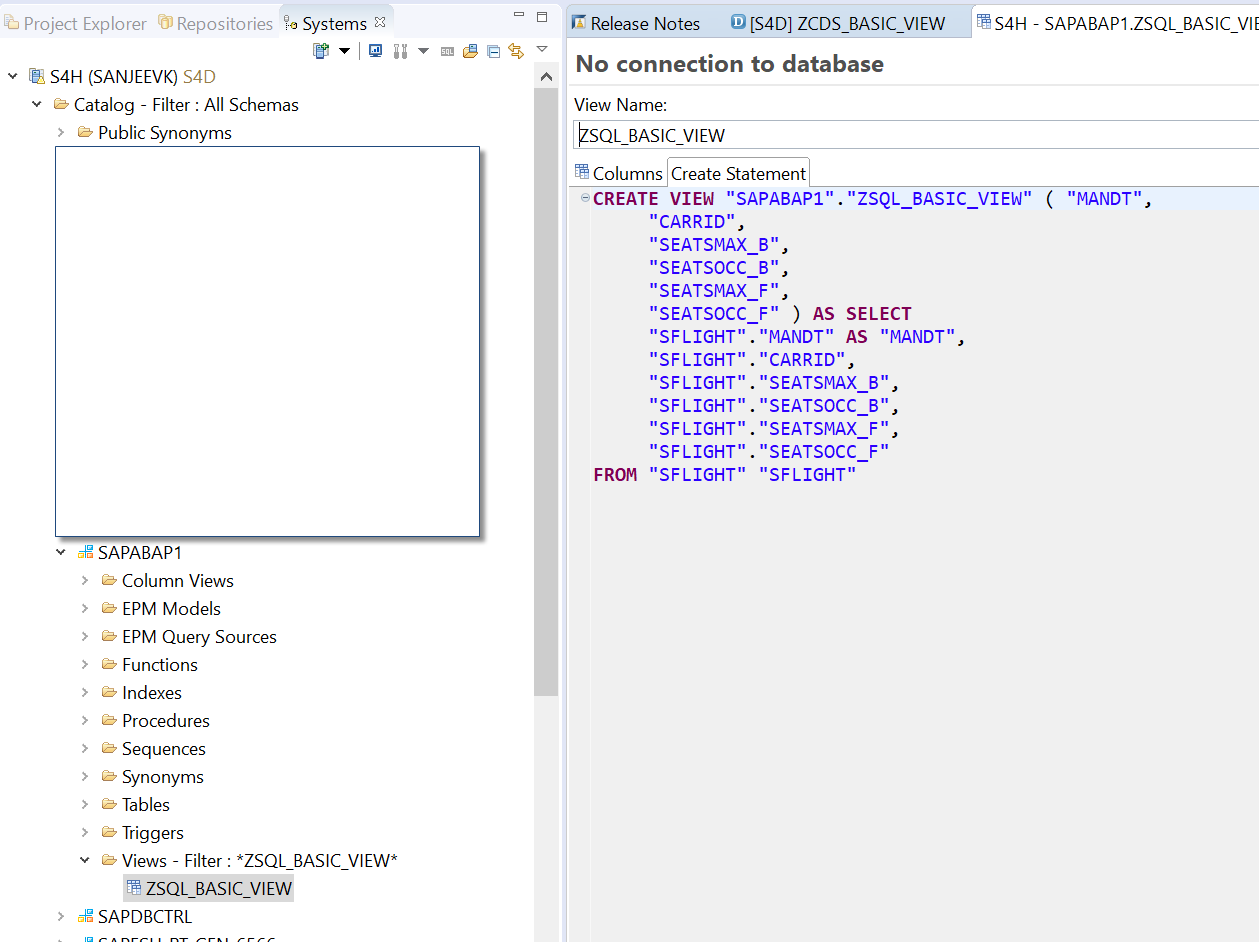
As mentioned before, 2 more objects get created when the CDS view is activated? A DDIC SQL view is created and a HANA view is created;
-Goto Tcode SE11 and check the DDIC SQL view;

-Check the HANA view in Eclipse or HANA Studio platform as below;

You can also check the ‘CREATE’ statement generated by the system.
To summarize, we created a basic CDS view and looked at the default annotations which are already configured when a CDS view is created. Also, we saw the different run time and design time objects which gets created with the view activation.
Part# 3. CDS view with Expressions and Session Variable: Find how to configure mathematical expressions and session variables to fetch system parameters.
Follow me for upcoming blog posts: kumarsanjeev
Keep learning..
SK.
Whenver a CDS view is created and activated, these 2 objects gets generated. As I mentioned in the introduction, this enables Code-to-Data paradigm shift.
- DDIC SQL view - It is a Design Time Object and can be seen in tcode- SE11
- HANA View - It is a run time object and gets created in HANA DB
BASIC CDS VIEW:
For all the view I create, I will use FLIGHT demo tables and data to showcase the CDS technology.
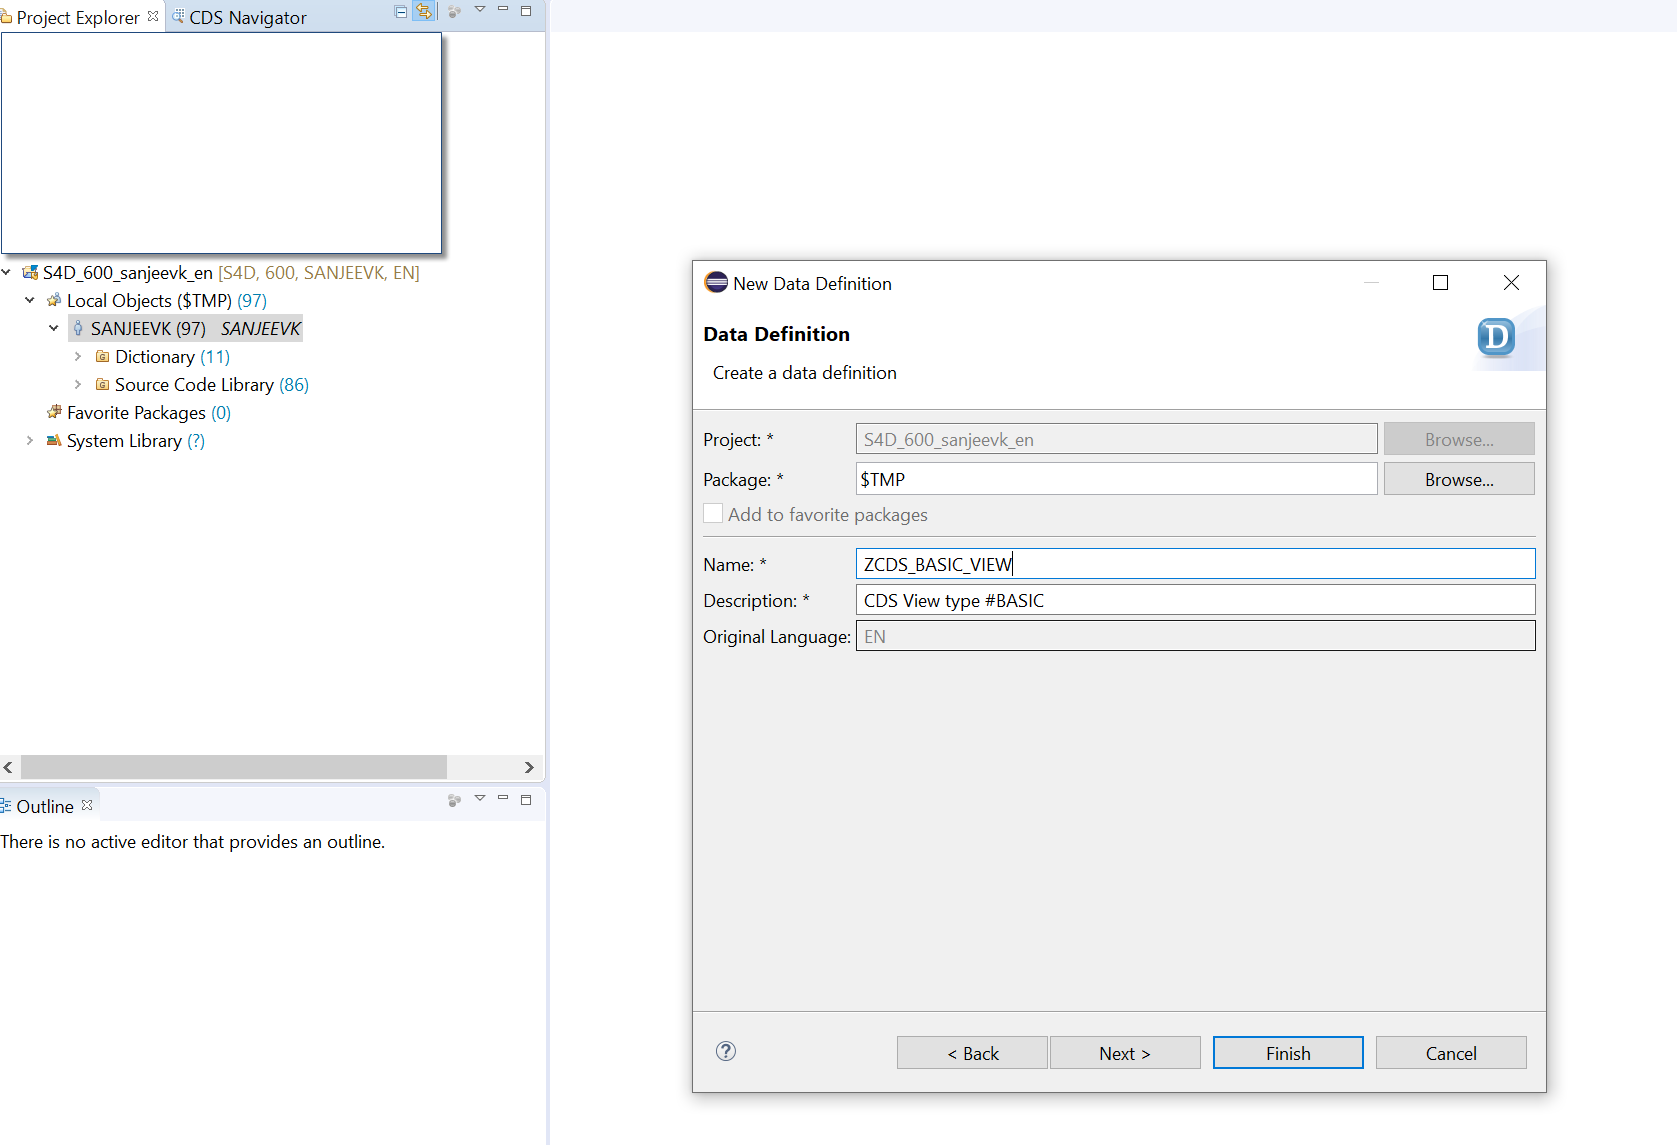
- Create an ABAP project within Eclipse by logging in to S4 HANA system.
- Right click on your username under Local Objects and choose New->Other ABAP Repository Objects. Core Data Services->Data Definition.
A simple view will be created. All the statements starting with ‘@’ at the start of the view are called ‘ANNOTATIONS’ and they play a very important role in design and development of the CDS view. They are the ‘Building Blocks’ behind the CDS views configuration. They also define how the CDS view will behave in different scenarios. I will talk about different kind and mostly used annotations.
Now let’s talk about the default annotations while creating the Basic view
- @AbapCatalog.sqlViewName: 'sql_view_name'.
Within first annotation, provide the SQL view name. This is the DDIC SQL view which gets generated once the CDS view is activated and can be seen in tcode SE11. This name must be of less than or equal to 16 characters as per DDIC SE11 view name limitations. Also, the CDS view name and the SQL view name can NOT be same. So choose a logical name, probably something similar to the CDS view name to keep it consistent.
- @AbapCatalog.compiler.compareFilter: true:
This annotation defines the behavior of the filtering the data i.e. this first compare the filter conditions and if they match then only the data is fetched. If the CDS view has join conditions, they are executed only after the filter conditions are matched. In DDIC views data if first fetched and then filtered.
- @AbapCatalog.preserveKey: true
Another important annotation of CDS views. As you know all the DB tables in SAP do have Keys defined and the CDS Views are always created on top of those DB tables. Now any DB table can have multiple keys defined and you might not want those keys to be the key fields of your view. So if you set this annotation as true, the only fields you define as Key Fields within your CDS view by adding word ‘Key’ in front of those fields will be the Key fields for the CDS view and the DDIC SQL view which gets generated.
If you set this as ‘False’ the DB table key fields will be defined as Key fields for the views as well, regardless of you adding word ‘Key’ in front of fewer fields.
- @AccessControl.authorizationCheck: #NOT_REQUIRED
This annotation is used to add ‘Security’ piece to the CDS view. When CDS view is ready to be rolled out to a bigger audience within or outside the organization, it is very important to restrict the data based on the authority. We will look into creation of authorization objects in the later part. For now let’s keep it #NOT_REQUIRED
- @EndUserText.label: 'CDS View type #BASIC'
This annotation is used to apply business labels other than labels attached in the DB tables, to the fields within the CDS view. This annotation will override the DB table business label and provides what you specify with this annotation.
Let’s add the fields to the CDS view by right click. You can either choose to insert all fields or one by one;
Add the below fields to the CDS view;
I made the field ‘Client’ or ‘MANDT’ disabled due to the reason that this CDS view is created in the ABAP system and the client is handled by the system itself. Now activate the CDS view.
As mentioned before, 2 more objects get created when the CDS view is activated? A DDIC SQL view is created and a HANA view is created;
-Goto Tcode SE11 and check the DDIC SQL view;
-Check the HANA view in Eclipse or HANA Studio platform as below;
You can also check the ‘CREATE’ statement generated by the system.
To summarize, we created a basic CDS view and looked at the default annotations which are already configured when a CDS view is created. Also, we saw the different run time and design time objects which gets created with the view activation.
Part# 3. CDS view with Expressions and Session Variable: Find how to configure mathematical expressions and session variables to fetch system parameters.
Follow me for upcoming blog posts: kumarsanjeev
Keep learning..
SK.
8 Comments
You must be a registered user to add a comment. If you've already registered, sign in. Otherwise, register and sign in.
Labels in this area
-
"Best Practice"
1 -
"mm02"
1 -
$session in CDS
1 -
*SAP"
1 -
- SAP
1 -
2023 Upgrade
1 -
@expertsap
2 -
@sapcommunity
1 -
A_PurchaseOrderItem additional fields
1 -
ABAP
5 -
abap cds
1 -
ABAP CDS VIEW
2 -
ABAP CDS Views
2 -
ABAP CDS Views - BW Extraction
1 -
ABAP CDS Views - CDC (Change Data Capture)
2 -
ABAP DDIC CDS view
1 -
ABAP Development
2 -
ABAP Extensibility
1 -
ABAP Programming
1 -
abapGit
1 -
ACCOSTRATE
1 -
Accounts Receivable
1 -
ACDOCP
1 -
Adding your country in SPRO - Project Administration
1 -
Adobe form binding
1 -
Adobe forms
1 -
Adobe Printing
1 -
Advance Return Management
1 -
Advanced Intercompany Sales (5D2)
1 -
Advanced SAP Techniques
1 -
ADVANCED VARIANT CONFIGURATION
1 -
AI and RPA in SAP Upgrades
1 -
API and Integration
1 -
Application Development for SAP HANA Cloud
1 -
Approval Workflows
1 -
Ariba
1 -
ARM
1 -
Artificial Intelligence (AI)
1 -
ASN
1 -
ASSET MANAGEMENT
1 -
Asset under construction
1 -
Assigned budget
1 -
Associations in CDS
1 -
Associations in CDS Views
2 -
Attachment List
1 -
auditlog
1 -
authorization
1 -
Auto PO from GR
1 -
Availability date
1 -
Azure Center for SAP Solutions
1 -
AzureSentinel
2 -
BADI
1 -
Bank
1 -
BAPI_SALESORDER_CREATEFROMDAT2
1 -
Best Practice
1 -
Billing
1 -
BRF+
1 -
BRFPLUS
1 -
Budget for PRs
1 -
Bundled Cloud Services
1 -
business participation
1 -
Business Partner Master Data
1 -
Business Processes
2 -
Business Trends
1 -
Business Trends
1 -
Capacity Planning
1 -
CAPM
1 -
Carbon
1 -
CDS Annotations
2 -
CDS View with Parameter
2 -
Cental Finance
1 -
Central finance
1 -
CFIN
2 -
CFIN Document Splitting
1 -
Charge calculation
1 -
Classical MRP
1 -
Cloud ALM
1 -
Cloud Integration
1 -
COGS SPLIT
1 -
Commitment Cost
1 -
Commitments by Cost Center
1 -
condition contract management
1 -
Condition Records
1 -
Condition technique
1 -
Connection - The default connection string cannot be used.
1 -
Consignment Process using MRP Area
1 -
Controlling
1 -
Conversion
1 -
CONVERSITON ECC TO S4HANA
1 -
COPA
1 -
Copy Control
1 -
Copy Inspection Results
1 -
cost distribution TM
1 -
Cost plan
1 -
CPI
1 -
CRM_PRICING_CUSTOMER_USER_EXIT
1 -
Custom Table Creation
1 -
Customer Screen in Production Order
1 -
Customizing
1 -
Data Analytics
1 -
Data Analytics & AI
1 -
Data Conversion
1 -
Data Quality Management
1 -
Date required
1 -
Decisions
1 -
desafios4hana
1 -
Developing with SAP Integration Suite
3 -
Direct Outbound Delivery
1 -
DMEEX
1 -
DMOVE2S4
1 -
DMS
1 -
DMS attachment Service SAP Object Link Tables
1 -
Downtime Optimization
1 -
DTW
1 -
EAM
1 -
ECTR
1 -
EDI
3 -
EDI 850
1 -
EDI 856
1 -
edocument
1 -
EHS Product Structure
1 -
Emergency Access Management
1 -
Employee Central Integration (Inc. EC APIs)
1 -
Energy
1 -
EPC
1 -
ERP
1 -
Expert Insights
1 -
Expert Insights
1 -
Extended Warehouse Management(EWM)
1 -
Finance
1 -
Financial Operations
1 -
Find
1 -
FINSSKF
1 -
fiori
1 -
FIORI MY-INBOX
1 -
Flexible Workflow
1 -
Forms & Templates
1 -
Freight Cost
1 -
FS
1 -
FTP
1 -
Functional Specification
1 -
Gas
1 -
GDPR
1 -
Gen AI enabled SAP Upgrades
1 -
General
1 -
generate_xlsx_file
1 -
Getting Started
1 -
GR Blocked stock
1 -
Group Reporting
1 -
hardware specification
1 -
HomogeneousDMO
1 -
How to add new Fields in the Selection Screen Parameter in FBL1H Tcode
1 -
IDOC
2 -
Incompletion Log in Sales Order
1 -
innovation
1 -
INS
1 -
Inspection lot
1 -
Inspection Plan
1 -
Inspection Points
1 -
Integrated solution
1 -
Integration
1 -
Intercompany
1 -
Introducing SAP Analytics Cloud
1 -
Investment Order
1 -
Just Ask
1 -
KE24
1 -
KEDR COPA Derivation
1 -
LE
1 -
Learning Content
2 -
Ledger Combinations in SAP
1 -
Life at SAP
1 -
LogicApps
2 -
LOVC
1 -
low touchproject
1 -
MAINTENANCE
1 -
management
1 -
Manufacturing
1 -
Material creation
1 -
Material Management
1 -
MD01N
1 -
MD04
1 -
MD61
1 -
MDG Derivation
1 -
methodology
1 -
Microsoft
2 -
MicrosoftSentinel
2 -
Migration
1 -
Migration Cockpit
1 -
mm purchasing
1 -
MRP
1 -
MRP Live
1 -
MS Teams
3 -
MT940
1 -
Multiple Valuation
1 -
Newcomer
1 -
Notifications
1 -
Oil
1 -
Oil & Gas
1 -
open connectors
1 -
OpenText Content Repository for QM Inspection Lots
1 -
Order Change Log
1 -
ORDERS
2 -
OSS Note 390635
1 -
outbound delivery
1 -
Output management in S4HANA
1 -
outsourcing
1 -
Overall budget exceeded error VS Annual budget exceeded error
1 -
OVR
1 -
Parallel Valuation
1 -
Payment medium
1 -
Payment Terms
1 -
PCE
1 -
Permit to Work
1 -
PIR Consumption Mode
1 -
PIR's
1 -
PIRs
1 -
PIRs Consumption
1 -
PIRs Reduction
1 -
Plan Independent Requirement
1 -
PLM
1 -
PO Workbench
1 -
POSTMAN
1 -
poultry in s4hana
1 -
Premium Plus
1 -
pricing
1 -
Pricing Conditions
1 -
Primavera P6
1 -
Process Excellence
1 -
Process Management
1 -
Process Order Change Log
1 -
Process purchase requisitions
1 -
Procurement
1 -
Product Information
1 -
Product Updates
1 -
Production Order Change Log
1 -
Production Planning & Control
1 -
PROJECT SYSTEM
1 -
Purchase Blanket Agreement
1 -
purchase order
1 -
Purchase requisition
1 -
Purchasing Lead Time
1 -
Putaway Strategy
1 -
QA32
1 -
Quality Inspection
1 -
Quantity Classification
1 -
QUERY SQL
1 -
Query View
1 -
Redwood for SAP Job execution Setup
1 -
Requirement Modeling
1 -
RFNO
1 -
RICEFW
1 -
RISE with SAP
1 -
RisewithSAP
1 -
Rizing
1 -
S4 Cost Center Planning
2 -
S4 FASHION
1 -
S4 HANA
1 -
s4 hana public cloud
1 -
s4hana
4 -
S4HANA Private Cloud
1 -
S4Hana Production Planning
1 -
S4HANACloud audit
1 -
Sales and Distribution
1 -
Sales Commission
1 -
sales order
1 -
SAP
3 -
SAP ABAP RAP
1 -
SAP Basis
1 -
SAP Best Practices
1 -
SAP BTP Cloud Foundry
1 -
SAP Build
1 -
SAP Build Apps
1 -
SAP Business One
2 -
SAP Business One Service Layer
1 -
SAP CI
1 -
SAP Cloud ALM
1 -
SAP Cloud Integration
1 -
sap cpi
1 -
SAP CPI (Cloud Platform Integration)
1 -
SAP Data Quality Management
2 -
SAP Digital Manufacturing for execution
1 -
sap DMS
1 -
SAP ECC
1 -
SAP ERP
2 -
SAP EWM
1 -
SAP FICO
1 -
SAP Fiori Application
1 -
SAP Fiori Elements
1 -
SAP FSCM
1 -
sap gui
1 -
SAP HANA HA
1 -
SAP Integration Suite
1 -
SAP Integrations
1 -
SAP IS Retail
1 -
SAP IS-OIL
1 -
SAP JVA
1 -
SAP Maintenance resource scheduling
2 -
SAP Master data goverance
1 -
SAP MDG
1 -
SAP MDG Data Quality Management
1 -
SAP MDG DQM
1 -
SAP MDM
1 -
SAP Mentors
1 -
SAP MM
1 -
SAP Netweaver
1 -
SAP Note 390635
1 -
SAP PLM
1 -
SAP Post Refresh Steps
1 -
SAP Project System
1 -
SAP RAP
1 -
SAP S4 Finance.
1 -
SAP S4 HANA Conversion
1 -
SAP S4HANA
3 -
SAP S4HANA Cloud private edition
1 -
SAP S4HANA Finance
1 -
SAP S4HANA Public Cloud Finance
1 -
SAP Security
1 -
SAP Signavio
2 -
SAP Subcontracting Process
1 -
SAP Treasury and Risk Management
1 -
SAP Upgrade Automation
1 -
SAP WCM
1 -
SAP Work Clearance Management
1 -
SAP_CRM_JAVA_Pricing
1 -
SAPDatasphere
1 -
Schedule Agreement
1 -
SCM-EWM
1 -
SCM-EWM-PMR
1 -
SD
1 -
SD (Sales and Distribution)
1 -
SD Pricing
1 -
SDM
1 -
security
2 -
Settlement Management
1 -
Simulate
1 -
soar
2 -
software specification
1 -
Sourcing and Procurement
1 -
SSIS
1 -
Standard network determination according to organization parameters
1 -
Stock Transfer order
1 -
Storage location
1 -
String operations In CDS
1 -
SU01
1 -
SUM2.0SP17
1 -
SUMDMO
1 -
supply chain
1 -
Teams
2 -
Technology Updates
1 -
Test systems
1 -
Time Management
1 -
Transpo
1 -
Universal Parallel Accounting
1 -
Update Bill of Materials
1 -
upgrade
1 -
User Administration
1 -
User Participation
1 -
utilities
1 -
va01
1 -
vendor
1 -
Vendor Rebates
1 -
vl01n
1 -
vl02n
1 -
Warehouse Management
1 -
WCM
1 -
Work Center
1 -
X12 850
1 -
xlsx_file_abap
1 -
xml
1 -
xml_pretty_print
1 -
xmlviews
1 -
YTD|MTD|QTD in CDs views using Date Function
1
- « Previous
- Next »
Related Content
- Title : Differences and functions of Classic MRP and MRP Live in Enterprise Resource Planning Blogs by Members
- SAP S/4HANA Cloud Private Edition | 2023 FPS02 Release – Part 2 in Enterprise Resource Planning Blogs by SAP
- sales price not determining in classic variant configuration in Enterprise Resource Planning Q&A
- 2023 FPS02 What's New in SAP S/4HANA advanced Available-To-Promise (aATP) in Enterprise Resource Planning Blogs by SAP
- Create New Collection Rules in SAP S4 HANA Public Cloud in Enterprise Resource Planning Q&A
Top kudoed authors
| User | Count |
|---|---|
| 3 | |
| 2 | |
| 2 | |
| 2 | |
| 1 | |
| 1 | |
| 1 | |
| 1 | |
| 1 | |
| 1 |