

- SAP Community
- Products and Technology
- Enterprise Resource Planning
- ERP Blogs by Members
- Hello World: CDS View - SAP S/4HANA On Premise 202...
Enterprise Resource Planning Blogs by Members
Gain new perspectives and knowledge about enterprise resource planning in blog posts from community members. Share your own comments and ERP insights today!
Turn on suggestions
Auto-suggest helps you quickly narrow down your search results by suggesting possible matches as you type.
Showing results for
kachiever
Participant
Options
- Subscribe to RSS Feed
- Mark as New
- Mark as Read
- Bookmark
- Subscribe
- Printer Friendly Page
- Report Inappropriate Content
01-24-2023
7:48 PM
Hi all, SAP HANA is no more a new name or new Technology Jargon now. Most of us would be either have already started using it, are in mid of a transition to SAP HANA, have attended training or workshops or read blogs about the same. SAP HANA (High-performance Analytic Appliance) is a multi-model database that stores data in its memory instead of keeping it on a disk. When we use SAP HANA with 4th Generation SAP Business Suite it's called SAP S/4 HANA. Now, there is a lot of theoretical documentation, facts, information about what is HANA & S/4 HANA, how it works, what are pros & cons etc. There are lot blogs you can refer to get that information, if you are new or you want to know more about them.
In this blog we will majorly focus on getting our hands dirty quickly, avoiding theory as much as possible. And as the Title says, we will Create our very First Simple CDS View on an SAP S/4HANA On-Premise System. We will quickly do required setup, create a table, add some data, create a CDS View & finally preview the same.
We will be using Eclipse as IDE for our development. SAP has a well-maintained Page to help you with the Setup, they call it :
SAP Development Tools: https://tools.eu1.hana.ondemand.com
But we are interested into ABAP Side of things so we will Go for the ADT Setup with Eclipse
Here: https://tools.eu1.hana.ondemand.com/#abap
Let's quickly download eclipse from
Here: https://www.eclipse.org/downloads/packages/release/2022-12/r
We will download Eclipse IDE for Java Developers from the page.
This will basically give a universal installer file for you (Assuming you are on Windows). You can either go by yourself or follow the 5 Steps Installation Guide by Eclipse.
Eclipse official Quick Installation Guide: https://www.eclipse.org/downloads/packages/installer
Click on Launch button & choose a desired workplace, it's basically a location where your all projects will reside.
Note: Workplace location is different than installation location, but you can reuse same location, it's your choice.

Once selected, it will finally open the landing page.
Now, Enter the URL https://tools.hana.ondemand.com/latest in Works with, choose ABAP Development Tools & click on Next.
It will ask to review installation, just click on Next.
It will finally ask to review licenses, Accept & click on Finish.
This will start installation, can be tracked at bottom right corner.
It will finally ask to restart to apply all the changes, click to restart & you are good to go. Once restarted it will show the workspace click on Launch & it will open ADT (ABAP Development Toolkit) Overview Screen.
Note: Somehow if you don't land here (ABAP Perspective), you can click Open Perspective Icon (Top Right Corner, shown below with red arrow), select ABAP & click Open.
And finally, you will be in ABAP Perspective.
You are all set now to connect S/4 System & start Development.
Click on File -> New -> ABAP Project as shown below.
This will show all your existing connection list, select your S/4 System from the List & click on Next.
You will get the below screen, click on Next.
Congratulations, you will get the below screen, you are all set for the development now.
We will go through 4 Steps to develop our CDS View from Scratch:
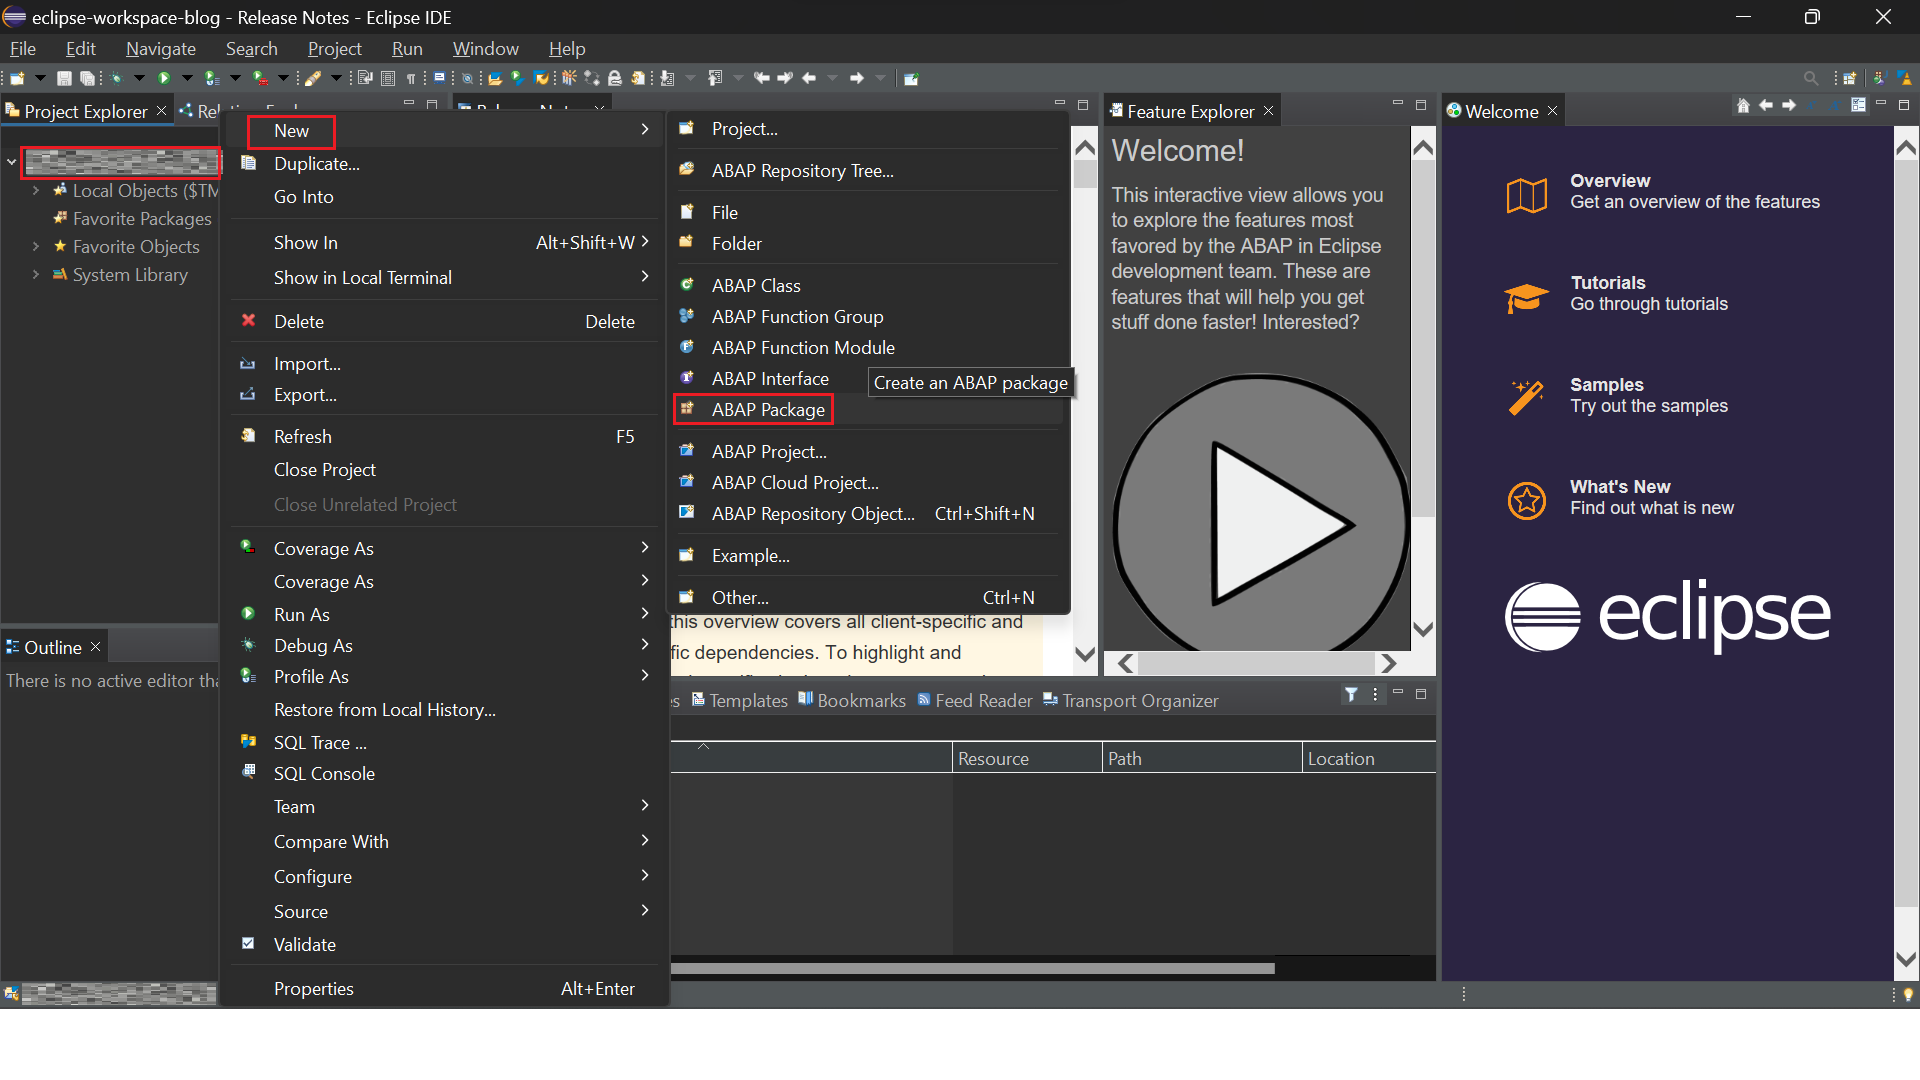
Click on your Project -> New -> ABAP package.
Now, click on finish without doing anything in the screen as we don't want Transport Request.
Now let's create a Table, as existing table may or may not have data. So, we will create a new Table & use it for tutorial.
Right Click on your Package -> New -> Other ABAP Repository Object.
Now type Table then Select Database table and choose Next.
Choose a table name starting with Z*, write description, click on Next & then Finish.
The Table will be created, it can be seen Under Package->Dictionary->Database Tables.
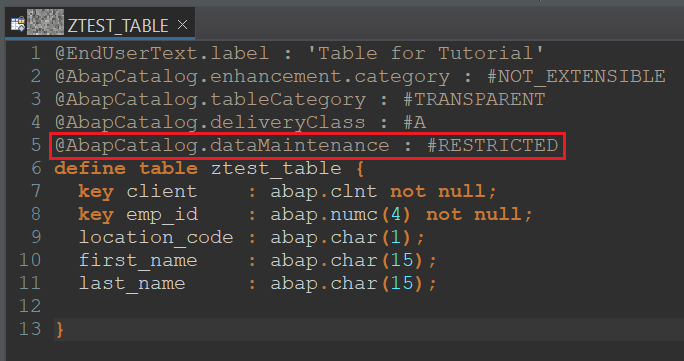
Now let's add some Fields, you can copy from below.
Finally, code should look like this.
Now Save it using Ctrl+S and Activate it using Ctrl+F3.
Congratulations, you have Successfully created your Table.
There are different ways to do it but first we need to enable Data Maintanence option.
By Default, Data maintenance would be set to #RESTRICTED
We will need to change it to #ALLOWED to enable Create Entries.
Now you are all set to add some test Entries. There are multiple ways to do the same. But as we need few entries & want to do it quickly without any extra line of code, so we will use the classic way to do it.
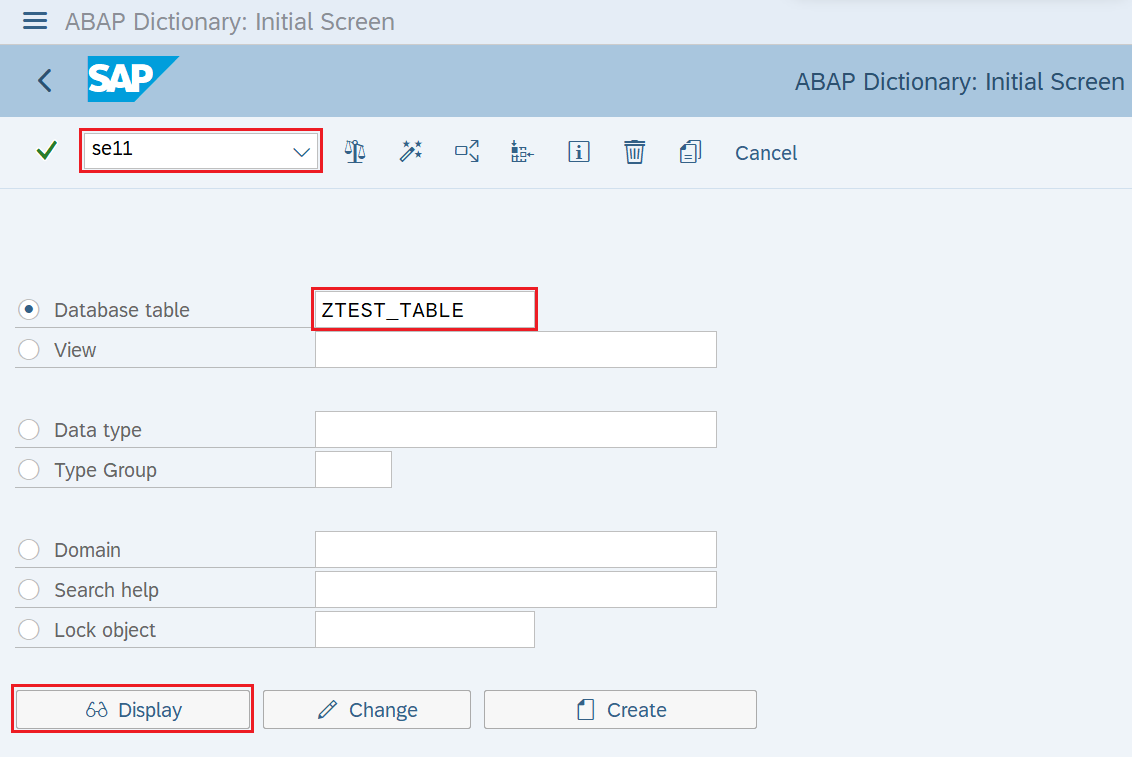
We will go to SAP Logon, login to our System, go to SE11 transaction, put our Table name ZTEST_TABLE ( in my case ) & click on Display.
Now, click on Utilities-> Table Contents -> Create Entries
Fill up the fields & click on Save Icon to save.
We will add 4 Entries like this with 2 Employees of Same Location Code.
Now come back to Eclipse, right click on your Table then click on Open With -> Data Preview.
You will be able to see the created data like this in preview.
Right Click on your Package -> New -> Other ABAP Repository Object.
Start typing Data Definition, choose Data Definition below & click Next.
Enter the Name & Description of the View, I am naming it as ZEMPLOYEE_LOCATION_A as I will fetch employees who are from Location A. Click Next and Finish in next screen.
You will get the default code/output like below.
It will show Error as its Default template & we will need to fill the required details.
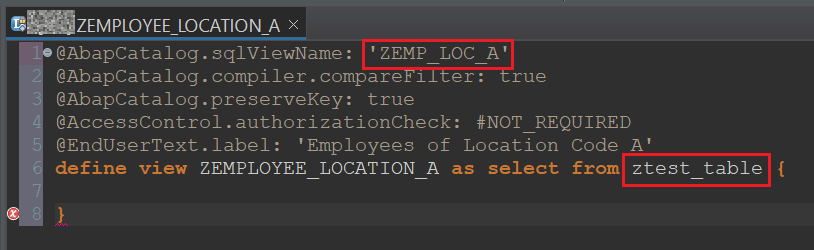
We will add the sqlViewName and the data_source_name as shown below.
I'll use ZEMP_LOC_A as sqlviewname & our table created above for the data_source_name. You can use Ctrl+Space to AutoFill or get suggestions.
Finally, would look like below.
Now we will add required Fields to our CDS View. Syntax will be data_source.field_name, again you can use Ctrl+Space to get suggestions to add source & fields.
We will be displaying EMP_ID, First name & Last name. Final code should look like below.
Right now, it is showing all the records, but we want the records only from Location Code A, so let's put the WHERE clause to do the same at the bottom like this.
You should get an output like below.
You can see its only showing the Employees that belong to Location Code A.
Congratulations, we have successfully created a fully functional condition based CDS View.

( All the Records of the Table for your Reference )
Thanks for reading my blog. We started from scratch, did installations, configurations, created a table, inserted records & finally created a CDS View using our table. Hope, it will help anyone who want to code His/Her's very first kind of a Hello World CDS View with very basic pre-requisite that you have a system with required access. If you have any doubt, question or face any blocker while following the steps, you can leave a comment below, I will be happy to help you out. If you like my blog or found it helpful, please like & share it with those who will be interested in the same & do share your comments & suggestions to improve the same.


In this blog we will majorly focus on getting our hands dirty quickly, avoiding theory as much as possible. And as the Title says, we will Create our very First Simple CDS View on an SAP S/4HANA On-Premise System. We will quickly do required setup, create a table, add some data, create a CDS View & finally preview the same.
Prerequisites
- I am assuming you already have an SAP S/4HANA On-Premise system.
- You have all the required access in the same.
IDE Setup
1. Installation
We will be using Eclipse as IDE for our development. SAP has a well-maintained Page to help you with the Setup, they call it :
SAP Development Tools: https://tools.eu1.hana.ondemand.com

But we are interested into ABAP Side of things so we will Go for the ADT Setup with Eclipse
Here: https://tools.eu1.hana.ondemand.com/#abap

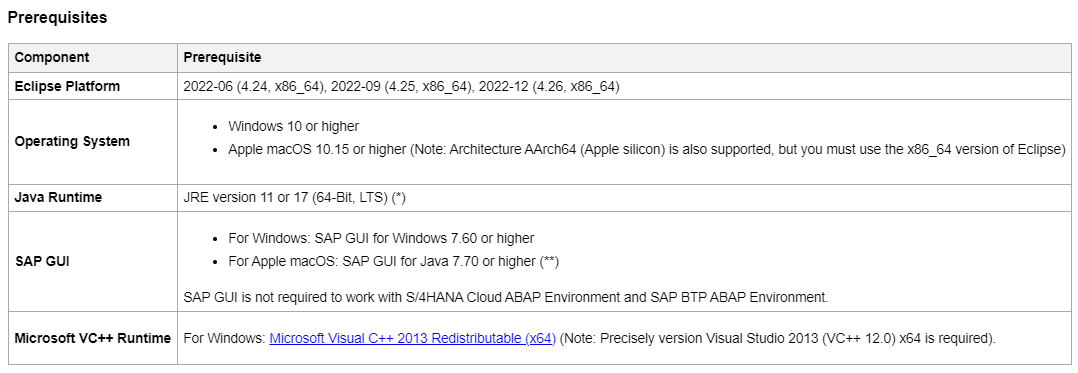
So, you will be able to see the Prerequisites for the ADT Setup
Let's quickly download eclipse from
Here: https://www.eclipse.org/downloads/packages/release/2022-12/r
We will download Eclipse IDE for Java Developers from the page.

This will basically give a universal installer file for you (Assuming you are on Windows). You can either go by yourself or follow the 5 Steps Installation Guide by Eclipse.
Eclipse official Quick Installation Guide: https://www.eclipse.org/downloads/packages/installer

It will take some time & will finally show the JAVA VM & Installation folder.

2. Configuration
Click on Launch button & choose a desired workplace, it's basically a location where your all projects will reside.
Note: Workplace location is different than installation location, but you can reuse same location, it's your choice.
Once selected, it will finally open the landing page.

We will navigate to Install new Software via Help.

Now, Enter the URL https://tools.hana.ondemand.com/latest in Works with, choose ABAP Development Tools & click on Next.
https://tools.hana.ondemand.com/latest
It will ask to review installation, just click on Next.

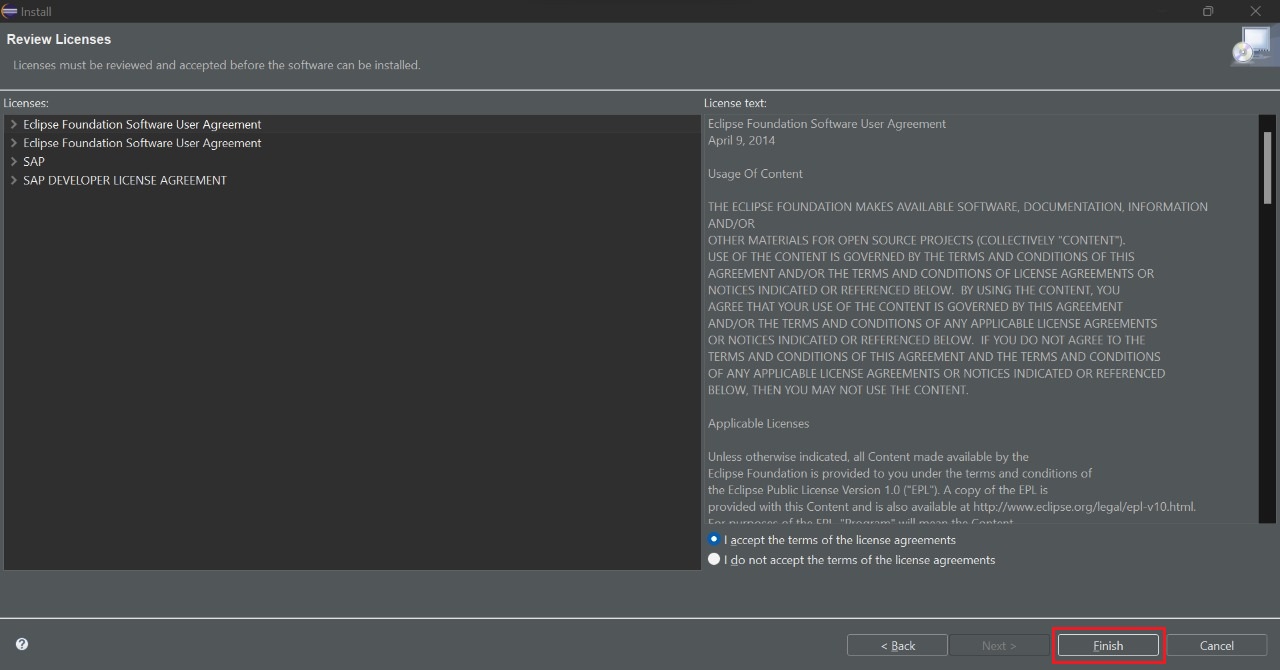
It will finally ask to review licenses, Accept & click on Finish.
This will start installation, can be tracked at bottom right corner.

It will finally ask to restart to apply all the changes, click to restart & you are good to go. Once restarted it will show the workspace click on Launch & it will open ADT (ABAP Development Toolkit) Overview Screen.

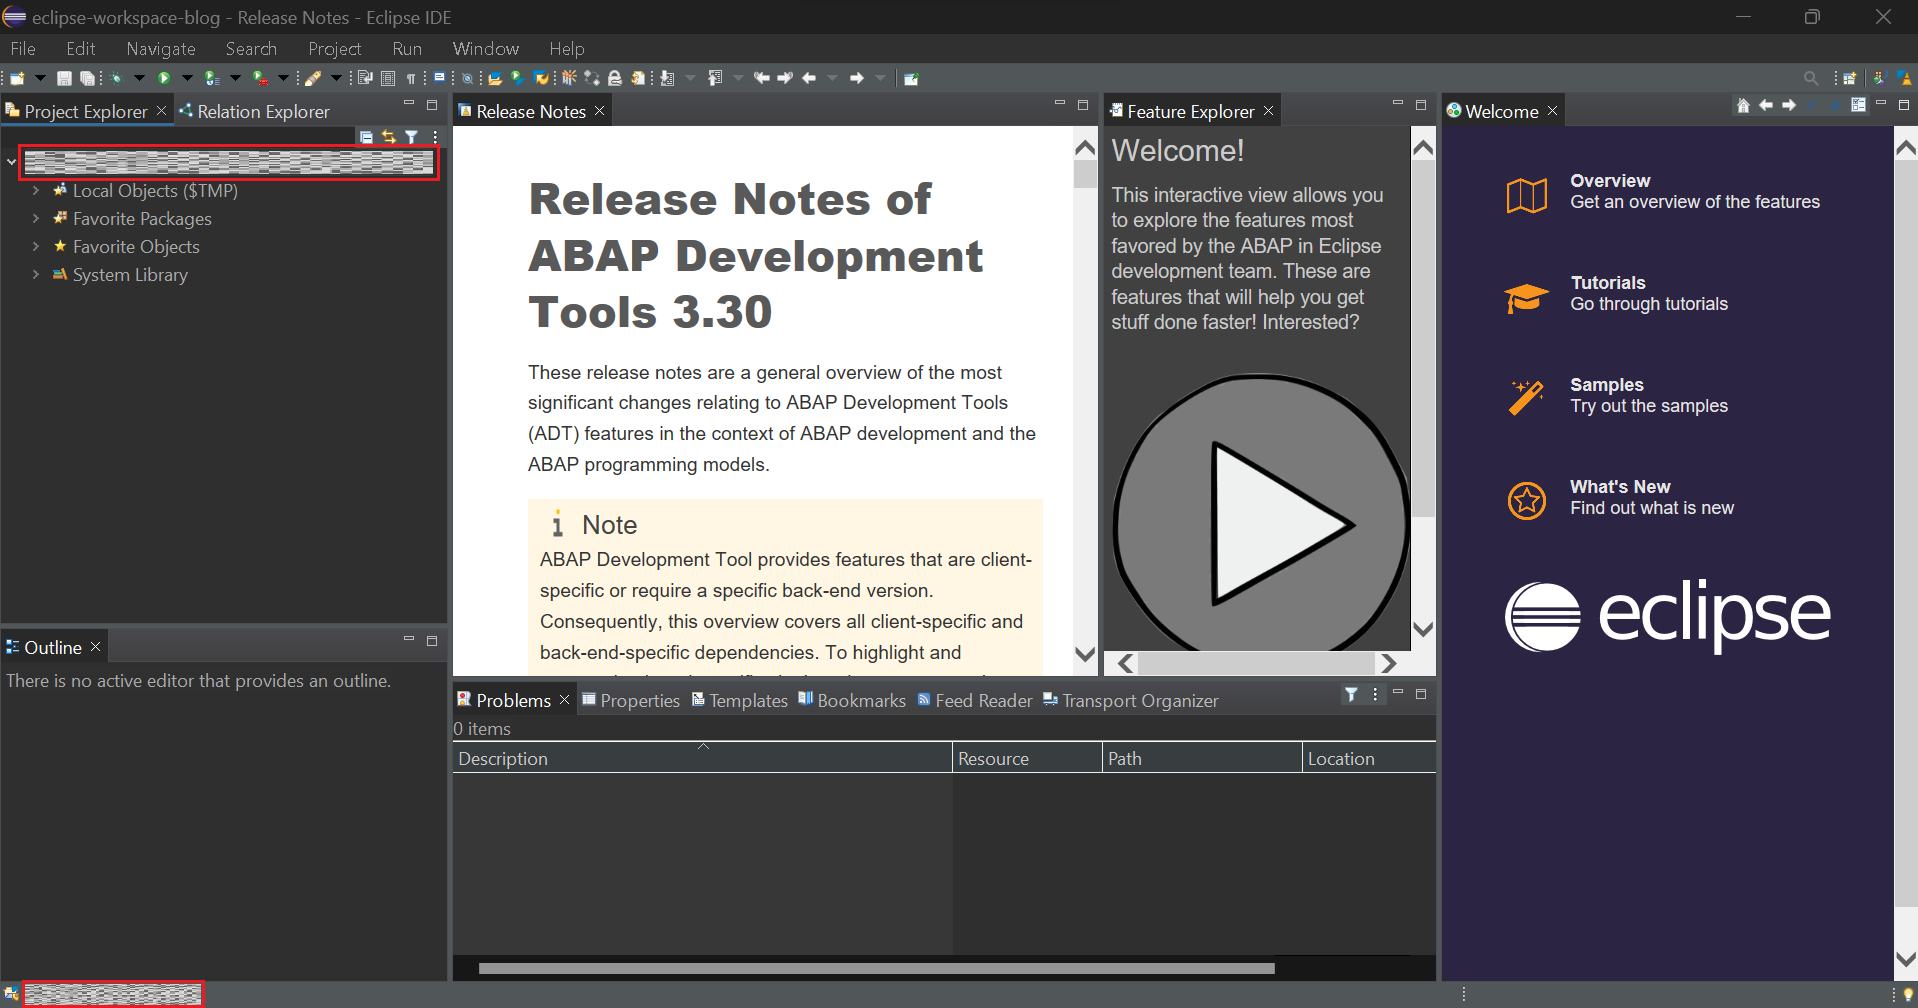
Note: Somehow if you don't land here (ABAP Perspective), you can click Open Perspective Icon (Top Right Corner, shown below with red arrow), select ABAP & click Open.

And finally, you will be in ABAP Perspective.

You are all set now to connect S/4 System & start Development.
Connect to S/4 System
Perquisites:
- Again, I am assuming you have the access to S/4 System with required accesses.
- You have SAP Logon on your system.
- You already have the system connection on your SAP Logon.
Click on File -> New -> ABAP Project as shown below.
This will show all your existing connection list, select your S/4 System from the List & click on Next.

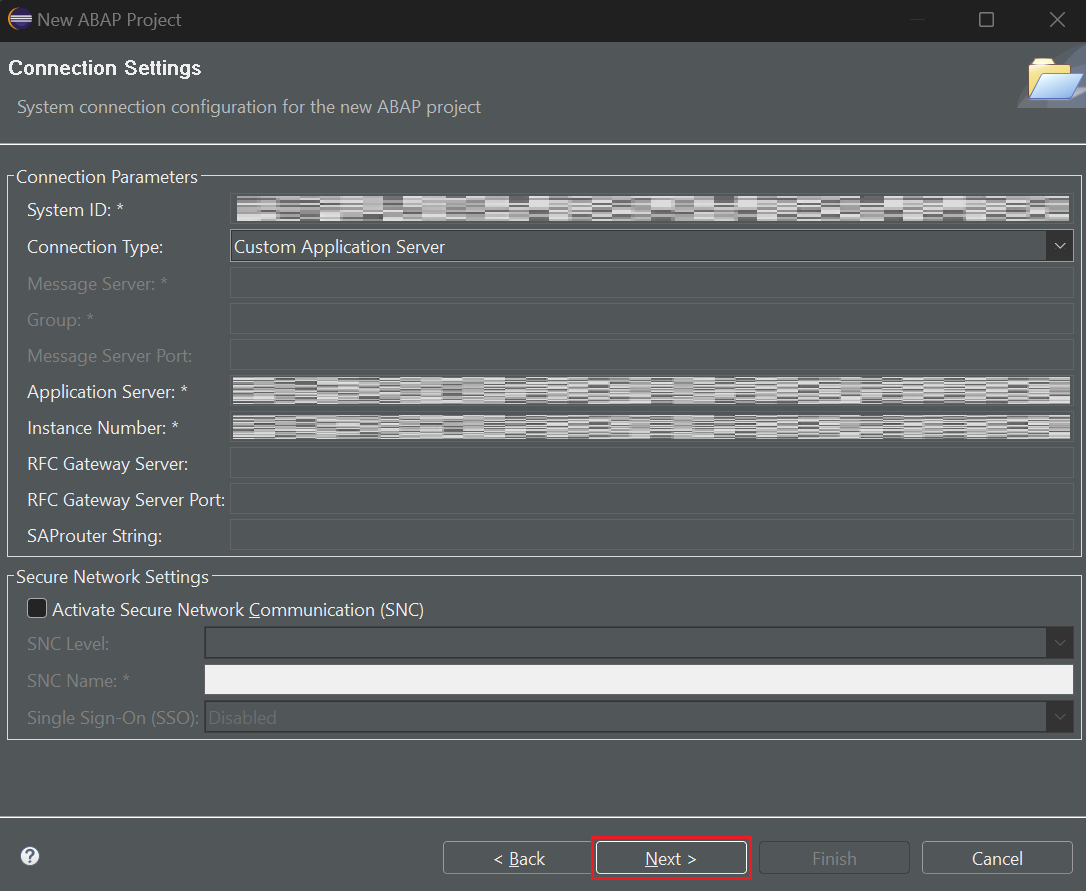
You will get the below screen, click on Next.
Enter Client ID, your Credentials & click on Finish.

Congratulations, you will get the below screen, you are all set for the development now.
Development
We will go through 4 Steps to develop our CDS View from Scratch:
- Create an ABAP Package
- Create a Custom/Z Table
- Add Data to our Table
- Create a CDS View
Create an ABAP Package
Click on your Project -> New -> ABAP package.
 Choose a Package name starting with $Z* as it will be our Temporary package. Check to add it as your favorite package & click Next. Package type will be left as Development.

Now, click on finish without doing anything in the screen as we don't want Transport Request.

Create a Table
Now let's create a Table, as existing table may or may not have data. So, we will create a new Table & use it for tutorial.
Right Click on your Package -> New -> Other ABAP Repository Object.

Now type Table then Select Database table and choose Next.

Choose a table name starting with Z*, write description, click on Next & then Finish.

The Table will be created, it can be seen Under Package->Dictionary->Database Tables.

Now let's add some Fields, you can copy from below.
define table ztest_table {

  key client    : abap.clnt not null;

  key emp_id    : abap.numc(4) not null;

  location_code : abap.char(1);

  first_name    : abap.char(15);

  last_name     : abap.char(15);


}
Finally, code should look like this.

Now Save it using Ctrl+S and Activate it using Ctrl+F3.
Congratulations, you have Successfully created your Table.
Add Data to your Table
There are different ways to do it but first we need to enable Data Maintanence option.
By Default, Data maintenance would be set to #RESTRICTED
We will need to change it to #ALLOWED to enable Create Entries.
@AbapCatalog.dataMaintenance : #ALLOWED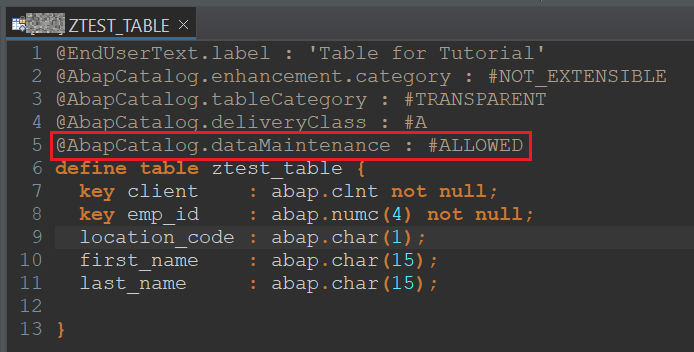
Now you are all set to add some test Entries. There are multiple ways to do the same. But as we need few entries & want to do it quickly without any extra line of code, so we will use the classic way to do it.
We will go to SAP Logon, login to our System, go to SE11 transaction, put our Table name ZTEST_TABLE ( in my case ) & click on Display.
Now, click on Utilities-> Table Contents -> Create Entries

Fill up the fields & click on Save Icon to save.

We will add 4 Entries like this with 2 Employees of Same Location Code.
01 A Kapil Verma

02 A Rob   Struas

03 B Isac  Thaw

04 C Stan  Lee
Now come back to Eclipse, right click on your Table then click on Open With -> Data Preview.

You will be able to see the created data like this in preview.
Create CDS View
Right Click on your Package -> New -> Other ABAP Repository Object.
Start typing Data Definition, choose Data Definition below & click Next.

Enter the Name & Description of the View, I am naming it as ZEMPLOYEE_LOCATION_A as I will fetch employees who are from Location A. Click Next and Finish in next screen.

You will get the default code/output like below.

It will show Error as its Default template & we will need to fill the required details.
We will add the sqlViewName and the data_source_name as shown below.

I'll use ZEMP_LOC_A as sqlviewname & our table created above for the data_source_name. You can use Ctrl+Space to AutoFill or get suggestions.

Finally, would look like below.
Now we will add required Fields to our CDS View. Syntax will be data_source.field_name, again you can use Ctrl+Space to get suggestions to add source & fields.
Syntax : data_source.field_name
We will be displaying EMP_ID, First name & Last name. Final code should look like below.
@AbapCatalog.sqlViewName: 'ZEMP_LOC_A'

@AbapCatalog.compiler.compareFilter: true

@AbapCatalog.preserveKey: true

@AccessControl.authorizationCheck: #NOT_REQUIRED

@EndUserText.label: 'Employees of Location Code A'

define view ZEMPLOYEE_LOCATION_A as select from ztest_table{

    ztest_table.emp_id,

    ztest_table.first_name,

    ztest_table.last_name

}
Let's Save (Ctrl+S) & Activate (Ctrl+F3) our View to see if things are working correctly. Right Click on View, select Open With -> Data Preview.

You should get an output like below.

Right now, it is showing all the records, but we want the records only from Location Code A, so let's put the WHERE clause to do the same at the bottom like this.
where location_code = 'A'
Let's Save (Ctrl+S) & Activate (Ctrl+F3) our View and test these final changes. Right Click on View, select Open With -> Data Preview.
You should get an output like below.

You can see its only showing the Employees that belong to Location Code A.
Congratulations, we have successfully created a fully functional condition based CDS View.
( All the Records of the Table for your Reference )
Conclusion
Thanks for reading my blog. We started from scratch, did installations, configurations, created a table, inserted records & finally created a CDS View using our table. Hope, it will help anyone who want to code His/Her's very first kind of a Hello World CDS View with very basic pre-requisite that you have a system with required access. If you have any doubt, question or face any blocker while following the steps, you can leave a comment below, I will be happy to help you out. If you like my blog or found it helpful, please like & share it with those who will be interested in the same & do share your comments & suggestions to improve the same.
About me
 | Name : LinkedIn : About : | Kapil Verma https://www.linkedin.com/in/kapil-verma-certified-sap-consultant SAP Certified Consultant (SAP FIORI, SAP Cloud Platform / SAP BTP, SAP HANA, SAP Analytics Cloud, ABAP on HANA, Cloud SDK Extensibility, SAP Activate, Design Thinking) |
- SAP Managed Tags:
- SAP HANA,
- SAP S/4HANA,
- BW SAP HANA Modeling Tools (Eclipse)
2 Comments
You must be a registered user to add a comment. If you've already registered, sign in. Otherwise, register and sign in.
Labels in this area
-
"mm02"
1 -
A_PurchaseOrderItem additional fields
1 -
ABAP
1 -
ABAP Extensibility
1 -
ACCOSTRATE
1 -
ACDOCP
1 -
Adding your country in SPRO - Project Administration
1 -
Advance Return Management
1 -
AI and RPA in SAP Upgrades
1 -
API and Integration
1 -
Approval Workflows
1 -
Ariba
1 -
ARM
1 -
ASN
1 -
Asset Management
1 -
Associations in CDS Views
1 -
auditlog
1 -
Authorization
1 -
Availability date
1 -
Azure Center for SAP Solutions
1 -
AzureSentinel
2 -
Bank
1 -
BAPI_SALESORDER_CREATEFROMDAT2
1 -
BRF+
1 -
BRFPLUS
1 -
Bundled Cloud Services
1 -
business participation
1 -
Business Processes
1 -
CAPM
1 -
Carbon
1 -
Cental Finance
1 -
CFIN
1 -
CFIN Document Splitting
1 -
Cloud ALM
1 -
Cloud Integration
1 -
condition contract management
1 -
Connection - The default connection string cannot be used.
1 -
Custom Table Creation
1 -
Customer Screen in Production Order
1 -
Customizing
1 -
Data Quality Management
1 -
Date required
1 -
Decisions
1 -
desafios4hana
1 -
Developing with SAP Integration Suite
2 -
Direct Outbound Delivery
1 -
DMOVE2S4
1 -
EAM
1 -
EDI
3 -
EDI 850
1 -
EDI 856
1 -
edocument
1 -
EHS Product Structure
1 -
Emergency Access Management
1 -
Employee Central Integration (Inc. EC APIs)
1 -
Energy
1 -
EPC
1 -
Financial Operations
1 -
Find
1 -
FINSSKF
1 -
Fiori
1 -
Flexible Workflow
1 -
Gas
1 -
Gen AI enabled SAP Upgrades
1 -
General
1 -
generate_xlsx_file
1 -
Getting Started
1 -
HomogeneousDMO
1 -
How to add new Fields in the Selection Screen Parameter in FBL1H Tcode
1 -
IDOC
2 -
Integration
1 -
Learning Content
2 -
Ledger Combinations in SAP
1 -
LogicApps
2 -
low touchproject
1 -
Maintenance
1 -
management
1 -
Material creation
1 -
Material Management
1 -
MD04
1 -
MD61
1 -
methodology
1 -
Microsoft
2 -
MicrosoftSentinel
2 -
Migration
1 -
mm purchasing
1 -
MRP
1 -
MS Teams
2 -
MT940
1 -
Newcomer
1 -
Notifications
1 -
Oil
1 -
open connectors
1 -
Order Change Log
1 -
ORDERS
2 -
OSS Note 390635
1 -
outbound delivery
1 -
outsourcing
1 -
PCE
1 -
Permit to Work
1 -
PIR Consumption Mode
1 -
PIR's
1 -
PIRs
1 -
PIRs Consumption
1 -
PIRs Reduction
1 -
Plan Independent Requirement
1 -
POSTMAN
1 -
Premium Plus
1 -
pricing
1 -
Primavera P6
1 -
Process Excellence
1 -
Process Management
1 -
Process Order Change Log
1 -
Process purchase requisitions
1 -
Product Information
1 -
Production Order Change Log
1 -
purchase order
1 -
Purchase requisition
1 -
Purchasing Lead Time
1 -
Redwood for SAP Job execution Setup
1 -
RISE with SAP
1 -
RisewithSAP
1 -
Rizing
1 -
S4 Cost Center Planning
1 -
S4 HANA
1 -
S4HANA
3 -
S4HANACloud audit
1 -
Sales and Distribution
1 -
Sales Commission
1 -
sales order
1 -
SAP
2 -
SAP Best Practices
1 -
SAP Build
1 -
SAP Build apps
1 -
SAP CI
1 -
SAP Cloud ALM
1 -
SAP CPI
1 -
SAP CPI (Cloud Platform Integration)
1 -
SAP Data Quality Management
1 -
SAP ERP
1 -
SAP Maintenance resource scheduling
2 -
SAP Note 390635
1 -
SAP S4HANA
2 -
SAP S4HANA Cloud private edition
1 -
SAP Upgrade Automation
1 -
SAP WCM
1 -
SAP Work Clearance Management
1 -
Schedule Agreement
1 -
SDM
1 -
security
2 -
Settlement Management
1 -
soar
2 -
Sourcing and Procurement
1 -
SSIS
1 -
SU01
1 -
SUM2.0SP17
1 -
SUMDMO
1 -
Teams
2 -
Time Management
1 -
User Administration
1 -
User Participation
1 -
Utilities
1 -
va01
1 -
vendor
1 -
vl01n
1 -
vl02n
1 -
WCM
1 -
X12 850
1 -
xlsx_file_abap
1 -
YTD|MTD|QTD in CDs views using Date Function
1
- « Previous
- Next »
Related Content
- What You Need to Know: Security and Compliance when Moving to a Cloud ERP Solution in Enterprise Resource Planning Blogs by SAP
- SAP ERP Functionality for EDI Processing: UoMs Determination for Inbound Orders in Enterprise Resource Planning Blogs by Members
- Migration cockpit - different approach shown for same project in same system different client in Enterprise Resource Planning Q&A
- S4 HANA Cost Center Activity Rate Calculation Hybrid Approach in Enterprise Resource Planning Blogs by Members
- need suggetion for upgrade HANA version in Enterprise Resource Planning Q&A
Top kudoed authors
| User | Count |
|---|---|
| 6 | |
| 2 | |
| 1 | |
| 1 | |
| 1 | |
| 1 | |
| 1 | |
| 1 | |
| 1 | |
| 1 |