
- SAP Community
- Products and Technology
- Technology
- Technology Blogs by SAP
- Welcome to the Library!
Technology Blogs by SAP
Learn how to extend and personalize SAP applications. Follow the SAP technology blog for insights into SAP BTP, ABAP, SAP Analytics Cloud, SAP HANA, and more.
Turn on suggestions
Auto-suggest helps you quickly narrow down your search results by suggesting possible matches as you type.
Showing results for
former_member20
Explorer
Options
- Subscribe to RSS Feed
- Mark as New
- Mark as Read
- Bookmark
- Subscribe
- Printer Friendly Page
- Report Inappropriate Content
07-01-2013
9:44 AM
Hello World!
These are the two words every developer knows best.
First, let me introduce myself. My name is Ilhan Myumyun, a newbie in the fantastic cloud world, with great passion for creating software. When I first opened the documentation of SAP HANA Cloud Platform I thought: ‘Wow, there are 4 services (persistence, connectivity, document and identity service) + the mail configurations. It will take some time before I get to code…’. But it turned out that I was absolutely wrong :smile: .
Now, I am presenting you what I have developed. After carefully reading the documentation, as well as playing around with one great sample – Paul the Octopus (which is a really nice work by the way), I made an app that is far away from being just a Hello World! application. And the best part is that it uses all the SAP HANA Cloud Platform services. And even better – it took me less than three weeks. (Bear in mind that I am still a student who attends classes, studies for exams, and in addition, I’m fighting against crime during the night, dressed like a superhero!..Well, OK, the superhero thing – not true :smile: ). But I am not only an enthusiast- my goal is to incorporate every new feature of the platform in this application.
Well, after this humble and “short” introduction, let’s take a look at the very application. It’s a library application.
How it works?
- The library users authenticate themselves using the identity service. It allows Single Sign on (SSO), which is another great feature.
- The books’ status and features are persisted using the persistence Service.
- You are able to see a book’s details via the set ISBN number (setting the ISBN is optional) – this is achieved due to the connectivity service.
- The e-mails you will receive, when reserving and returning books to the library, are provided by the means of the mail configurations.
- When the user uploads his/her profile image, it is saved into the document repository, provided by the document service.
I guess you can’t wait to see some code. You can find it here.
How to run this app?
Let’s take a tour from downloading the source to having the application up and running.
- To run the application, you need to download the latest Java Web SDK.
- This is a Maven project. You will need the m2e plug-in for Eclipse as well as m2e-wtp (installable from the Eclipse Marketplace).
- Open your Eclipse IDE, with SAP HANA Cloud tools already installed (you can get them from here).
- Import the project as Existing Maven Project. Here a manual step is also required.
- Go to your computer’s properties -> Advanced System Settings -> Environment Variables.
- Create a new system variable named “NW_CLOUD_SDK_PATH”.
- Enter the path to the downloaded SAP HANA Cloud SDK.
- Create a new server - either a local one or on SAP HANA Cloud. Double-click on the server and go the Connectivity tab. Here you are going to create a destination that is used by the connectivity service, which extracts book details from an exposed REST service, provided by Open Library.
- For the destination name, enter OpenLibrary (it is also described in the web.xml file as <resource-ref> tag) and the type of the destination should be HTTP.
- Click OK.

7. You need to enter some more properties:
- URL – it is mandatory and it points to http://openlibrary.org/.
- ProxyType should be set to Internet (for the application consumes Internet connectivty).
 (Hint: you can simply import the destination that is located in the src/main/resources)
For the mail configurations you need a Mail destination (only if running the application on SAP HANA Cloud. In the local server scenario you will receive the messages on your local file system, folder: /Servers/<your server name>-config/work/mailservice and you don’t need a Mail destination)
- Double-click on the server and go to the Connectivity tab.
- Create a new destination with type MAIL.
- Name the destination Session.
- You will have to also provide some additional properties. See the screenshot below:


(Hint: you can simply import the destination that is located in the src/main/resources and fill in the required data)
If you have chosen to create a local server instead of one on SAP HANA Cloud, you will need to add local users:
- Double-click on the server and go to the Users tab.
- Create as many users as you wish and for each of them, enter the required properties. This Library Sample application works with two types of users:
- Users who only reserve books (customers)
- Users who are allowed to edit a book’s info, remove books from the library and register the event of a customer who returns his/her book to the library.
Those users have got roles respectively Everyone and admin.
3. Assign the desired roles to your local users.
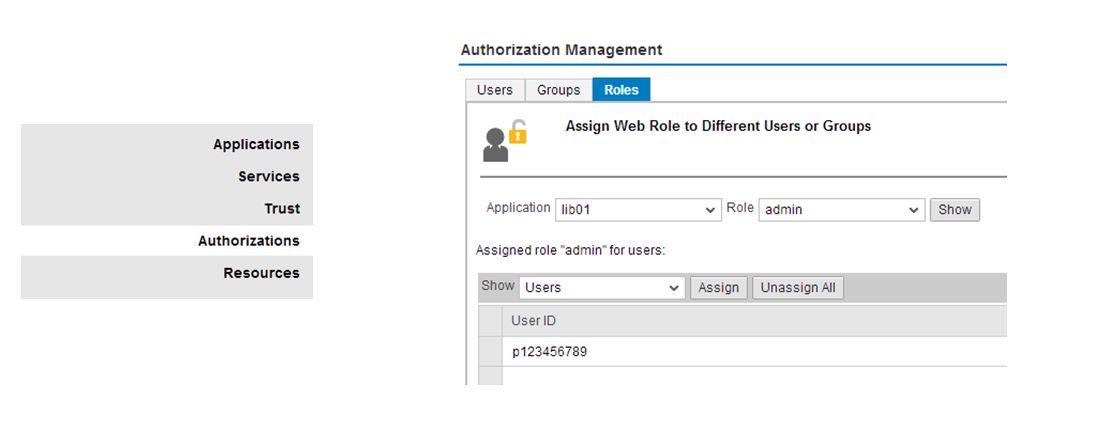
If you are running this sample on SAP HANA Cloud and you would like to assign an admin role to a particular user, you have to use SAP HANA Cloud Cockpit:
- Logon to the cockpit and go to Authorizations (located on the left side of the screen).
- Go to Roles tab
- Choose an application from the first dropdown box.
- Select ‘admin’ from the second dropdown box.
- Then, assign the user the corresponding admin role.
If you have chosen to create a local server and you work behind a proxy, you need the following properties added to your VM arguments in the run configurations:
-Dhttp.proxyHost=<yourproxyHost> -Dhttp.proxyPort=<yourProxyPort>
-Dhttps.proxyHost=<yourproxyHost> -Dhttps.proxyPort=<yourProxyPort>
You also need mongodb in the local scenario to store your profile images via the document service. You can download mongodb from here: http://www.mongodb.org/downloads. Unpack the downloaded archive and run the following command: mongod --dbpath C:\mongodb_data, where "C:\mongodb_data" is an empty directory.
Now, the most pleasant part: Right-click on the project, then choose Run As -> Run on Server and select the server you have just created.
NOTE: If the option Run on Server is not in the menu, then right-click on the project -> Properties -> Project Facets and make sure the Dynamic Web Module is checked and its version is 2.5.
And you are ready! :smile:
Let’s open the application’s URL in the browser and sign in. First, we will get familiar with the screens an ordinary customer (role Everyone) can see:
- User with role Everyone
- The Library view – here the user can see all the books available in the library. Since this sample application only supports (for the current moment) one copy of every book, it displays who is the person who has borrowed it, as well as when the book is supposed to be returned to the library (3rd and 4th columns in the table). The first two columns are Title and Author. The title is a bit more interesting – if an ISBN number is entered while initially adding the book to the library, the application connects to the Open Library’s REST service and extracts some data. If an ISBN is not specified, the link is disabled. Setting ISBN is optional.

Below you can see details of the book “Zorro” by Johnston McCulley. The cover of the book is displayed, as well as some additional information and a link to the book in Open Library:

The 5th column of this table shows the overall rating of the book. The 6th column, named Action, contains two buttons. Reserve button with which the user can reserve the desired book, of course if it is not already reserved. You can use the "Return" button wich makes the book available for reserving again. It is disabled, if the book is not reserved.
- My Books view

Here, the user can see the books that he/she has borrowed from the library, the remaining days before the book should be returned (by default the period is 30 days) and in the 4th column the user can rate the book.
- My Profile view
Initially, the default image is displayed + some basic user information available from the identity service.

The user can click on the Browse button, select a different image and it will be set as profile picture. The image itself is stored into the document service repository.
The user can click on the Edit button and change some data (the user cannot upload images before the changes are saved). There is a client side validation that checks the user’s input (e.g. phone should be in a special format, not as free text). If the input is not correct, the Save button is disabled:

After the input is correct, the changes can be saved:

2. Now let’s see what an admin user can see:

In the Library view there are two additional buttons in Action column - Edit and Remove. The Edit button is enabled if the book is not reserved. If there is a typo in the title or author, the admin can fix this error via clicking this button. If the admin decides that a certain book will no longer be available for customers, he/she can easily remove it by the Remove button (also enabled if the book is not reserved). With the Return button the admin sets the book available for other customers to borrow it.
There is another button below the table – Add New Books. With this button the admin can add more books to the library. There are three fields that can be filled with input – ISBN, title and author. The first one is not mandatory because this application is only a sample, and there are not many people who are going to search over the Internet for the right ISBN number for the book they want to add. So it is possible to add a book without an ISBN. The second two are mandatory. Of course, I have prepared some predefined books that have got ISBNs as well. The link with thetitle is only enabled if ISBN is provided. See the screenshots below:

Here, the client side validation reminds the user that Author should be typed as well before clicking on the Save button. You can also use the predefined books:

Finally, there is additional tab, named All Users. The admin can chek the users that ever used the Library application.
Their e-mails are also available, so the admin can write to someone, if he needs to. For example, if some of the users forgot to return their books in time.

Log out functionality is also provided. After the user signs out, then he/she is redirected to another view:

From here he/she can sign in again and use this sample application.
So…
Do you like the app? Be prepared! My plans are to incorporate every new feature of SAP HANA Cloud Platform into this sample application and to demonstrate it to you in a fascinating way.
- SAP Managed Tags:
- SAP Business Technology Platform
12 Comments
You must be a registered user to add a comment. If you've already registered, sign in. Otherwise, register and sign in.
Labels in this area
-
ABAP CDS Views - CDC (Change Data Capture)
2 -
AI
1 -
Analyze Workload Data
1 -
BTP
1 -
Business and IT Integration
2 -
Business application stu
1 -
Business Technology Platform
1 -
Business Trends
1,658 -
Business Trends
132 -
CAP
1 -
cf
1 -
Cloud Foundry
1 -
Confluent
1 -
Customer COE Basics and Fundamentals
1 -
Customer COE Latest and Greatest
3 -
Customer Data Browser app
1 -
Data Analysis Tool
1 -
data migration
1 -
data transfer
1 -
Datasphere
2 -
Event Information
1,400 -
Event Information
95 -
Expert
1 -
Expert Insights
177 -
Expert Insights
431 -
General
2 -
Getting Started
1 -
Google cloud
1 -
Google Next'24
1 -
GraphQL
1 -
Kafka
1 -
Life at SAP
780 -
Life at SAP
18 -
Migrate your Data App
1 -
MTA
1 -
Network Performance Analysis
1 -
NodeJS
1 -
PDF
1 -
POC
1 -
Product Updates
4,571 -
Product Updates
479 -
Replication Flow
1 -
REST API
1 -
RisewithSAP
1 -
SAP BTP
1 -
SAP BTP Cloud Foundry
1 -
SAP Cloud ALM
1 -
SAP Cloud Application Programming Model
1 -
SAP Datasphere
2 -
SAP S4HANA Cloud
1 -
SAP S4HANA Migration Cockpit
1 -
Technology Updates
6,868 -
Technology Updates
561 -
Workload Fluctuations
1
Related Content
- Camera Access permission on Attachment Control in Technology Q&A
- XLSX external library working fine in BAS but not working in Fiori Launchpad in Technology Q&A
- Taming Text: A Guide to SAP Predicate and String Functions in Technology Blogs by Members
- Run Turi Create (or any x86_64 lib) on Apple Silicon architecture in Technology Blogs by SAP
- Using Ragas with AI core + other metrics to evaluate LLMs in Technology Blogs by SAP
Top kudoed authors
| User | Count |
|---|---|
| 21 | |
| 13 | |
| 10 | |
| 10 | |
| 9 | |
| 9 | |
| 8 | |
| 7 | |
| 7 | |
| 7 |