

- SAP Community
- Products and Technology
- Technology
- Technology Blogs by SAP
- TMS - Transport SAP Cloud Integration (CI/CPI) Con...
Technology Blogs by SAP
Learn how to extend and personalize SAP applications. Follow the SAP technology blog for insights into SAP BTP, ABAP, SAP Analytics Cloud, SAP HANA, and more.
Turn on suggestions
Auto-suggest helps you quickly narrow down your search results by suggesting possible matches as you type.
Showing results for
Product and Topic Expert
Options
- Subscribe to RSS Feed
- Mark as New
- Mark as Read
- Bookmark
- Subscribe
- Printer Friendly Page
- Report Inappropriate Content
03-25-2022
9:29 AM
Series – TMS:
- Transport Content Archives on Local File Systems with Transport Management Service (TMS)
- SAP CI/CD Integration with Transport Management Service (TMS)
- Transport SAP Cloud Integration (CI/CPI) Content with Transport Management Service (TMS) and Content...
- Use Transport Management Service (TMS) API
Before having Content Agent service (CAS), the only way to transport integration content artifacts between integration tenants in the CF environment was to manually export and import them. This changes with the introduction of the SAP Content Agent service.
Content Agent service is a Cloud Foundry-based utility service. It acts like an agent that allows you to assemble the integration content and also export it to the transport queue using transport solutions like SAP Cloud Transport Management or the Enhanced Change and Transport System (CTS+). This is equivalent to the assembly and export functionality provided by Solution Lifecycle Management Service in the Neo Environment.
The following sample configuration describes the scenario: Transport SAP Cloud Integration (CI/CPI) Content with Transport Management Service (TMS) and Content Agent Service (CAS). You have different subaccounts, for example, a DEV subaccount, a TEST subaccount, and a PROD subaccount, and each subaccount has a CPI tenant. You want to transport the content archives of the source DEV subaccount to the target TEST subaccount and further PROD account.

Prerequisites
- Three separate subaccounts (for DEV Node, TEST Node, and PROD Node)
- Integration content (a package, for example)
- Entitlements:
- Integration Suite, Cloud Integration (for each subaccount)ServicePlanCategory
Process Integration (any) Application Process Integration Runtime api Service
- Integration Suite, Cloud Integration (for each subaccount)ServicePlanCategory
Transport Management Service (can be provisioned to any single subaccount, called TMS subaccount in this post):
ServicePlanCategoryCloud Transport Management standard Service Cloud Transport Management standard (Application) Application
Content Agent Service (can be provisioned to any single one subaccount, called CAS subaccount in this post, where should have a destination for CI and TMS configured)
ServicePlanCategoryContent Agent Service standard Service
Configuration Entries
- Transport Destination for TEST Node and PROD Node (TMS subaccount)
- Transport Node for DEV Node, TEST Node, and PROD Node (TMS subaccount)
- Transport Route between DEV Node, TEST Node, and PROD Node (TMS subaccount)
- A Destination pointing to the CAS Service (DEV subaccount)
- A Destination pointing to the CI Service (CAS subaccount)
- A Destination pointing to the TMS Service (CAS subaccount)
TMS and CAS can be provisioned to any single one subaccount. In this post, for convenience, you can place them together, for example, DEV subaccount.
Step 1: Set Up the TMS Environment (TMS subaccount)
Please follow this guide to set up your TMS environment: https://help.sap.com/viewer/7f7160ec0d8546c6b3eab72fb5ad6fd8/Cloud/en-US/8d9490792ed14f1bbf8a6ac08a6...
Then, in order to enable TMS transport configuration in CI tenant, you should have the Role AuthGroup.Administrator assigned. Besides, in order to see the Transport button in CI tenant to trigger the whole transport process, you should ensure the Role WorkspacePackagesTransport assigned to yourself as well:

You can either add this Role to your existed Role Collection, or add it into a new one.
Step 2: Configure Destinations for Deployment (TMS subaccount)
In SAP Cloud Transport Management, transport destinations are used to address the target endpoint of a deployment process, so transport destinations (for deployment) need to be set for each node that is planned to deploy the content. In this scenario, we should configure transport destinations for both TEST Node and PROD Node.
Create Destination for TEST Node
In SAP BTP Cockpit of the subaccount with TMS provisioned, choose Connectivity -> Destinations -> New Destination .

Fill in with the following information:
FieldValueDescription
| Name | Test_Node | For example. |
| Type | HTTP | |
| URL | https://deploy-service.cfapps.<default-domain>/slprot/<myorg>/<myspace>/slp. | As a result, the CI content (MTA) is deployed into the space <myspace> of the organization <myorg>. The default domain can be found in the API Endpoint. For example (BTP@AliCloud): https://deploy-service.cfapps.cn40.platform.sapcloud.cn/slprot/beta-support_testagain-75bwmerz/tms/s... |
| Authentication | BasicAuthentication | |
| User | Specify the name of the technical user that is used for the deployment. The technical user used for the destination must be a valid user on Cloud Foundry environment, and it must have the role SpaceDeveloper in the target space. | |
| Password |
For example:

Click Save.
Click Check Connection, it will return 200: OK

For more details, please read: Create Transport Destinations
Create Destination for PROD Node
The same as above.
For example:

Step 3: Configure Transport Nodes (TMS Subaccount)
In Cloud Transport Management, transport nodes represent the source and target endpoints of a deployment process - for example, a Cloud Foundry subaccount. Transports take place between transport nodes.
Create DEV Node
Make sure you have one of the roles Administrator or LandscapeOperator assigned to your user.
You have the following options to create transport nodes:
- Choose Landscape Visualization from the navigation pane, and then click button + (Create a Node).
- Choose Landscape Wizard from the navigation pane, then select a template for your landscape, and create your transport nodes as part of the process.
- Choose Transport Nodes from the navigation pane, and click button + (Create a new node).

In this post, we create node with option Transport Nodes.
Open the Transport Management home screen:

Navigate to Transport Nodes, click button + (Create a new node):

Only provide the name, description, and check the checkbox of Allow Upload to Node. Leave everything else as empty (by default) and click OK. This will act as your source transport node.

For more details, please read: Create Transport Nodes
Create TEST Node
Create a new one and fill it in with the following information:

We need to set the Destination so as to deploy the CI content into corresponding tenant.
Create PROD Node
Create a new one and fill it in with the following information:

We need to set the Destination so as to deploy the CI content into corresponding tenant.
Step 4: Configure Transport Routes (TMS Subaccount)
You can use the same transport node as a source node for multiple transport routes. However, you can use the same transport node only once as a target node for a transport route.
You have the following options to create transport nodes:
- Choose Landscape Visualization from the navigation pane, and then choose to Create a Route, or select a transport node and choose to Create Route from the side menu.
- Choose Landscape Wizard from the navigation pane, then select a template for your landscape, and create your transport routes as part of the process.
- Choose Transport Routes from the navigation pane, and choose to Create a route.

In this post, we create a node with the option Transport Routes.
Create Transport Route between DEV Node and TEST Node
On your SAP Cloud Transport Management home screen, click button + (Create a route):

Fill in with the following information:

Click OK.
For more details, please read: Create Transport Routes
Create Transport Route between TEST Node and PROD Node
The same as above.
For example:

Step 5: Create Instance and Service Key of CAS Service (CAS subaccount)
Under anyone subaccount, create a CAS instance and a service key:

For more details, please read: Create Instance and Create Service Key
Step 6: Create Destination Pointing to CAS Service (DEV subaccount)
In SAP BTP Cockpit of the source DEV subaccount, choose Connectivity -> Destinations -> New Destination.
Fill in with the following information:
FieldDescription
| Name | Provide value as ContentAssemblyService. Please note that this value is case-sensitive. |
| Type | HTTP |
| Description | You can provide a description for your reference. This field is optional. |
| URL | Provide the URL from the service key details. |
| Proxy Type | Internet |
| Authentication | OAuth2ClientCredentials |
| Client ID | Provide the client ID from the service key details. |
| Client Secret | Enter the client secret. |
| Token Service URL | Provide the URL from the service key details. Note: Append the value oauth/token to the Token Service URL. |
| Token Service User | No inputs required. |
| Token Service Password | No inputs required. |
For example:

If you check the connection, you can ignore response 401.
For more details, please read: Create SAP Content Agent Service Destination
Step 7: Create Instance and Service Key of CI Service (DEV subaccount)
Under your DEV subaccount, create an instance of Process Integration Runtime, plan api with Role WorkspacePackagesTransport:

Create a service key for the instance:

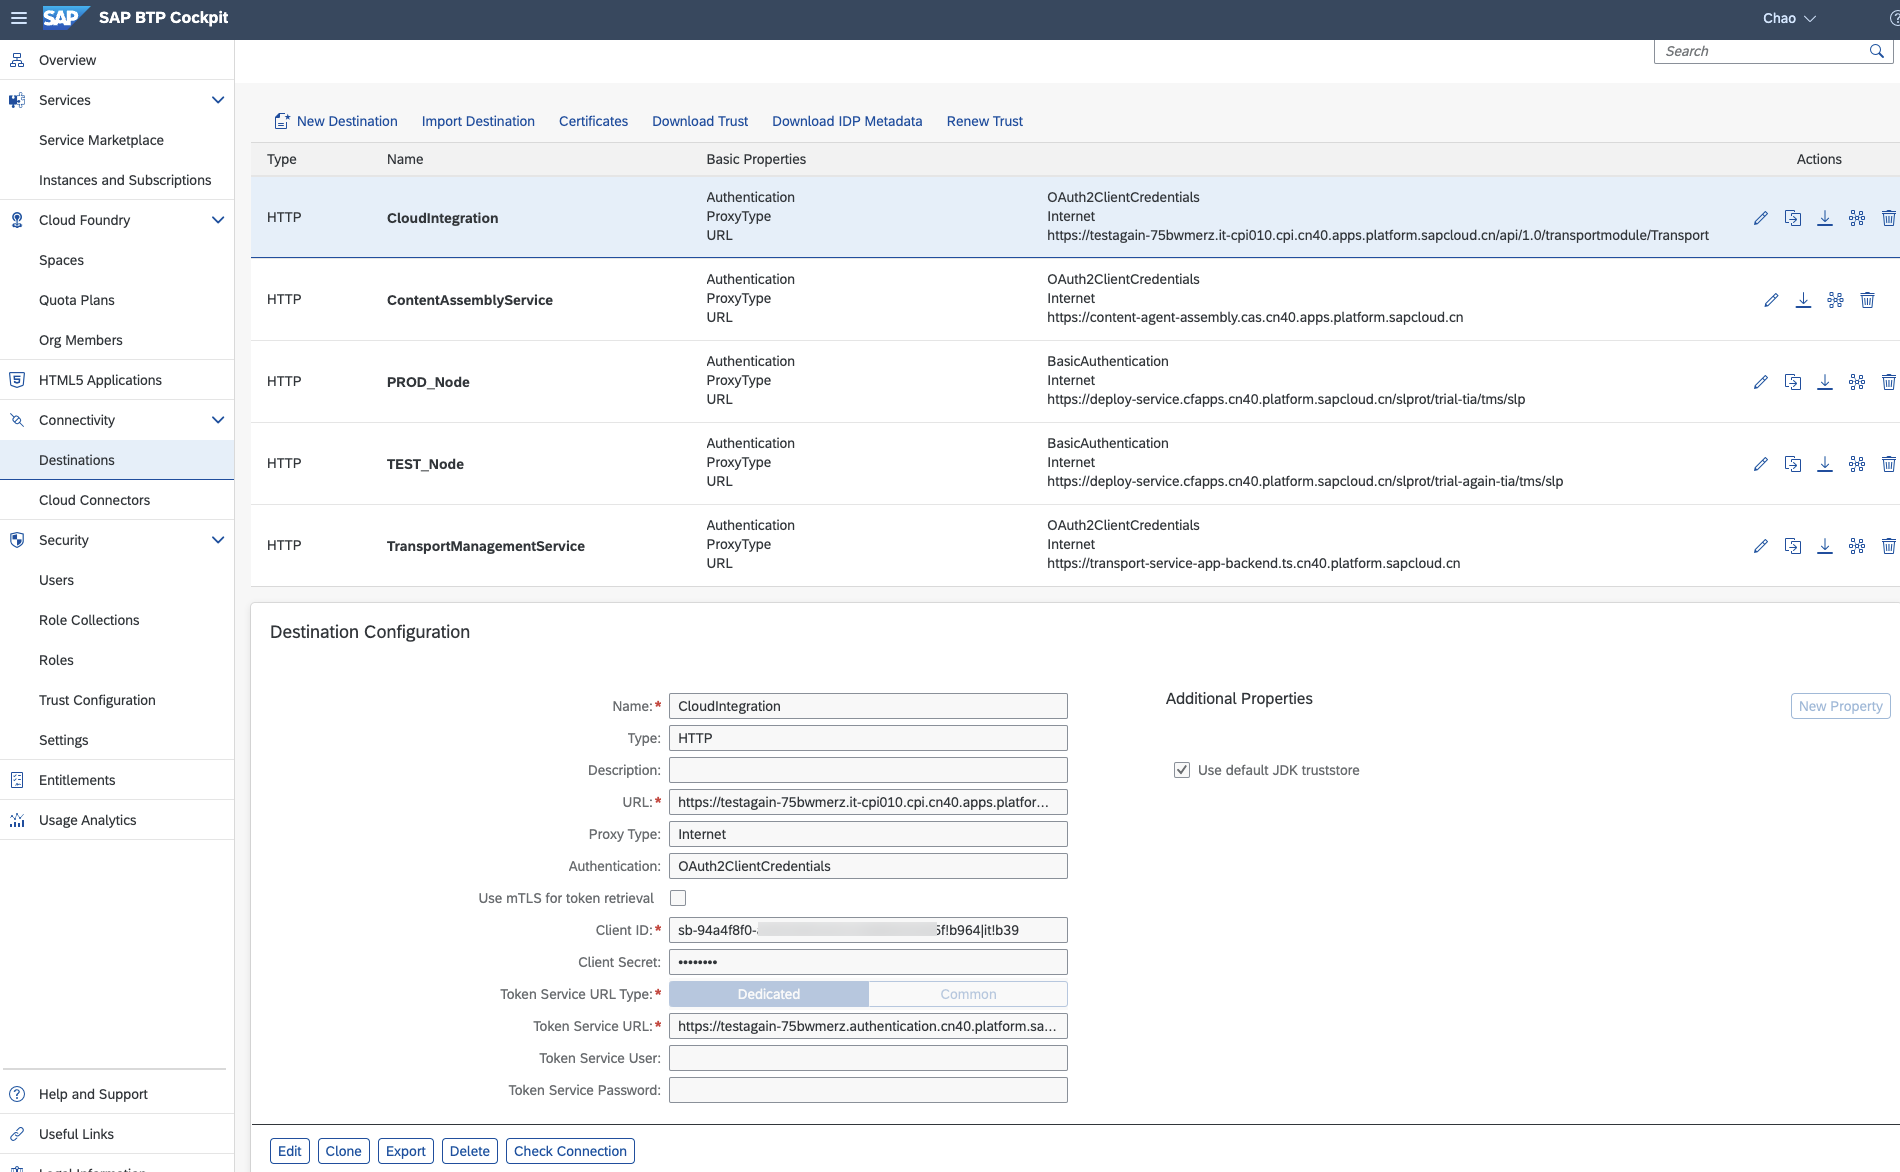
Step 8: Create Destination Pointing to CI Service (CAS subaccount)
In SAP BTP Cockpit of the subaccount with CAS provisioned, choose Connectivity -> Destinations -> New Destination.
Fill in with the following information:
FieldDescription
| Name | Provide value as CloudIntegration.This value is case-sensitive. |
| Type | HTTP |
| Description | You can provide a description for your reference. This field is optional. |
| URL | Provide the URL of the system that you want a create a destination to.The format is: <oauth → url>/api/1.0/transportmodule/Transport. |
| Proxy Type | Internet |
| Authentication | OAuth2ClientCredentials |
| Client ID | Provide the value of the uaa → clientid field from the service key. |
| Client Secret | Provide the value of the uaa → clientsecret field from the service key. |
| Token Service URL | Provide the value of the tokenurl field from the service key. |
| Token Service User | No inputs required. |
| Token Service Password | No inputs required. |
For example:
If you check the connection, you can ignore response 401. You can check the connection later in the CI tenant.
For more details, please read: Create SAP Cloud Integration Destination
Step 9: Create Destination Pointing to TMS Service (CAS subaccount)
In SAP BTP Cockpit of the subaccount with TMS provisioned, choose Connectivity -> Destinations -> New Destination.
Fill in with the following information:
FieldDescription
| Name | Provide value as TransportManagementService. Please note that this value is case-sensitive. |
| Type | HTTP |
| Description | You can provide a description for your reference. This field is optional. |
| URL | Provide the URL from the service key details. |
| Proxy Type | Internet |
| Authentication | OAuth2ClientCredentials |
| Client ID | Provide the client ID from the service key details. |
| Client Secret | Enter the password |
| Token Service URL | Provide the URL from the service key details. |
| Token Service User | No inputs required |
| Token Service Password | No inputs required |
| Additional Properties | sourceSystemId: Enter the ID of the source node of the transport route, for example, DEV_Node. |
You can check the sourceSystemId in the TMS tenant:

For example:

If you check the connection, you can ignore response 401. You can check the connection later in the CI tenant.
For more details, please read: Export using SAP Cloud Transport Management
Step 10: Configure Transport Mode in CI Service (DEV subaccount)
Log into your CI tenant as an administrator.
Click on Settings -> Transport, click on Edit (bottom right corner), and then set Transport mode to Transport Management Service and Save.
Note: To enable this setting AuthGroup.Administrator role required.
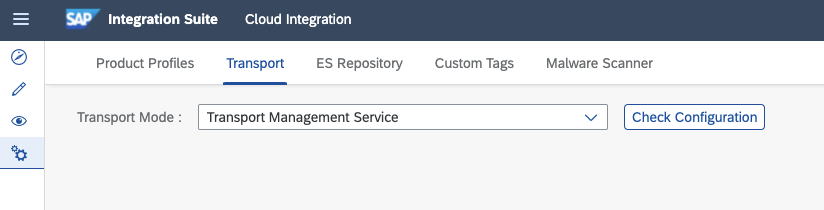
Click Check Configuration to check the necessary configuration behind including both destinations pointing to CI service and TMS service. You will get results as below if your destinations are correctly configured:

Step 11: Test (DEV subaccount)
Trigger Transport Process
Open the CI package that you want to transport and click the trigger button Transport in the upper right corner.

Fill in comments for this transport and click Transport:

If your content is successfully exported as an MTAR file by CAS service, it will return a message as below:

You can check the status in the TMS tenant:

Import to TEST Node and Transport to PROD Node
In the TMS service, the export process of DEV_Node will create a transport request and attach the content archive into the import queue of the target node, in this case, namely TEST_Node. Then, the administrator can manually trigger the import process to transport the content archive into the TEST subaccount. As a result, the CI package will be available in the CI tenant of the TEST subaccount, and at the same time, the content archive will be transported to the import queue of the next node PROD_Node.
Go into the TEST_Node, select the transport request, and click Import Selected, the content archive will be imported (deployed) into the TEST subaccount and immediately transported into the PROD_Node:

Confirm the execution again by clicking OK:

If this action is executed successfully, it means the application has been successfully deployed into the CI tenant of the TEST subaccount. At the same time, the content archive has been transported to the import queue of the PROD_Node.

Check the package in the CI tenant of the TEST subaccount:

Import to PROD Node
Repeat the operations exactly the same as you do for the TEST_Node. Then the content will be transported further into the next CI tenant.
Step 12: More Options to Transport CI Content with CAS
SAP Content Agent service enables you to assemble the content from the content providers (for example, CI service, API Management, etc.) in MTAR format. Later, this content is either available for download or exported to the configured transport queue, such as Change and Transport System (CTS+) or SAP Cloud Transport Management.
In another word, CI and CAS provide three options of Transport Mode for you to configure. In this post, we transport the content with the mode Transport Management Service.
The three options of Transport Mode in CI service:

- CTS+ Direct: For more details, you can read: Export Using Change Management System (CTS) Destination
- MTAR Download: You can download the MTAR file locally and do further deployment or transportation manually.
- Transport Management Service: This can be achieved by performing all the above steps.

For more details, please read: Content Assembly and Export
Reference
Help Portal - Enabling Content Transport, Cloud Foundry Environment
Labels:
10 Comments
You must be a registered user to add a comment. If you've already registered, sign in. Otherwise, register and sign in.
Labels in this area
-
ABAP CDS Views - CDC (Change Data Capture)
2 -
AI
1 -
Analyze Workload Data
1 -
BTP
1 -
Business and IT Integration
2 -
Business application stu
1 -
Business Technology Platform
1 -
Business Trends
1,658 -
Business Trends
132 -
CAP
1 -
cf
1 -
Cloud Foundry
1 -
Confluent
1 -
Customer COE Basics and Fundamentals
1 -
Customer COE Latest and Greatest
3 -
Customer Data Browser app
1 -
Data Analysis Tool
1 -
data migration
1 -
data transfer
1 -
Datasphere
2 -
Event Information
1,400 -
Event Information
95 -
Expert
1 -
Expert Insights
177 -
Expert Insights
431 -
General
2 -
Getting Started
1 -
Google cloud
1 -
Google Next'24
1 -
GraphQL
1 -
Kafka
1 -
Life at SAP
780 -
Life at SAP
18 -
Migrate your Data App
1 -
MTA
1 -
Network Performance Analysis
1 -
NodeJS
1 -
PDF
1 -
POC
1 -
Product Updates
4,571 -
Product Updates
480 -
Replication Flow
1 -
REST API
1 -
RisewithSAP
1 -
SAP BTP
1 -
SAP BTP Cloud Foundry
1 -
SAP Cloud ALM
1 -
SAP Cloud Application Programming Model
1 -
SAP Datasphere
2 -
SAP S4HANA Cloud
1 -
SAP S4HANA Migration Cockpit
1 -
Technology Updates
6,868 -
Technology Updates
562 -
Workload Fluctuations
1
Related Content
- Leveraging Artificial Intelligence for SAP Analytics Cloud Planning:Revolutionizing BOM Optimization in Technology Blogs by Members
- Meet your new friend EMIS: Event Mesh in SAP Integration Suite in Technology Blogs by SAP
- What’s New in SAP Analytics Cloud Release 2024.12 in Technology Blogs by SAP
- What happened to the uploaded cards in Work Zone and Why? in Technology Blogs by SAP
- SAP Data and Analytics Forum 12.-13.11.2024 in Technology Blogs by SAP
Top kudoed authors
| User | Count |
|---|---|
| 21 | |
| 13 | |
| 10 | |
| 10 | |
| 9 | |
| 8 | |
| 7 | |
| 7 | |
| 7 | |
| 7 |