
- SAP Community
- Products and Technology
- Technology
- Technology Blogs by SAP
- SAP Cloud Integration - Prinicpal Propagation to B...
Technology Blogs by SAP
Learn how to extend and personalize SAP applications. Follow the SAP technology blog for insights into SAP BTP, ABAP, SAP Analytics Cloud, SAP HANA, and more.
Turn on suggestions
Auto-suggest helps you quickly narrow down your search results by suggesting possible matches as you type.
Showing results for
ruchir_sinha
Participant
Options
- Subscribe to RSS Feed
- Mark as New
- Mark as Read
- Bookmark
- Subscribe
- Printer Friendly Page
- Report Inappropriate Content
09-17-2021
1:08 PM
1. Introduction
With the 5.25.x/6.17.x release, SAP Cloud Integration provides the support of Principal Propagation for the RFC adapter for Neo & CF versions. See RFC Principal Propagation.
This blog explains on how to make use of this enhancement.
2. Overview
The below diagram depicts that a BTP user can pass the identity to the backend ABAP system via SAP Cloud Integration application (RFC Adapter) and SAP Cloud Connector.

The Connectivity service in the SAP BTP cocpit provides a secure way of forwarding the identity of a cloud user to the Cloud Connector, and from there to an on-premise system. This process is called principal propagation
It uses a SAML token as exchange format for the user information. User mapping is done in the back end. The token is forwarded either directly, or an X.509 certificate is generated, which is then used in the backend.
3. Using the Principal Propagation Property in Destinations
You can create and configure connectivity destinations using the PrincipalPropagation property in the Eclipse IDE and in the cockpit. Keep in mind that this property is only available for destination configurations created in the cloud.
As we specifically perform our configuration/testing based on RFC, lets look at how its done
- Create RFC destinations in the Destinations editor (SAP BTP cockpit)

- Click on New Destination

- Fill in the details for RFC enabled for Principal Propagation

a – provide a generic but logical name for the destination for the backend system that you want to reach from cockpit
b – configure properties, note that jco.destination.auth_type = PrincipalPropagation is mandatory when you want to use Principal Propagation. Also provide the hostname, client number and system number
c – Location ID should correspond to the master instance cloud connector name (this cloud connector instance must also have the backend system defined for the cloud platform subaccount)

Verify and save the Destination and do a connection check by clicking on Check Connection button. If the system details are correct and cloud connector is connected, you would see the Success message

For more details on RFCs, please refer to Create and Delete Destinations on the Cloud
4. Configuring Principal Propagation
4.1 Set Up Trust for Principal Propagation
Establish trust to an identity provider to support principal propagation. Please note that besides Neo/CF, you will need to perform certain set of tasks mentioned below, on your Cloud Connector and backend ABAP System
4.1.1 Configure an On-Premise System for Principal Propagation
Since this document primarily focusses on Principal Propagation to backend ABAP system through RFC, SNC setup on the ABAP System is mandatory
Click here for more information on configuring SNC for ABAP system. Ensure SAP Cryptographic library is installed as a pre-requisite. Refer to Installing the SAP Cryptographic Library on the AS ABAP
You may also use transaction SNCWIZARD in the backend ABAP system to configure SNC. For more details, please click here. But only use this link to run the SNCWIZARD for SNC configuration, you do not have to worry about SPNego Configuration or Kerberos credentials here.
Once you have configured SNC with required parameters settings and SNC PSE, you can run transaction SNCCONFIG to validate these on your ABAP backend system

NOTE – the above configuration would require an ABAP application server restart
It is recommended that you always sign the SNC certificate/id with a trusted CA. The pse maintenance can be done using transaction STRUST.

Please note that own certificate or SNC id will correspond to the name of SNC id that was given while executing the SNCWIZARD or value for profile parameter snc/identity/as
From Trust Manager (transaction code STRUST), you can sign the SNC own certificate for an SAP System by your trusted CA. Please use the Create Certificate Request and Import Certificate Response to perform this task.
This PSE will be your place holder for establishing trust between backend AS ABAP and other applications (say cloud connector) to import/add their respective SNC certificates into this SNC PSE
For further details, refer to Configure Principal Propagation for RFC
4.1.2 Add backend AS ABAP System in the Cloud Connector
Login to cloud connector admin console https://<host_name>:8443

a – Choose your subaccount
b – Choose Cloud to On-Premise
c – Click on ‘+’ sign to add the system
For e.g. as the backend system in our scenario is AS ABAP, select ABAP System from the list


Summary screen –

Click on Finish to Add the ABAP System. Ensure that you have used correct information and all details correspond to the abap system for which we did the SNC configuration in the previous section
Also Edit the System details now in Cloud connector and ensure the correct SNC name is added to the details

4.1.3 Configure Trusted Entities in the Cloud Connector
You perform trust configuration to support principal propagation. By default, the Cloud Connector does not trust any entity that issues tokens for principal propagation. Therefore, the list of trusted identity providers is empty by default. If you decide to use the principal propagation feature, you must establish trust to at least one identity provider. Currently, SAML2 identity providers are supported. You can configure trust to one or more SAML2 IdP per subaccount. After you've configured trust in the cockpit for your subaccount, for example, to your own company's identity provider(s), you can synchronize this list with your Cloud Connector.
From your subaccount menu, choose Cloud to On-Premise and go to the Principal Propagation tab. Choose the Synchronize button to store the list of existing identity providers locally in your Cloud Connector.
To perform this task, Login to cloud connector admin console https://<host_name>:8443 , Choose your sub-account, --> Cloud To On-Premise --> Principal Propagation

! Note
Whenever you update the SAML IdP configuration for a subaccount on cloud side, you must synchronize the trusted entities in the Cloud Connector. Otherwise the validation of the forwarded SAML assertion will fail with an exception containing an exception message similar to this: Caused by: com.sap.engine.lib.xml.signature.SignatureException: Unable to validate signature -> java.security.SignatureException: Signature decryption error: javax.crypto.BadPaddingException: Invalid PKCS#1 padding: encrypted message and modulus lengths do not match!.
4.1.4 Configure a CA Certificate for Principal Propagation
Create certificate signing requests for – System Certificate , CA Certificate
Login to Cloud connector -> Connector -> Configuration -> On Premise

Navigate to CA Certificate and click on Generate a certificate signing request

On the pop-up dialog box, fill in the required details and sign the CSR from your trusted CA and import it back into the cloud connector CA certificate section, using the import button
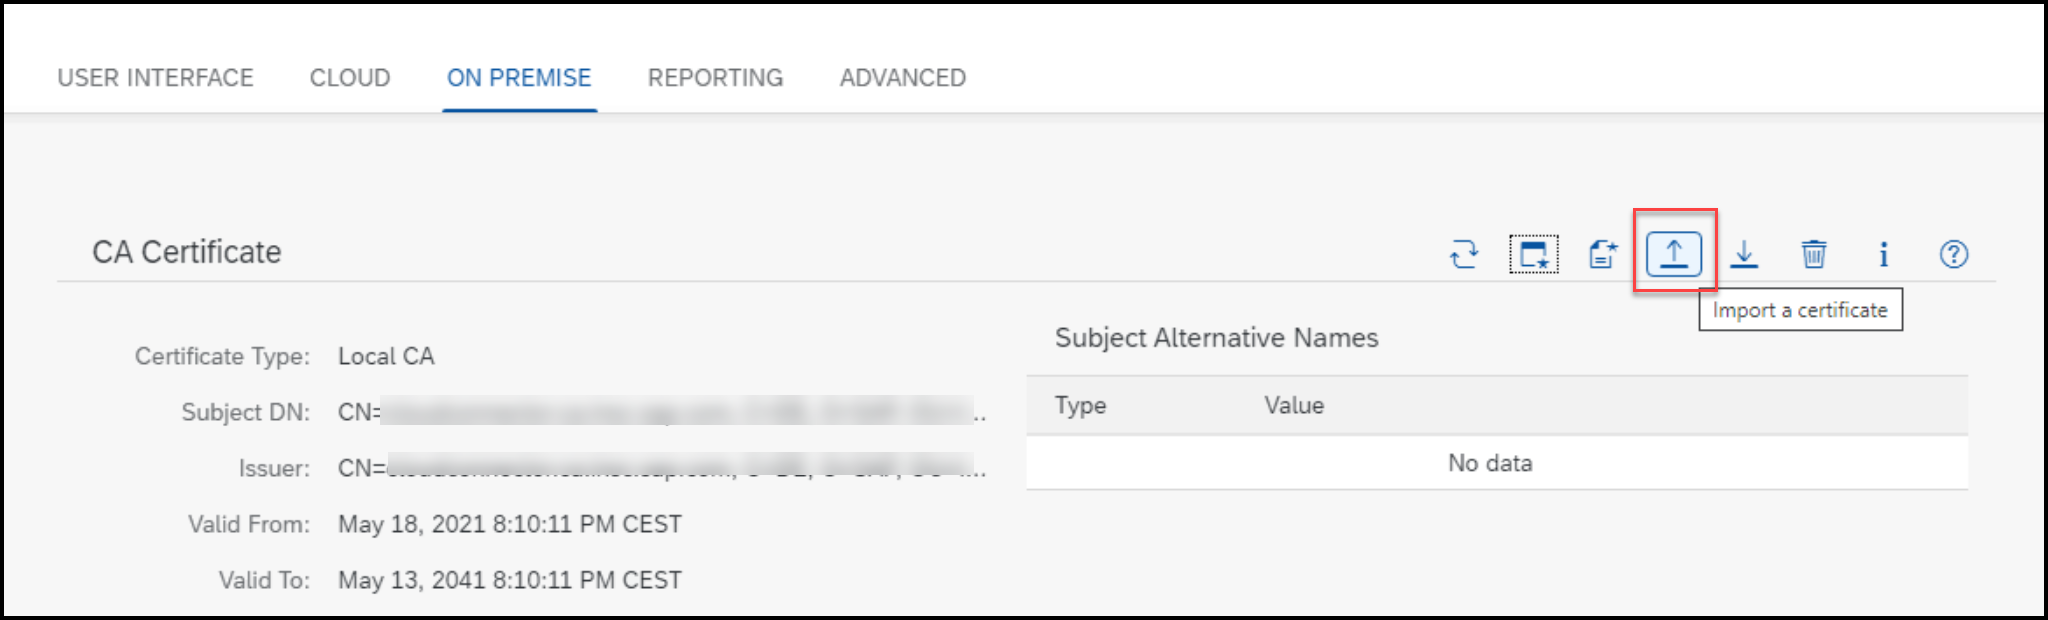
For more details, click here
4.1.5 Configure System Certificate in Cloud Connector


4.1.6 Additional Mandatory Parameters on Backend AS ABAP System
Please set the below parameters in the instance profile for your backend AS ABAP system
Parameter Name | Parameter Value | Comments |
| login/certificate_mapping_rulebased | 1 | Support user mapping via transaction CERTRULE. |
| icm/HTTPS/verify_client | 1 | Enable authentication via X.509 certificates. Value 1 means "The server asks the client to produce a certificate. If the client does not send a certificate, authentication is carried out by another method, for example, basic (default setting)." |
| icm/HTTPS/trust_client_with_subject | CN=<example.abc.com>, C=<Country>, O=<Org>, OU=<OrgUnit> | This value needs to match the name of the Cloud Connector system certificate. Ideally you copy and paste the value form the Cloud Connector web ui. |
| icm/HTTPS/trust_client_with_issuer | CN=<issuer.abc.com>, C=<Country>, O=<Org>, OU=<OrgUnit> | This value needs to match the issuer of the Cloud Connector system certificate. |
! Note if you have a multi-application server setup for your backend ABAP system, set these parameters into the instance profile for all the application servers !! The change will require AS ABAP application restart !! |
4.1.7 Configure a Subject Pattern for Principal Propagation
Subject pattern defines identification for the subject of the generated short-lived X.509 certificate, as well as its validity period.
To configure such a pattern, choose Configuration --> ON PREMISE and press the Edit icon in section Principal Propagation


Save this configuration and now click on create a sample certificate to download the sample certificate

CN name will correspond to a user in backend system.
Please remember that this is only a sample certificate and will be used to create a rule-based mapping on the backend AS ABAP system
Click here for more details
4.1.8 Rule-Based Mapping of Certificates
Rule-based certificate mapping (transaction CERTRULE) enables the mapping of users from parts of the subject or the subject alternative name of an X.509 certificate for a given issuer to the user ID or alias of a user master record. With a few rules, you can enable logon with X.509 certificates for all your users. The tool also enables you to load an X.509 certificate and check if a rule applies to the certificate and if the certificate maps to a user. For individual users that do not map to the rules you create, you can create exceptions.
Once enabled, rule-based mapping replaces manual mapping in the table USREXTID. If you currently use table USREXTID for certificate mapping, use transaction CERTRULE_MIG to create a set of rules based on your current entries. Read for more details
The sample certificate from the above section used the default name scc_sample_cert.der.
Now in the backend ABAP System, Launch transaction CERTRULE. Enter edit mode and upload the certificate "scc_sample_cert.der" via menu "Certificate" → "Upload Certificate"

Press the button "+ Rule". In the upcoming dialog select the single entry in "Certificate Attribute" and choose "Login Name" as "User Name". Confirm the dialog.

This creates a new rule in the table
Click on OK to save the rule. If all was done correctly, you will see the confirmation for the mapped user as shown below:

NOTE – for generating the sample certificate from cloud connector, please choose a user name that already exists on the backend system, this will only help you to determine if the mapping is successful and configuration for short lived X.509 certificate from cloud connector to backend system is correct
If your incoming user principal is email address, you may make user of explicit mapping for mapping the incoming email address in user principal from cloud connector to a valid user id in your backend system
4.1.9 SNC Configuration in Cloud Connector
Prerequisite to this task –
- Installation of SAP Cryptographic library on cloud connector host. Ensure you have set the Environment variables SECUDIR and SNC_LIB correctly
- Create a dedicated user and ensure your cloud connector is running under that user. Refer to SAP Note
2642538 - How to enable SNC from external java program to ABAP using standalone JCo3
Once the above pre-requisites are met, please create a SNC pse for cloud connector
Below are some sample commands
a. Create SNC PSE -
sapgenpse get_pse -p SCC.pse -x <pin> -r SCC.csr -k GN-dNSName:<host_name>.<domain> "CN=<hostname>.<domain>,O=SAP-AG,C=DE"
it is recommended that you sign the CSR from SNC pse with a trusted CA. Once you have received the signed certificate, you may import it into SCC.pse as shown below
b. Import Signed Certificate –
sapgenpse import_own_cert -p SCC.pse -x <pin> -c SCC.cer -r <Root_CA>.cer
c. Create credentials for the SNC PSE –
sapgenpse seclogin -p SCC.pse -x <pin> -O <scc_user>
Note that this scc_user is the user under which cloud connector is running
d. Export Cloud Connector SNC certificate
sapgenpse export_own_cert -o SCC.crt -p SCC.pse -x <pin>
Add this certificate into ABAP SNC PSE
! Note That if you are using a password protected SNC PSE at the OS level, ensure that you import the cloud connector SNC certificate to that PSE !! – you will also need to import the ROOT signing certificate for SNC PSE at cloud connector into this ABAP SNC PSE if ABAP and Cloud connector SNC Certificates are signed by different Root CAs |

e. Import Root Certificate from ABAP backend system into SNC pse of Cloud Connector
sapgenpse maintain_pk -a <Root_CA_ABAP>.cer -p SCC.pse -x <pin>
f. Import SNC Certificate from ABAP backend system into SNC pse of Cloud Connector
sapgenpse maintain_pk -a <SNC_ABAP>.cer -p SCC.pse -x <pin>
g. List the contents of SNC pse
sapgenpse maintain_pk -l -p SCC.pse -x <pin>
Note – You may use similar sapgenpse commands to perform tasks on ABAP SNC PSE
Once you have created the SNC pse and imported the required certificates into it, please login to cloud connector UI to define the SNC name

Click on Edit to Add/change the SNC name


4.1.10 Add Cloud Connector SNC entry into ABAP System
Note the SNC name from SAP Cloud connector

Login to backend ABAP system and execute transaction SNC0 and add cloud connector’s SNC identity

Save this entry.
5 Testing Principal Propagation
For testing purpose, we created a function module in the backend ABAP System.

The idea behind was only to test the Principal Propagation, where we passed 5 and 7 as 2 values, calling the Integration workflow end-point URL, expecting the result as 12
Calling the workflow URL

After the initial authentication, the result will only be displayed if your Principal Propagation is working correctly

Also, at this same time, the ljs_trace.log file on your cloud connector will contain entries for the authentication user as shown below

6 Summary
After this three stage setup (Cloud Platform, Cloud Connector and Backend ABAP system) the principal user can be propagated to the backend ABAP system using the SAP Cloud Integration RFC adapter.
Please share your feedback which will help for future blogs.
- SAP Managed Tags:
- SAP Integration Suite,
- Cloud Integration
Labels:
1 Comment
You must be a registered user to add a comment. If you've already registered, sign in. Otherwise, register and sign in.
Labels in this area
-
ABAP CDS Views - CDC (Change Data Capture)
2 -
AI
1 -
Analyze Workload Data
1 -
BTP
1 -
Business and IT Integration
2 -
Business application stu
1 -
Business Technology Platform
1 -
Business Trends
1,658 -
Business Trends
107 -
CAP
1 -
cf
1 -
Cloud Foundry
1 -
Confluent
1 -
Customer COE Basics and Fundamentals
1 -
Customer COE Latest and Greatest
3 -
Customer Data Browser app
1 -
Data Analysis Tool
1 -
data migration
1 -
data transfer
1 -
Datasphere
2 -
Event Information
1,400 -
Event Information
72 -
Expert
1 -
Expert Insights
177 -
Expert Insights
340 -
General
1 -
Google cloud
1 -
Google Next'24
1 -
GraphQL
1 -
Kafka
1 -
Life at SAP
780 -
Life at SAP
14 -
Migrate your Data App
1 -
MTA
1 -
Network Performance Analysis
1 -
NodeJS
1 -
PDF
1 -
POC
1 -
Product Updates
4,575 -
Product Updates
384 -
Replication Flow
1 -
REST API
1 -
RisewithSAP
1 -
SAP BTP
1 -
SAP BTP Cloud Foundry
1 -
SAP Cloud ALM
1 -
SAP Cloud Application Programming Model
1 -
SAP Datasphere
2 -
SAP S4HANA Cloud
1 -
SAP S4HANA Migration Cockpit
1 -
Technology Updates
6,872 -
Technology Updates
472 -
Workload Fluctuations
1
Related Content
- DevOps with SAP BTP in Technology Blogs by SAP
- Building an integration from a third party ATS to SuccessFactors Onboarding in Technology Blogs by SAP
- SAP Cloud Integration: Understanding the XML Digital Signature Standard in Technology Blogs by SAP
- Single Sign On to SAP Cloud Integration (CPI runtime) from an external Identity Provider in Technology Blogs by SAP
- SAP Datasphere - Space, Data Integration, and Data Modeling Best Practices in Technology Blogs by SAP
Top kudoed authors
| User | Count |
|---|---|
| 17 | |
| 14 | |
| 12 | |
| 10 | |
| 9 | |
| 7 | |
| 7 | |
| 7 | |
| 6 | |
| 6 |