
- SAP Community
- Products and Technology
- Technology
- Technology Blogs by SAP
- Part 3: SAP S/4HANA Backend Configuration to Commu...
Technology Blogs by SAP
Learn how to extend and personalize SAP applications. Follow the SAP technology blog for insights into SAP BTP, ABAP, SAP Analytics Cloud, SAP HANA, and more.
Turn on suggestions
Auto-suggest helps you quickly narrow down your search results by suggesting possible matches as you type.
Showing results for
Advisor
Options
- Subscribe to RSS Feed
- Mark as New
- Mark as Read
- Bookmark
- Subscribe
- Printer Friendly Page
- Report Inappropriate Content
2021 Nov 29
11:00 AM
6,403
- SAP Managed Tags:
- SAP Workflow Management,
- SAP Business Workflow
This is part of a series of articles, which describe the steps to integrate an extension workflow using SAP Workflow Management on Business Technology Platform (BTP Workflow) into a Flexible Workflow in SAP S/4HANA OP.
Part 1: Integrating an Extension Workflow on SAP BTP into a Flexible Workflow
Part 2: SAP BTP Cockpit Configuration for Usage of SAP Workflow Management
Part 3: SAP S/4HANA Backend Configuration to Communicate with SAP BTP
Part 4: User and Roles for SAP BTP Workflow and Flexible Workflow
Part 5: Configure Cloud Connector for Workflow Integration
Part 6: Workflow Scenario with Extension Step
Part 7: Flexible Workflow in Integration Scenario
Part 8: Extension Workflow using SAP Workflow Management on SAP BTP
Part 9: End-to-End Test of Workflow Integration Scenario
Part 10: Problem Solving of Workflow Integration Scenario
1. Get Server Name
2. Certificate Issues
... 2.1. Create PSE Folder
... 2.2. Create PSE
... 2.3. Create, Sign and Upload Backend Certificate to your PSE
... 2.4. Add SAP BTP Certificate
3. Customizing
... 3.1. Create bgRFC Inbound Destination
... 3.2. Consumer Type Activation
... 3.3. Maintain Destination to External Server
... 3.4. Maintain OAuth 2.0 Client
... 3.5. Activate OData Service
Use the backend system.
Get name for https connection:
The following activities are done to create a trusted connection between backend and SAP BTP.
On backend system create a folder, create, sign and upload a certificate into this folder (for the backend system) and add the SAP BTP certificate, which was downloaded in Part 2: SAP BTP Cockpit Configuration for Usage of SAP Workflow Management Follow the instructions in the next sections.
In backend system
Switch to your new Folder (PSE) from section above via double-click (same transaction STRUST as before in change mode).
At the moment the icon besides the PSE folder name is a red cross:
Same place as before (STRUST transaction in change mode, PSE folder)
On the right side follow the next steps:
Same place as before (STRUST transaction in change mode, PSE folder)
Repeat these steps for all certificates from certificate chain of SAP BTP.
In backend system:
All of the following activities can be reached via transaction SPRO. Follow the path in screenshot, but be aware, that the path can slightly differ:
Use same named menu in SPRO transaction or run transaction SBGRFCCONF
Intention, see documentation in SPRO: "The API calls to the connected SAP Cloud Platform Workflow tenant are done by scheduling an asynchronous background processing of Remote Function Calls (bgRFC). You must therefore configure a bgRFC inbound destination."
Use same named menu in SPRO transaction
Intention, see documentation in SPRO: "Each application using the proxy API for the integration of SAP Cloud Platform Workflow registers itself as consumer type within the proxy framework. This consumer type is used to determine the correct destination, which the proxy uses to process the requests of the application, for example, to start or cancel workflow instances on SAP Cloud Platform Workflow."
External Server means SAP BTP in our scenario.
Use same named menu in SPRO transaction or SM59.
Intention, see documentation in SPRO: "The APIs of SAP Cloud Platform Workflow service are called using REST and require an RFC destination to an external server (Type 'G'). You must maintain such a destination for each connected instance of the workflow service."
At the end you should check, whether this new destination works well via button Connection Test. Then you see a popup for logging on. To get this popup is a successful test, push Cancel button.
Test result is Response 401 (Unauthorized). This is fine.
Hint: In case you don't get the popup with logon data, check the following system parameters (transaction RZ11)
Use same named menu in SPRO transaction or run transaction OA2C_CONFIG
Intention, see documentation in SPRO: "The APIs of SAP Cloud Platform Workflow service are called using REST and use OAuth 2.0 with client credentials flow. You must maintain an OAuth 2.0 client configuration for each connected instance of the workflow service with the information provided in the service key of the service instance. The service key can be obtained from the SAP Cloud Platform cockpit." (replace SAP Cloud Platform with Business Technology Platform [BTP])
Use same named menu in SPRO transaction or run transaction /n/IWFND/MAINT_SERVICES (or SICF)
=> Conclusion: Having maintained all configurations in the SAP S/4HANA backend system, SAP BTP and backend know each other. What we still need are certain communications users, which need special authorizations. This is what we care about in the next part.
Part 1: Integrating an Extension Workflow on SAP BTP into a Flexible Workflow
Part 2: SAP BTP Cockpit Configuration for Usage of SAP Workflow Management
Part 3: SAP S/4HANA Backend Configuration to Communicate with SAP BTP
Part 4: User and Roles for SAP BTP Workflow and Flexible Workflow
Part 5: Configure Cloud Connector for Workflow Integration
Part 6: Workflow Scenario with Extension Step
Part 7: Flexible Workflow in Integration Scenario
Part 8: Extension Workflow using SAP Workflow Management on SAP BTP
Part 9: End-to-End Test of Workflow Integration Scenario
Part 10: Problem Solving of Workflow Integration Scenario
Content
1. Get Server Name
2. Certificate Issues
... 2.1. Create PSE Folder
... 2.2. Create PSE
... 2.3. Create, Sign and Upload Backend Certificate to your PSE
... 2.4. Add SAP BTP Certificate
3. Customizing
... 3.1. Create bgRFC Inbound Destination
... 3.2. Consumer Type Activation
... 3.3. Maintain Destination to External Server
... 3.4. Maintain OAuth 2.0 Client
... 3.5. Activate OData Service
1. Get Server Name
Use the backend system.
- Run transaction RZ11 to view parameter values
- Display parameter SAPLOCALHOSTFULL (case sensitive!)
- Remember current value as localhost
Get name for https connection:
- Run transaction SICF
- Run (F8)
- Menu >> Goto >> Port Information
- Consider Host Name and Service columns for HTTPS-Protocol-line and remember as https host and https port

2. Certificate Issues
The following activities are done to create a trusted connection between backend and SAP BTP.
On backend system create a folder, create, sign and upload a certificate into this folder (for the backend system) and add the SAP BTP certificate, which was downloaded in Part 2: SAP BTP Cockpit Configuration for Usage of SAP Workflow Management Follow the instructions in the next sections.
2.1. Create PSE Folder
In backend system
- Run Transaction STRUST
- Switch to change mode
- Menu: Environment >> SSL Client Identities

- Add a new line with any PSE ID and save, remember PSE description for the next step

- There is a new entry SSL client <PSE description>

2.2. Create PSE
Switch to your new Folder (PSE) from section above via double-click (same transaction STRUST as before in change mode).
At the moment the icon besides the PSE folder name is a red cross:
- Use the context menu of the new PSE folder >> Create
- Insert values:
- Name: value localhost from first section on this page
- Org. (Opt): e.g. your department, optional value
- Comp./Org.: e.g. your company
- CA: Owner of the certificate
- other meaningful values see below:
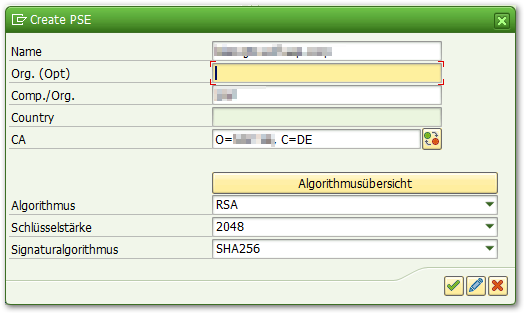
- Save
2.3. Create, Sign and Upload Backend Certificate to your PSE
Same place as before (STRUST transaction in change mode, PSE folder)
On the right side follow the next steps:
- Create new certificate request, use buttons as shown in the screenshot:

- Create (button below)

- Use this generated string and let it sign by a proper Authority
- Afterwards upload the signed certificate

- New popup opens. Upload your signed string.
- Set checkbox for trusting your own root certificate
- Save
2.4. Add SAP BTP Certificate
Same place as before (STRUST transaction in change mode, PSE folder)
- On the bottom of section Certificate push button Import certificate

- Enter your certificate's file path and name in tab File >> OK
- For description how to get BTP certificate file(s) see in Part 2: SAP BTP Cockpit Configuration for Usage of SAP Workflow Management
- Push Button Add to Certificate List
- Save
Repeat these steps for all certificates from certificate chain of SAP BTP.
3. Customizing
In backend system:
All of the following activities can be reached via transaction SPRO. Follow the path in screenshot, but be aware, that the path can slightly differ:

3.1. Create bgRFC Inbound Destination
Use same named menu in SPRO transaction or run transaction SBGRFCCONF
Intention, see documentation in SPRO: "The API calls to the connected SAP Cloud Platform Workflow tenant are done by scheduling an asynchronous background processing of Remote Function Calls (bgRFC). You must therefore configure a bgRFC inbound destination."
- Tab Define Inbound Dest.
- Create the destination BC_CPWF_INBOUND_DEST in case it does not exist. There is no need to assign any queue prefix or a logon group.

- Save
3.2. Consumer Type Activation
Use same named menu in SPRO transaction
Intention, see documentation in SPRO: "Each application using the proxy API for the integration of SAP Cloud Platform Workflow registers itself as consumer type within the proxy framework. This consumer type is used to determine the correct destination, which the proxy uses to process the requests of the application, for example, to start or cancel workflow instances on SAP Cloud Platform Workflow."
- Add DEFAULT entry and activate it

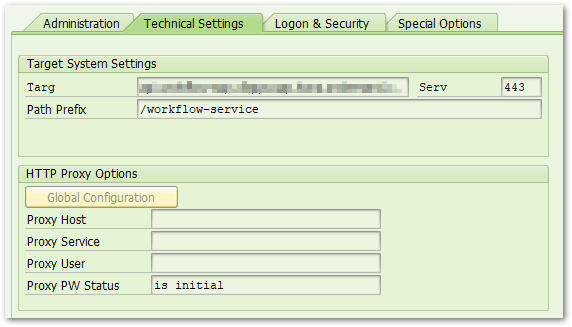
3.3. Maintain Destination to External Server
External Server means SAP BTP in our scenario.
Use same named menu in SPRO transaction or SM59.
Intention, see documentation in SPRO: "The APIs of SAP Cloud Platform Workflow service are called using REST and require an RFC destination to an external server (Type 'G'). You must maintain such a destination for each connected instance of the workflow service."
- Create a new HTTP Connection to external server (use folder with type G)

- Insert and remember a meaningful destination name and connection type G

- General Area:
- RFC Destination: prefilled with name from step before
- Connection Type: G (prefilled)
- Description 1: any description

- Tab Technical Settings:
- Target Host: hostname, see Part 2: SAP BTP Cockpit Configuration for Usage of SAP Workflow Management
- Port: 443 (or empty)
- Path Prefix: path prefix, see Part 2: SAP BTP Cockpit Configuration for Usage of SAP Workflow Management (sample: /workflow-service)
- Tab Logon & Security:
- Section Logon with User >> Radiobutton Do not Use a User
- Section Logon with Ticket >> Radiobutton Do not Send Logon Ticket
- No MQTT/AMQP values
- Section Security Options
- SSL: Radiobutton Active
- SSL Certificate: Choose your PSE ID + PSE description from list, see former section Create PSE Folder

- Tab Special Options:
- Section Timeout: Radiobutton ICM Default Timeout
- Section Status of HTTP Version: select HTTP 1.1
- Section Compression Status: Compression radiobutton Inactive
- Section Status of Compressed Response: Compressed Response radiobutton Yes
- Section Type of Cookies Acceptance: Accept Cookies radiobutton No

At the end you should check, whether this new destination works well via button Connection Test. Then you see a popup for logging on. To get this popup is a successful test, push Cancel button.

Test result is Response 401 (Unauthorized). This is fine.

Hint: In case you don't get the popup with logon data, check the following system parameters (transaction RZ11)
- icm/HTTPS/client_sni_enabled >> TRUE
- ssl/client_sni_enabled >> TRUE
- ssl/ciphersuites >> 135:PFS:HIGH::EC_P256:EC_HIGH
- ssl/client_ciphersuites >> 150:PFS:HIGH::EC_P256:EC_HIGH
3.4. Maintain OAuth 2.0 Client
Use same named menu in SPRO transaction or run transaction OA2C_CONFIG
Intention, see documentation in SPRO: "The APIs of SAP Cloud Platform Workflow service are called using REST and use OAuth 2.0 with client credentials flow. You must maintain an OAuth 2.0 client configuration for each connected instance of the workflow service with the information provided in the service key of the service instance. The service key can be obtained from the SAP Cloud Platform cockpit." (replace SAP Cloud Platform with Business Technology Platform [BTP])
- A browser window opens; eventually copy the URL to Google Chrome in case Internet Explorer starts (IE has not the full feature set, which we need here)
- Button Create

- Insert values:
- OAuth 2.0 Client Profile: choose SWF_CPWF_OAUTH_PROFILE from list,
- Configuration Name: any name, remember as Configuration Name, sample CAS_AUDIT
- OAuth 2.0 Client ID: Clientid, see Part 2: BTP Cockpit Configuration for Usage of SAP Workflow Management

- Fill fields in Details area:
- General Settings:
- Client Secret: Clientsecret, see Part 2: SAP BTP Cockpit Configuration for Usage of SAP Workflow Management
- Authorization Server Settings:
- Authorization Endpoint: Authorization Endpoint, see Part 2: SAP BTP Cockpit Configuration for Usage of SAP Workflow Management
- Token Endpoint: Token Endpoint, see Part 2: SAP BTP Cockpit Configuration for Usage of SAP Workflow Management
- Access Settings
- Client Authentication: radiobutton Form Fields
- Resource Access Authentication: radiobutton Header Field
- Selected Grant Type: radiobutton Client Credentials
- No more changes in fields
- General Settings:

3.5. Activate OData Service
Use same named menu in SPRO transaction or run transaction /n/IWFND/MAINT_SERVICES (or SICF)
- Search for Service SWF_CPWF_NOTIFICATION_SRV (in column External Service Name). If you can't find this service:
- Push button Add Service
- Choose your system, where this service is supposed to be (in this scenario it is the same server as the backend system and therefore probably LOCAL)
- Push button Get Services and search for SWF_CPWF_NOTIFICATION_SRV
- Select the line and push button Add Selected Services
- Assign a package and continue
- Go back
- In section ICF Nodes push button ICF Node >> Choose Activate >> node should have a green traffic light icon

- Check availability of a system alias in section System Aliases

=> Conclusion: Having maintained all configurations in the SAP S/4HANA backend system, SAP BTP and backend know each other. What we still need are certain communications users, which need special authorizations. This is what we care about in the next part.
>> Next: User and Roles for SAP BTP Workflow and Flexible Workflow
Labels:
1 Comment
You must be a registered user to add a comment. If you've already registered, sign in. Otherwise, register and sign in.
Labels in this area
-
ABAP CDS Views - CDC (Change Data Capture)
2 -
Advanced Event Mesh
1 -
ai
1 -
Analyze Workload Data
1 -
BTP
1 -
Business and IT Integration
2 -
Business application stu
1 -
Business Technology Platform
1 -
Business Trends
1,657 -
Business Trends
178 -
CAP
1 -
cf
1 -
Cloud Foundry
1 -
Confluent
1 -
Customer COE Basics and Fundamentals
1 -
Customer COE Latest and Greatest
3 -
Customer Data Browser app
1 -
Data Analysis Tool
1 -
data migration
1 -
data transfer
1 -
Datasphere
2 -
Event Information
1,396 -
Event Information
134 -
Expert
1 -
Expert Insights
177 -
Expert Insights
632 -
General
2 -
Getting Started
2 -
Google cloud
1 -
Google Next'24
1 -
GraphQL
1 -
Introduction
1 -
Kafka
1 -
Life at SAP
779 -
Life at SAP
30 -
Migrate your Data App
1 -
MTA
1 -
Network Performance Analysis
1 -
NodeJS
1 -
PDF
1 -
POC
1 -
Product Updates
4,568 -
Product Updates
665 -
Replication Flow
1 -
REST API
1 -
RisewithSAP
1 -
sap btp
1 -
SAP BTP Cloud Foundry
1 -
SAP Cloud ALM
1 -
SAP Cloud Application Programming Model
2 -
SAP Datasphere
2 -
SAP Datasphere تحقيق أقصى استفادة من بيانات الأعمال
1 -
SAP s4hana cloud
1 -
SAP S4HANA Migration Cockpit
1 -
Technology Updates
6,865 -
Technology Updates
802 -
Workload Fluctuations
1
Related Content
- MDG Cloud ready Mode: Integration of S/4HANA with SAP Build process automation & SAP Build work zone in Technology Blogs by SAP
- Execute critical business decisions with SAP Signavio Process Manager & DMN business rules in Technology Blogs by Members
- Using on-premise systems in your SAP Cloud Identity Services tenant in Technology Blogs by SAP
- Issue during Deploy MDK App in the Dev Space in Technology Q&A
- Build process on webide fails: Error occured during communication with HTTP server in Technology Q&A
Top kudoed authors
| User | Count |
|---|---|
| 10 | |
| 10 | |
| 10 | |
| 9 | |
| 8 | |
| 8 | |
| 6 | |
| 6 | |
| 5 | |
| 5 |