
- SAP Community
- Products and Technology
- Technology
- Technology Blogs by SAP
- HANA EIM SDI/SDQ SPS12 - OData Adapter in HANA SPS...
Technology Blogs by SAP
Learn how to extend and personalize SAP applications. Follow the SAP technology blog for insights into SAP BTP, ABAP, SAP Analytics Cloud, SAP HANA, and more.
Turn on suggestions
Auto-suggest helps you quickly narrow down your search results by suggesting possible matches as you type.
Showing results for
Employee
Options
- Subscribe to RSS Feed
- Mark as New
- Mark as Read
- Bookmark
- Subscribe
- Printer Friendly Page
- Report Inappropriate Content
06-02-2016
10:25 AM
Working with the OData Adapter in HANA SPS12
In this blog entry the following activities are covered:
- OData Adapter creation
- Using a public OData service with read and write capabilities
- OData remote source & virtual table creation
- Virtual table select (OData GET)
- Virtual table insert (OData PUT)
- Modeling in SAP HANA WebIde in Google Chrome Browser
- Flowgraph to capture the delta of OData source (each step for creation is described)
- …
This is an extract from the “Whats New in HANA smart data integration – SPS12” slidedeck. It describes some of the new abilities that the OData adapter has in SPS12.

Used documents:
- HANA EIM SPS12 Administration Guide
- HANA Academy Video "SAP HANA Academy - Smart Data Integration/Quality: The Table Comparison Transform [SPS09"
Used resources:
- HANA SPS12 system
- Chrome browser with WebIde
Now let's begin...
It is a really simple scenario we are dealing with: Accessing a public OData URL, read from and write to the tables exposed there. HANA is running on SPS12 on premise. The purpose of this blog entry is to better illustrate the different steps analogous as they are explained in the HANA EIM Administration Guide (chapter 8.13.1).
In this scenario we are accessing the following public OData Service URL (ODATA V4) which allows read and write operations.
http://services.odata.org/V4/OData/(S(1t3xkksfwh00yknrwftrjhm5))/OData.svc/
The following describes the context of tables that we can access in this example:

In order to realize the above mentioned points, you can consider the following steps:
1.) Create the OData Adapter in HANA studio manually via the following SQL command (this is necessary and an exception as the OData Adapter is NO system adapter! Other than common adapters/drivers used in the SDA context):
create"ODataAdapter"'display_name=OData Adapter;description=Odata Adapter' AT LOCATION DPSERVER;
The following architecture outlines the location of the ODataAdapter which is not communicating through the DP-Agent. That aspect can become important in scenarios where e.g. IP filtering on OData APIs is considered.
In cloud scenarios, your DP-Agent establishes a tunneled connection to your on-premise network and can access on-premise data sources. Your ODataAdapter remains in the cloud and is therefore still outside of your company network. I.e. OData APIs that you can authenticate against from your on-premise applications do not necessarily work in that constellation.

(select * from "SYS"."ADAPTERS"):

2.) Create new remote source, choosing the previously create OData Adapter:
(System priviledge "CREATE REMOTE SOURCE" required")

Enter your proxy, trust, CSRF and format settings according to your requirements. For further information on each of the fields consider reading the EIM Administration Guide.
In my case I set “Support Format Query” to true which allows me to receive the dataset in JSON-format. In the credentials section (if you also use a public OData service to test e.g. the adapter capabilities you need to enter anything… I entered for instance “test” as user and “test” as password. It will allow you to connect as it doesn’t require any user).
In productive and secure environments you most probably need a user, password and/or a certificate to be on the safe side! 😉

3.) Browse remote tables and create virtual tables of your choice you want to play with
Now go to Provisioning and browse your remote tables. You should now be able to access them via your new OData remote source:


4.) Working with your virtual table (1) – READ (or GET…)
You can now browse the entries of your virtual table.

You can verify the entries displayed in HANA studio with the entries you get when calling the service directly from a URL
http://services.odata.org/V4/OData/(S(1t3xkksfwh00yknrwftrjhm5))/OData.svc/Products/?$format=json

5.) Working with your virtual table (2) – WRITE (or PUT…)
If your OData service allows read and write operations you can also insert new entries with e.g. using the corresponding insert statement:
insert into "SYSTEM"."MV1_RW_ODATA_Products" values(13,'Afri Cola','The Original Cola','01.10.2005 00:00:00.0','01.10.2006 00:00:00.0',3,9.9);

You should now see the new entry when firing a GET request from your browser on that table:
http://services.odata.org/V4/OData/(S(1t3xkksfwh00yknrwftrjhm5))/OData.svc/Products/?$format=json

6.) Create a replication task with the table comparison transform node to capture the delta only. In order to achieve this, you need to follow the subsequent steps:
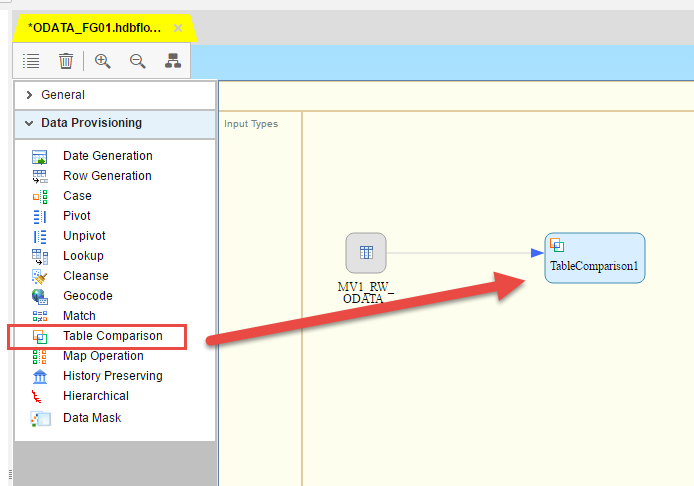
(1) In the flowgraph builder in the WebIDE drag and drop a new data source node and select the virtual table your OData source table. Remember that you use WebIde only with Google Chrome Browser.

(2) Drag and drop a new Table Comparison node onto the canvas and connect your data source node with it.
(3) Intermediate step (this could also be done in advance...) Create your target table. You could do it as follows:
CREATE TABLE "ODATA_Products_target" LIKE "SYSTEM"."MV1_RW_ODATA_Products";
It will create a similar table with the same table structure.
(4) Adjust your target table and a new primary key of type integer, e.g. “SURR_ID” (this approach follows the concept as introduced in the SAP HANA Academy Video “SAP HANA Academy - Smart Data Integration/Quality: The Table Comparison Transform [SPS09]”).
In my example I need to drop the already existing primary key “ID” first in order to realize adding a new primary key “SURR_ID”.
ALTER TABLE "SYSTEM"."ODATA_PRODUCTS_TARGET" DROP CONSTRAINT ID;
You can then add a new column called “SURR_ID” of type integer to your target table (in edit mode).

(5) After adding this new column you can specify this column as a new primary key with the following command:
ALTER TABLE "SYSTEM"."ODATA_PRODUCTS_TARGET" ADD CONSTRAINT PK PRIMARY KEY (SURR_ID);
You need to do this for the table comparison transform to work properly. We will see this later on in this document

(6) What you also need to do is create a database sequence for your data sink in your flowgraph. You can do this either in WebIde or in HANA Studio. You need to create a new file that ends with *.hdbsequence. Just right click on your package and select “File”.

Enter your sequence name with the correct file ending.

Specify your sequence properties. Adjust the schema property according to your schema’s name. Save your sequence.

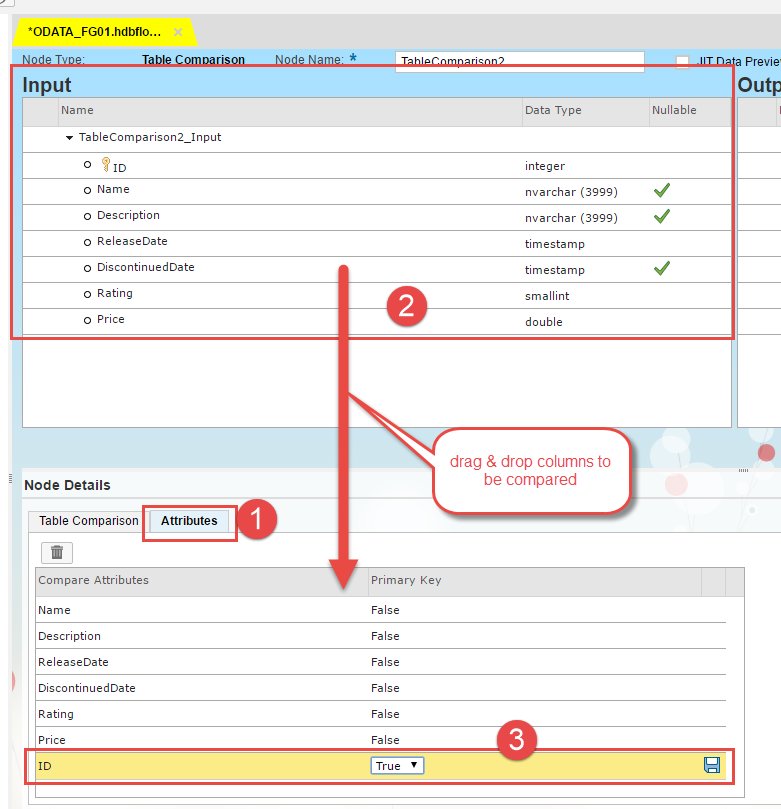
(7) Now you can edit your table comparison node. First and foremost choose your comparison table. This needs to be your previously created target table that has the “SURR_ID” and ideally the same structure as your source table (…or another structure, depending on your requirements).

In the table comparison transform specify the generated key attribute which is your “SURR_ID” field of your target table.

If you OData source allows delete operations you can select "Detect Deleted Rows From Comparison Table". This will ensure that deleted rows in the source will also be deleted in your target table.

Click on attributes in your Table Comparison node and drag and drop the fields which you want to be considered for comparison. You need to set the key column as "Key = true". The table comparison node will capture every change that occurs in one of these columns and correspondingly transfer the delta to your target table.
(8) Select a data sink node. Choose your target table as your data sink.
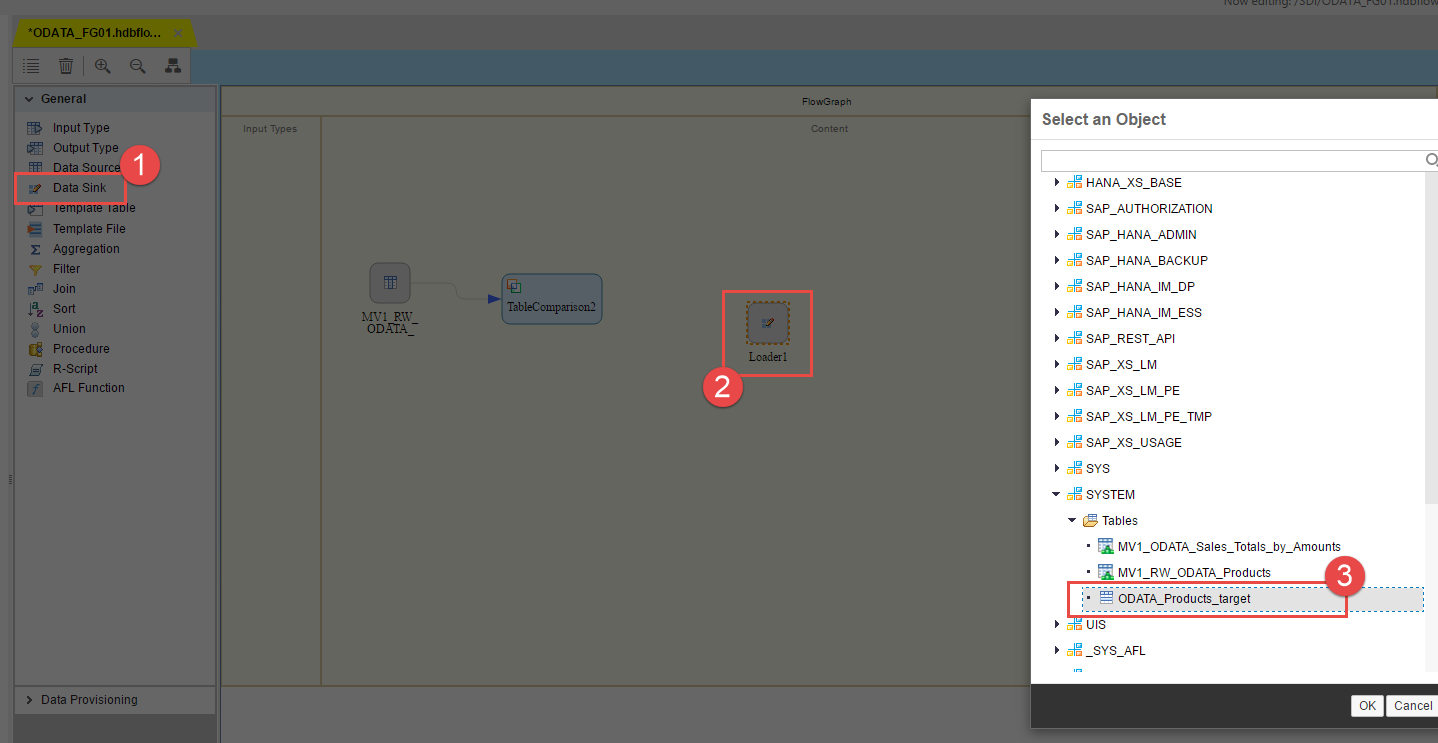
Enter the database sequence into the corresponding field of your data sink. You can find it on the "Settings" tab of your data sink node. What you should also do is specify your key generation attribute which is "SURR_ID" in our case.

(9) Save your flowgraph and execute the task to conduct an initial load of your target table.
If you can´t save your flowgraph in WebIde you're probably lacking priviledges. Make sure you have object priviledges on:
- EXECUTE
on "_SYS_REPO"."TEXT_ACCESSOR"
and "_SYS_REPO"."MULTI_TEXT_ACCESSOR"
- SELECT, UPDATE, INSERT, DELETE, EXECUTE granted to _SYS_REPO
You may also refer to the EIM Administration Guide chapter "7.1 Assign Roles and Priviledges"

(10) Check in system table “M_TASKS” how many records where processed with the initial load.
SELECT * FROM "SYS"."M_TASKS";

(11) Insert a new record into the source table of the OData service with e.g. an insert command, re-run the task and check how many records have been processed. It is assumed that only the delta or respectively changed rows were transferred.
INSERT INTO "SYSTEM"."MV1_RW_ODATA_PRODUCTS" VALUES(14,'NEW COLA','THE ORIGINAL WOW COLA','01.10.2005 00:00:00.0','01.10.2006 00:00:00.0',3,39.9);
START TASK "SYSTEM"."SDI::ODATA_FG01";
SELECT * FROM "SYS"."M_TASKS";

Alternatively you could also execute an update statement on your OData source table, re-run the task, see how many records were processed and what has changed and compare your source and target table if it really worked out for you.
(12) Finally see what is in the target table. We can see that our inserted record was appended to the table:
SELECT * FROM "SYSTEM"."ODATA_Products_target";

On top of what we modelled we could now create a replication task to let the batch task run e.g. every ten minutes to capture the delta of our OData source.
If you have any comments, hints, tips and tricks what I did please share and let us all know. I also embrace suggestions to enhance this example.
Kind regards
Stefan
- SAP Managed Tags:
- SAP HANA
10 Comments
You must be a registered user to add a comment. If you've already registered, sign in. Otherwise, register and sign in.
Labels in this area
-
ABAP CDS Views - CDC (Change Data Capture)
2 -
AI
1 -
Analyze Workload Data
1 -
BTP
1 -
Business and IT Integration
2 -
Business application stu
1 -
Business Technology Platform
1 -
Business Trends
1,658 -
Business Trends
110 -
CAP
1 -
cf
1 -
Cloud Foundry
1 -
Confluent
1 -
Customer COE Basics and Fundamentals
1 -
Customer COE Latest and Greatest
3 -
Customer Data Browser app
1 -
Data Analysis Tool
1 -
data migration
1 -
data transfer
1 -
Datasphere
2 -
Event Information
1,400 -
Event Information
74 -
Expert
1 -
Expert Insights
177 -
Expert Insights
348 -
General
1 -
Google cloud
1 -
Google Next'24
1 -
GraphQL
1 -
Kafka
1 -
Life at SAP
780 -
Life at SAP
14 -
Migrate your Data App
1 -
MTA
1 -
Network Performance Analysis
1 -
NodeJS
1 -
PDF
1 -
POC
1 -
Product Updates
4,575 -
Product Updates
391 -
Replication Flow
1 -
REST API
1 -
RisewithSAP
1 -
SAP BTP
1 -
SAP BTP Cloud Foundry
1 -
SAP Cloud ALM
1 -
SAP Cloud Application Programming Model
1 -
SAP Datasphere
2 -
SAP S4HANA Cloud
1 -
SAP S4HANA Migration Cockpit
1 -
Technology Updates
6,871 -
Technology Updates
481 -
Workload Fluctuations
1
Related Content
- 10+ ways to reshape your SAP landscape with SAP Business Technology Platform – Blog 4 in Technology Blogs by SAP
- Workload Analysis for HANA Platform Series - 2. Analyze the CPU, Threads and Numa Utilizations in Technology Blogs by SAP
- What’s New in SAP HANA Cloud – March 2024 in Technology Blogs by SAP
- Sap Hana Online Table Partitioning - Example in Technology Q&A
- Exploring Datasphere & BW Bridge : Technical Insights in Technology Blogs by Members
Top kudoed authors
| User | Count |
|---|---|
| 17 | |
| 15 | |
| 11 | |
| 10 | |
| 9 | |
| 8 | |
| 8 | |
| 8 | |
| 7 | |
| 7 |