
- SAP Community
- Products and Technology
- Supply Chain Management
- SCM Blogs by Members
- How to add custom fields to the Transportation Coc...
Supply Chain Management Blogs by Members
Learn about SAP SCM software from firsthand experiences of community members. Share your own post and join the conversation about supply chain management.
Turn on suggestions
Auto-suggest helps you quickly narrow down your search results by suggesting possible matches as you type.
Showing results for
petra_just
Active Participant
Options
- Subscribe to RSS Feed
- Mark as New
- Mark as Read
- Bookmark
- Subscribe
- Printer Friendly Page
- Report Inappropriate Content
12-30-2019
8:14 AM
in Transportation Management, we use the Transportation Cockpit. in many implementation, it is required to add addtional custom fields to the Transport Cockpit. the below pcitures Show the steps that are required to add 2 custom fields to the freight unit stages view of the Cockpit:
PICTURE 1 summarizes the 6 steps that are necessary to add custom fields to the cockpit:

PICTURE 2 - How to identify the correct ui structure
STEP 1: go to SE84
STEP 2: Choose WebDynpro + Componenent configuration
STEP 3: Enter /SCMTMS/PLN for the Cockpit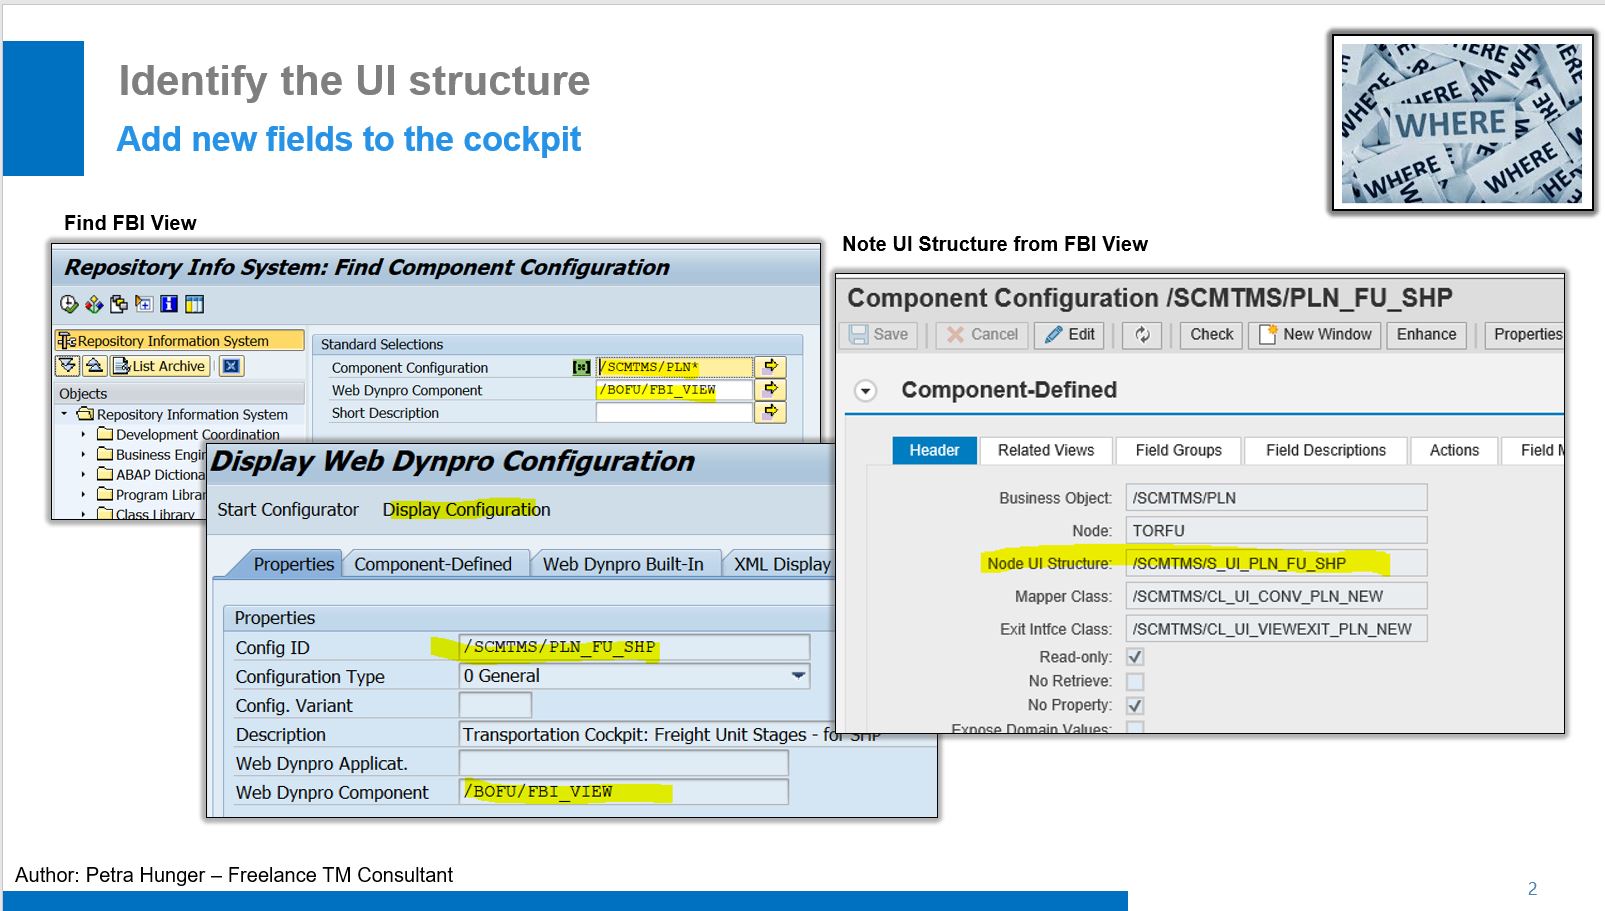
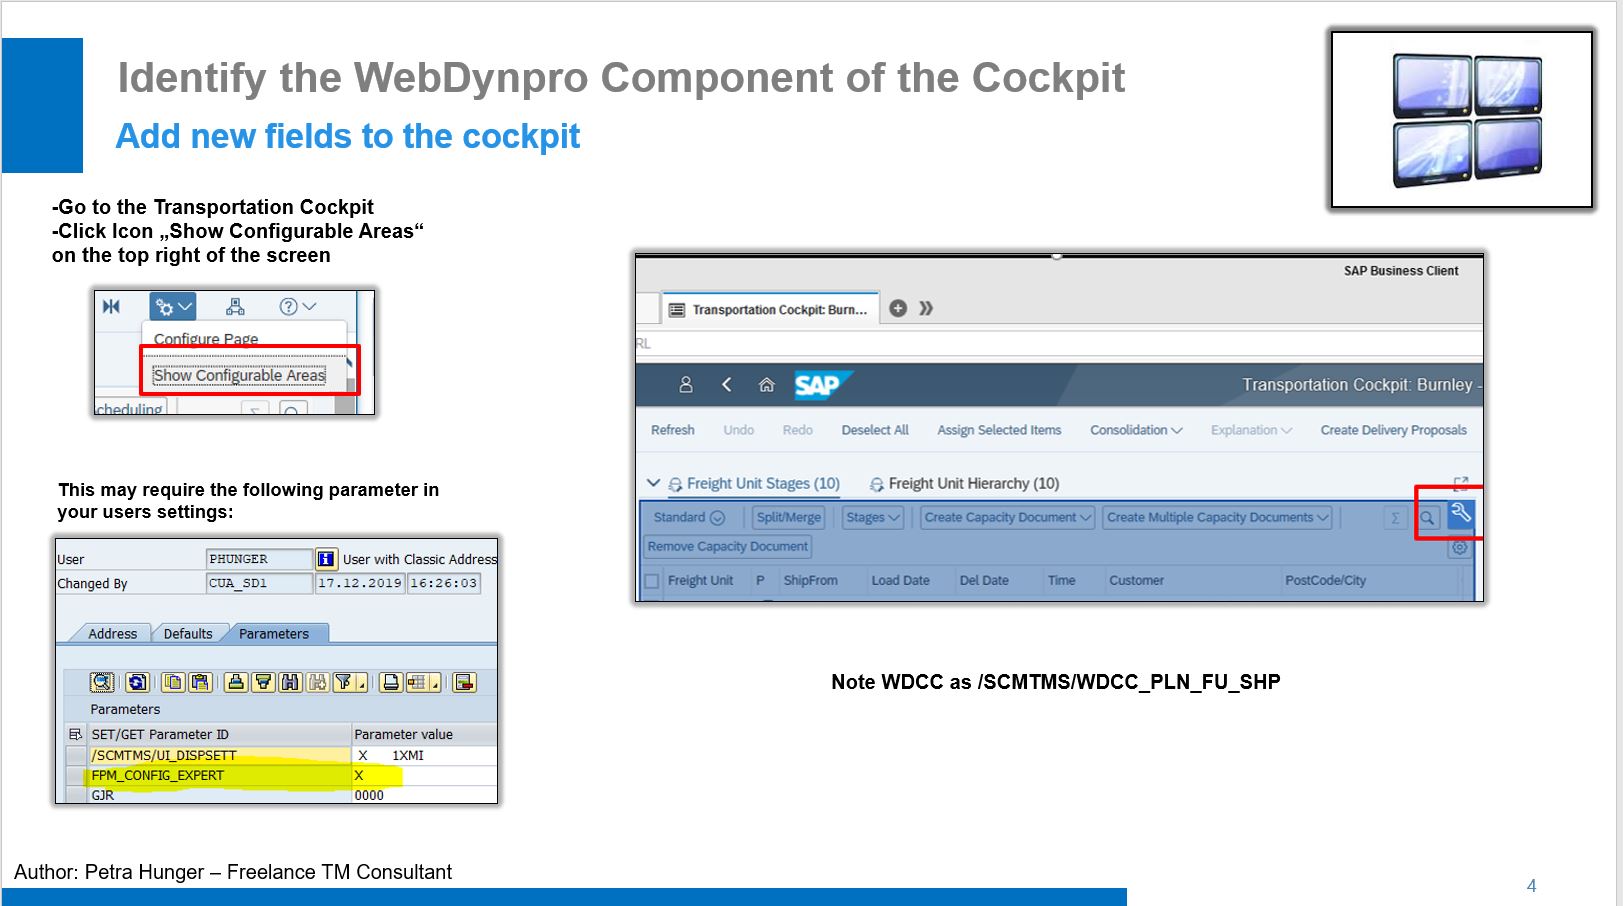
PICTURE 3 - How to identify the correct ui structure (ALTERNATIVE)
The System Shows node ui structure /SCMTMS/UI_PLN_FU_SHP. This is the structure where you canadd the custom fields via append. Btw, the ui structure for the Fu item area on a hierarchy is /SCMTMS/S_UI_TBI_H_FU.
If you have set Parameter FPM_CONFIG_EXPERT as X, you can go to component config from any Sap Business Client or netweaver BC screen by choosing "Show configurable Areas" on top Right of the screen" and click on "hammer Icon".
PICTURE 4 - How to add the custom fields to the ui structure
STEP 1: TC SE11 - go in Display mode of the ui structure
STEP 2. press "APPEND"
STEP 3: write the field names into field component and the data element in the component type.
STEP : Activate the structure

PICTURE 5 - add the fields on the screen using webdynpro CONFIGURATION
STEP 1 - go to web dynpro config using steps described in Picture 2 or 3
STEP 2 - Choose additional function "Create Customizi" and give a title "enhanced FU area for customer xyz
STEP 3 - Scroll down and choose "add column"
STEP 4 - at the very bottom of the field list, you will find the custom fields
STEP 5 - choose them and they will be placed at the end of the list
STEP 6 - you can Change the field description , length and sequence in properties
All Customizing can be removed by "delete Customizing". This is really configuration.

PICTURE 6 - View the new fields in the cockpit
STEP 1 - go to sap Business client
STEP 2 -type Transport-Cockpit
STEP 3- choose a profile combination and press continue
RESULT. The custom fields are added on the screen

PICTURE 7 - identify the viewexit
STEP 1: Note FBI view for this is /SCMTMS/PLN_FU_SHP
STEP 2: go back to se84 and Display the viewexit name

PICTURE 8 - Fill the field Content using coding
STEP 1 - enhance viewexit class /SCMTMS/CL_UI_VIEWEXIT_PLN_NEW

CONCLUSION: The layout of the Cockpit can be configured and custom fields can be added.
PICTURE 1 summarizes the 6 steps that are necessary to add custom fields to the cockpit:
- Identify the Ui structure (place where the fields have to be added via append)
- Enhance the UI (how to add the fields)
- Identify the web dynpro component (this is the Name of the component that represents a screen or part of a screen in floor plan Manager)
- Add new columns to the screen area (this is to Show the fields on the actual screen)
- Identify the viewexit (the place where you can fill the fields using codign logic)
- Enhance the viewxit (add coding to the viewexit)
PICTURE 2 - How to identify the correct ui structure
STEP 1: go to SE84
STEP 2: Choose WebDynpro + Componenent configuration
STEP 3: Enter /SCMTMS/PLN for the Cockpit
PICTURE 3 - How to identify the correct ui structure (ALTERNATIVE)
The System Shows node ui structure /SCMTMS/UI_PLN_FU_SHP. This is the structure where you canadd the custom fields via append. Btw, the ui structure for the Fu item area on a hierarchy is /SCMTMS/S_UI_TBI_H_FU.
If you have set Parameter FPM_CONFIG_EXPERT as X, you can go to component config from any Sap Business Client or netweaver BC screen by choosing "Show configurable Areas" on top Right of the screen" and click on "hammer Icon".
PICTURE 4 - How to add the custom fields to the ui structure
STEP 1: TC SE11 - go in Display mode of the ui structure
STEP 2. press "APPEND"
STEP 3: write the field names into field component and the data element in the component type.
STEP : Activate the structure
PICTURE 5 - add the fields on the screen using webdynpro CONFIGURATION
STEP 1 - go to web dynpro config using steps described in Picture 2 or 3
STEP 2 - Choose additional function "Create Customizi" and give a title "enhanced FU area for customer xyz
STEP 3 - Scroll down and choose "add column"
STEP 4 - at the very bottom of the field list, you will find the custom fields
STEP 5 - choose them and they will be placed at the end of the list
STEP 6 - you can Change the field description , length and sequence in properties
All Customizing can be removed by "delete Customizing". This is really configuration.
PICTURE 6 - View the new fields in the cockpit
STEP 1 - go to sap Business client
STEP 2 -type Transport-Cockpit
STEP 3- choose a profile combination and press continue
RESULT. The custom fields are added on the screen
PICTURE 7 - identify the viewexit
STEP 1: Note FBI view for this is /SCMTMS/PLN_FU_SHP
STEP 2: go back to se84 and Display the viewexit name
PICTURE 8 - Fill the field Content using coding
STEP 1 - enhance viewexit class /SCMTMS/CL_UI_VIEWEXIT_PLN_NEW
CONCLUSION: The layout of the Cockpit can be configured and custom fields can be added.
- SAP Managed Tags:
- SAP Transportation Management
16 Comments
You must be a registered user to add a comment. If you've already registered, sign in. Otherwise, register and sign in.
Labels in this area
-
aATP
1 -
ABAP Programming
1 -
Activate Credit Management Basic Steps
1 -
Adverse media monitoring
1 -
Alerts
1 -
Ausnahmehandling
1 -
bank statements
1 -
BI
1 -
Bin Sorting sequence deletion
1 -
Bin Sorting upload
1 -
BP NUMBER RANGE
1 -
Brazil
1 -
Business partner creation failed for organizational unit
1 -
Business Technology Platform
1 -
Central Purchasing
1 -
Change History
1 -
Charge Calculation
3 -
Cloud Extensibility
1 -
Compliance
1 -
Controlling
1 -
Controlling Area
1 -
Data Analysis
1 -
Data Enrichment
1 -
decentralized ewm
1 -
DIGITAL MANUFACTURING
1 -
digital transformation
1 -
Dimensional Weight
1 -
Direct Outbound Delivery
1 -
E-Mail
1 -
ETA
1 -
EWM
7 -
EWM - Delivery Processing
3 -
EWM - Goods Movement
5 -
EWM - Interleaving with RF
1 -
EWM Monitor
2 -
EWM Outbound
1 -
EWM Outbound configuration
1 -
EWM-RF
1 -
EWM-TM-Integration
1 -
Extended Warehouse Management (EWM)
4 -
Extended Warehouse Management(EWM)
7 -
FINANCE
1 -
Freight Agreement
1 -
Freight Order
1 -
Freight Settlement
2 -
FSM
1 -
FUB_Strategy
1 -
FUBR
1 -
Geo-coordinates
1 -
Geo-routing
1 -
Geocoding
1 -
Geographic Information System
1 -
GIS
1 -
Goods Issue
2 -
GTT
2 -
IBP inventory optimization
1 -
illuminator services
1 -
inbound delivery printing
1 -
Incoterm
1 -
Innovation
1 -
Inspection lot
1 -
intraday
1 -
Introduction
1 -
Inventory Management
1 -
Localization
1 -
Logistics Optimization
1 -
Map Integration
1 -
Material Management
1 -
Material Master changes
1 -
Materials Management
1 -
MFS
1 -
New Feature
1 -
Outbound queue
1 -
Outbound with LOSC and POSC
1 -
Packaging
1 -
Physical Inventory
1 -
PHYSICAL INVENTORY EWM
1 -
PowerBI
1 -
PPF
1 -
PPOCE
1 -
PPOME
1 -
print profile
1 -
Process Controllers
1 -
Production process
1 -
QM
1 -
QM in procurement
1 -
Real-time Geopositioning
1 -
Risk management
1 -
S4 HANA
1 -
S4 HANA 2022
1 -
S4-FSCM-Custom Credit Check Rule and Custom Credit Check Step
1 -
S4SCSD
1 -
SAC
1 -
Sales and Distribution
1 -
SAP DMC
1 -
SAP ERP
1 -
SAP EWM
1 -
SAP Extended Warehouse Management
2 -
SAP Extended Warehouse Management (SAP EWM)
1 -
SAP Fiori
1 -
SAP FSM
1 -
SAP Hana Spatial Services
1 -
SAP IBP IO
1 -
SAP MDO
1 -
SAP MII
1 -
SAP MM
1 -
sap production planning
1 -
SAP QM
1 -
SAP REM
1 -
SAP repetiative
1 -
SAP S4HANA
1 -
SAP TM
1 -
SAP Transportation Management
4 -
SAP UI5
1 -
SAP Variant configuration (LO-VC)
1 -
SAPEWM
1 -
SAPTM
1 -
SD (Sales and Distribution)
1 -
Shotcut_Scenario
1 -
Source inspection
1 -
Storage bin Capacity
1 -
Supply Chain
1 -
Supply Chain Disruption
1 -
Supply Chain for Secondary Distribution
1 -
Technology Updates
1 -
TMS
1 -
Transportation Cockpit
1 -
Transportation Management
2 -
Trends
1 -
Visibility
2 -
warehouse door
1 -
WOCR
1
- « Previous
- Next »
Related Content
- Why Logistics Visibility is Best with SAP Business Network Global Track and Trace in Supply Chain Management Blogs by SAP
- Freight Order Management in Supply Chain Management Q&A
- SAP Business Network for Logistics 2404 Release – What’s New? in Supply Chain Management Blogs by SAP
- How to change planning status "not relevant for planning" from Freight Units? in Supply Chain Management Q&A
- Empty Leg optimization using TM Optimizer in Supply Chain Management Blogs by SAP
Top kudoed authors
| User | Count |
|---|---|
| 4 | |
| 1 | |
| 1 | |
| 1 | |
| 1 | |
| 1 | |
| 1 | |
| 1 | |
| 1 | |
| 1 |