Application Development Blog Posts
Learn and share on deeper, cross technology development topics such as integration and connectivity, automation, cloud extensibility, developing at scale, and security.
cancel
Showing results for 
Search instead for 
Did you mean: 
julieplummer20
Product and Topic Expert

NOTE: ASE license expiry


New ASE license, valid until Q1 2019 is available in this blog post: ASE License Blog. Please see the instructions below for the correct procedure.


Linux for Newbies


So, you want to install a developer edition of a SAP NetWeaver ABAP AS. It should sit on a Linux distribution, in a virtual box.
However, you're a Linux newbie.
FEAR NOT!
We have created a genuine, step-by-step guide, with loads of screenshots to help you on your way.
In this example, we will focus on the openSUSe distribution.

This guide is part of a series for anyone who wants a free trial version of an SAP NetWeaver ABAP AS. To find out more about this whole series, see SAP NW 750 SP2 ABAP AS Available to Download!

A. Preparation


  1. Download the latest released version of Oracle VirtualBox from https://www.virtualbox.org/wiki/Downloads for your Operating system.

  2. Download openSUSE Leap 42.1 in your local machine (64 bit, released version) from https://software.opensuse.org/421/en

  3. Make sure the relevant ABAP download files ("abap.rar") are on your local hard drive.

  4. Download the correct version of the ASE license from this blog: ASE License Blog and store it on your local hard drive.


B. Create VirtualBox instance; install openSUSE:


    1. Start VirtualBox and create a new VirtualBox instance by clicking the New button:

    2. Enter the following values:

      • Name : MyVirtualLinux (for example)

      • Type : Linux

      • Version: openSUSE (64 bit) -> Next

      • Select Memory size : 6 GB  -> Next

      • Hard disk: Create a virtual hard disk now -> Next

      • Hard disk file type: VHD (Virtual Hard Disk) -> Next

      • Storage on physical hard disk: Dynamically allocated -> Next

      • File location and size: 100 GB

      • Choose Create.


    3. Again in the VirtualBox Manager, click on Start to start the VirtualBox:

    4. In the dialog that appears, navigate to the downloaded openSuse installation file which you downloaded in Step 2, eg openSUSE-Leap-42.1-DVD-x86_64.iso.Then select this drive, choose OK:

    5. Now choose Installation (using keyboard, not mouse):

    6. Important: Choose language and keyboard layout (test keyboard).
      NOTE: We have only tested the US English-language version. If you have problems, please use the English version.

      • Accept the License Agreement by choosing Next.

      • In Installation Options, leave the 2 options unchecked, and choose Next:

      • In Suggested Partitioning, choose Edit Proposal Settings and enter the following:

        • File System for Root partitionin: choose  Ext4 from the drop-down box.


        • Uncheck Propose Separate Home Partition
          (This step is needed so that SUSE installation creates only one drive but does not create 2 drives (Home and Extension) where Home has less space to continue the ABAP installation.)

        • (Optional: Enlarged Swap for Suspend - I left it unchecked.)


      • Choose Ok, -> Next

      • Select Region and Timezone -> Next

      • In Desktop Selection, choose GNOME desktop -> Next

      • Enter:

        • Your full name

        • (Create a ) User name

        • Create a Master password, confirm it -> Next
          (
          I ticked Use this password for system administrator and Automatic Login. Leave the authentication method and encryption method as they are.
          The password should be at least 7 characters.)


    7. IMPORTANT: In Installation Settings, do not choose Install yet! You need to make settings:
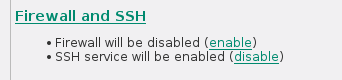
      Scroll down to find Firewall and SSH.

      • Disable Firewall

      • Enable SSH service:


    8. Click on Install and Confirm again to Install the Operating System.The Linux operating system will install (yes!)


C. Prepare openSUSE system for ABAP installation


In this section, we will make some settings in the openSUSE system to prepare it for the ABAP installtion: Proxy settings; extract the ABAP .rar files; automount the folder containing these .rar files; install the uuidd daemon; change the hostname; assign root privileges to the install script.

  1. If you have successfully installed the openSUSE operating system, you will see something like this:

  2. Boot up the system by choosing the first option, "Boot from Hard Disk."Now, we just have these settings before we install the ABAP server.

  3. Change Proxy settings if you are behind a proxy:

    • Open Activities and enter "N" as the search term.
      The system returns something like this:

    • Choose Network.
      In the dialog that opens, choose Network Proxy, then choose Manual.

    • Change the http / https proxy settings according to your company requirements and set the port to 8080:


  4. Now we want to enter some commands using a tool called Xterm.
    (Background note: Technically speaking, we are interacting with the shell, a program that passes keyboard commands to the operating system. We are interacting with the shell using a terminal emulator, called Xterm. If these terms are unfamiliar, I would strongly recommend William Schotts' The Linux Command Line (free PDF)).

    • Again, choose Activities, then enter "X" as the search term.

    • Choose Xterm.

    • Check used memory by typing df -h :

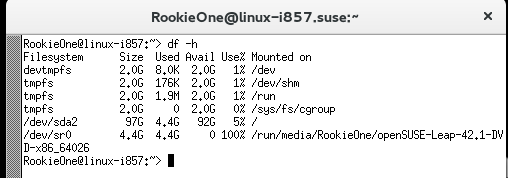
      Minimum space in home directory should 33 GB to avoud memory errors during installation. (In this example, mine is 92G, or 5%.)


  5. AND NOW..., it is time to download and extract the abap rar files to a local folder.
    First, so that the Linux system can access this folder, we need to register it for auto-mount.

  6. IMPORTANT: Make sure your Linux system is up and running.

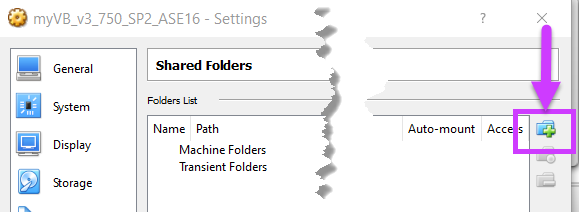
    • Select the folder, then choose Settings, then choose Shared Folders.

    • Add a new folder to automount, by choosing the plus icon to the right:

    • In the dialog that appears, navigate to the folder that contains the ABAP installation.

    • Change the folder name to s4installer. (You will need to enter this folder name manually later, so using this alias is less error-prone than trying to remember the complete path.):

    • Choose OK, OK.

    • IMPORTANT: Reboot the Linux system.


  7. Now we are going to change some settings, before installing the uuidd daemon. This daemen provides universal unique identifiers - essential for creating database keys. (See SAP Note 1310037 for more details.)
    (Note: You only need to do this step if you are using a proxy.)

    • Open the system tool YaST (choose Activities -> enter "Y" as search term...).

    • Enter your root password (ie the one you use to log on to the Linux system.)

    • On the left, choose Software .

    • Scroll down on the right-hand side and choose Proxy.

    • CHange the http settings, tick Use same for all, then test proxy.

    • Choose OK, OK.


  8. Now we are going to install the uuidd daemon.

    • Still in YaST, scroll back up and select Online Update.

    • Open the Search tab, and and enter the search term "uuidd", then choose Search.

    • Select "uuidd", then choose Accept.
      YaST will install uuidd, then reboot.

    • End YaST.


  9. Now we are going to start the uuidd service in Xterm.

    • Open Xterm.

    • Start uuidd, by entering:  sudo service uuidd start 

    • Enter the root's password.
      (
      Note: sudo = "superuser do" ie you need to be a superuser to execute this command. Thus you also have enter the root's password.)

    • Check if the service has started by entering: sudo service --status-all |grep uuidd

    • Your Xterm will look like this:


  10. Now, still in Xterm we will change the hostname, by entering sudo vi /etc/hostname.

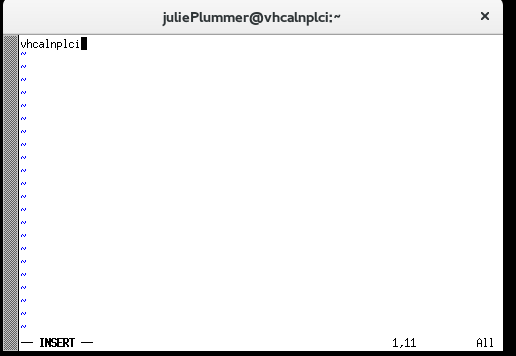
    • Insert the hostname by entering i (for "insert"). It should look something like this:

    • Save your changes by hitting the ESC key, then :wq (ie "colon", "Write", "Quit")

    • Check by entering sudo cat /etc/hostname

    • Restart network by entering: sudo rcnetwork restart

    • Check that the hostname has changed by entering hostname


  11. Now we will map hosts to the new hostname.

    • Check the IP address by entering sudo ifconfig

    • Open the hosts file by entering sudo vi /etc/hosts

    • Using this IP address, add a new entry of the form:
      <IP address> <hostname> <hostname>.dummy.nodomain
      (Here it is: 10.0.2.15 vhcalnplci vhcalnplci.dummy.nodomain )

    • (To add a new entry, proceed as before:

      • Enter 

      • Enter  10.0.2.15 vhcalnplci vhcalnplci.dummy.nodomain

      • Hit ESC

      • Enter :wq


    • Save the file hosts

    • Check the changes by using the cat command: sudo cat /etc/hosts


  12. And now, we will assign root privileges, by entering sudo -i.

    • Enter the root's password.

    • Navigate to the shared folder with the ABAP installation: cd /media/sf_s4installer

    • Change the access rights of the install script: chmod +x install.sh


  13. Finally, just before we install, we will ensure that we have the correct ASE license version. To do so, put the new .lic file, which you downloaded in section A above, in the same folder as the script file, using the name SYBASE_ASE_TD.lic . Do this after you have successfully extracted the ABAP .rar files. You do not need to edit the .tar files:


(Background: The .rar files for this version, 7.50, are now relatively old. However, only 7.50 supports SLT. Therefore, if you need SLT, you need to insert the correct ASE license version before you install.)


D. Install ABAP


  1. FINALLY, we run the installation, by entering the command ./install.sh


    • Read and accept the license agreement

    • When prompted for the OS users password enter your master password of the virtual Linux OS instance twice

    • Be patient, this will take a while...

    • If the installation is successful, you will see something like this:


  2. Ok, we're almost done. We just need to enter the right proxy settings so that SAP GUI, ABAP in Eclipse etc can find your ABAP system:

    • In Oracle VirtualBox Manager, select the VirtualBox with the installed ABAP system on it, then choose Settings from the context menu.

    • From the left-hand menu, choose Network.

    • Open Advanced, then choose Port Forwarding.

    • In the dialog that appears, enter the following settings:


      Name Protocol Host IP Host Port Guest IP Guest Port
      HTTP TCP 127.0.0.1 8000 10.0.2.15 8000
      HTTPS TCP 127.0.0.1 44300 10.0.2.15 44300
      RFC TCP 127.0.0.1 3300 10.0.2.15 3300
      SAPGUI TCP 127.0.0.1 3200 10.0.2.15 3200


And that's it! Hope this helps. Feel free to comment below.
We have also provided some additional info (admin, starting / stopping the server, created directories and users, etc) in the Concise Installation Guide.

Further reading:


The first thing to do is to make yourself familiar with the Linux command line (steps 17-21). I found the most helpful guide here:
The Linux Command Line, by William E Shotts, Jr (PDF)

For openSUSE support: openSUSE forums
278 Comments
0 Kudos
Hi,

I have a problem during SAP installation.

I'm using Mac OS with SUSE Linux under Virtualbox.

When I execute sudo ./install.sh I get following error after some seconds:
sapmnt/NPL/global/000JOBLG/

sapmnt/NPL/sapcc-2.7.2-linux-x64.zip

rm: cannot remove ‘/sapmnt/NPL/profile/NPL_D00_vhcalnplci_*’: No such file or directory

./install.sh: line 321: /usr/sap/NPL/SYS/exe/run/SAPCAR: No such file or directory

./install.sh: line 322: cd: /tmp/hostctrl/: No such file or directory

./install.sh: line 323: ./saphostexec: No such file or directory

./install.sh: line 325: /usr/sap/hostctrl/exe/SAPCAR: No such file or directory

./install.sh: line 326: cd: /tmp/swpm/: No such file or directory

./install.sh: line 330: ./sapinst: No such file or directory

Installation of NPL failed, please check logifiles in /tmp/sapinst_instdir for possible root cause.


Any idea?


Thanks and regards.

Alfonso.

 
sealcw
Explorer
Hi,

I'm using a openSUSE Leap 42.1 Packer template for running Vagrant.

The Vagrant Box creates a VirtualBox instance with all recommended system preparations to install SAP NetWeaver AS ABAP 750 SP02 Developer Edition.


Packer (https://www.packer.io/intro/index.html) is a tool that automates the creation of identical machine images from a single source configuration.

Vagrant (https://www.vagrantup.com/intro/index.html) is a tool for building and managing virtual machine environments with focus on automation.

See the repo:

https://github.com/wechris/SAPNW75SPS02

It works quite well.

Regards

Christian
Former Member
0 Kudos
Hi Alfonso Rodriguez,

use unrar and the Parameters x to extract the .Rar files (unrar x filename).


Regards,

Amani


Former Member
julie.plummer thanks)))

 
vodela
Active Participant
0 Kudos
Hi

I have installed and able to work with trial ABAP 7.5 - is it possible to upgrade this to 7.51 so that I can try out new functionality that is provided in this version.  I dont have download option from the service.

Thanks

Ramesh
raghava32
Explorer
0 Kudos
Hi Julie,

good day....!

i am facing below issue while installing "sap_netweaver_as_abap_750_sp02_ase_dev_edition", if you have any idea to resolve it will be greatly helpfull.


tar: Error is not recoverable: exiting now
rm: cannot remove '/sapmnt/NPL/profile/NPL_D00_vhcalnplci_*': No such file or directory
./install.sh: line 321: /usr/sap/NPL/SYS/exe/run/SAPCAR: No such file or directory
./install.sh: line 322: cd: /tmp/hostctrl/: No such file or directory
./install.sh: line 323: ./saphostexec: No such file or directory
./install.sh: line 325: /usr/sap/hostctrl/exe/SAPCAR: No such file or directory
./install.sh: line 326: cd: /tmp/swpm/: No such file or directory
./install.sh: line 330: ./sapinst: No such file or directory
Installation of NPL failed, please check logifiles in /tmp/sapinst_instdir for possible root cause.


Thanks,

Raghav.
Former Member
Hi Juli,

I have got an error message during installation of NW750 like below


Where I apply this step:

3. I have resolved the issue with Login failed

To fix the issue, follow finals steps in the SAP note 1706410:

Login as npladm

isql -X -Usapsa -SNPL -w999
use master
go
sp_helpexternlogin
go
exec sp_dropexternlogin SYB_JSTASK, sapsa
go
exec sp_addexternlogin SYB_JSTASK, sapsa, sapsa, ‘<new sapsa password>’
go


Best regards

Claudio
Former Member
0 Kudos
Hi,

Really, Thank you so much for this blog. But i have few problems, My host name has changed into vhcalnplci only when i check it using sudo cat /etc/hosts command, But when i simply use the hostname command it's showing me "linux-fn7g" . yes in the title bar this same is showing...


and i am unable to access the install.sh , it giving me this error "no such file or directory".


Yes, i am so new to linux, please help me with this yeah
Former Member
0 Kudos
brother, how much time does it takes? .. I had the same errors, I tried this "/.install.sh -g". Now installation is here "SL Controller started... " it took so much time...

I hope there is no loop in it.. does it stuck anywhere?

Don't take it wrong, I am just completely new to this.
Former Member
0 Kudos
Hello abraham,

Thanks for sharing this. I got this same issue. It's not moving after this. Did you find the solution for this?

Please let me know soon brother.
Former Member
0 Kudos
Hi Julie,

I had many issues. Some of them are solved, Thanks to you guys. Now I am stuck with this one.

While installing with "./install.sh -g" I am facing this Error which says "The server port 21212 is not free"
Former Member
0 Kudos
it takes not so much time. Check your Java installation. Try reinstall it automatically
Former Member
0 Kudos
Hi,


have you solved this in the meantime?


If not, please be sure to use the rigt password Appl1ance

 
Former Member
0 Kudos
Thanks Julie, appreciate your help with this
julieplummer20
Product and Topic Expert
Hi Simone,

Please

You've mentioned "other posts" , but I don't know which ones. Have you tried:


  1. run GUI version of installer. Just run script install.sh with the -g option


  2. Upgrade RAM (at least 4GB. I have 16GB).


  3. follow final steps in the SAP note 1706410:


Login as npladm


isql -X -Usapsa -SNPL -w999
use master
go
sp_helpexternlogin
go
exec sp_dropexternlogin SYB_JSTASK, sapsa
go
exec sp_addexternlogin SYB_JSTASK, sapsa, sapsa, '<new sapsa password>'
go


Please just let me know if you have tried these. I will then discuss the log files with a colleague.


Bes twishes Julie.

julieplummer20
Product and Topic Expert
0 Kudos
Hi Alfonso,

Sorry. There should be no difference between a VBox on Mac and a VBox on Windows. However, I have only tested on Windows.

The only I can think of is perhaps you have to make a setting in the Linux system before you start. So I would suggest you also post this in the SAP Linux forum:

SCN SAP on Linux Forum

Sorry I couldn't help.

Julie.
julieplummer20
Product and Topic Expert
0 Kudos
Hi Christian,

Thanks for this. I am trying to compile this type of useful info in a Wiki page, but not quite sure how, yet.

I will publish this here if this happens .

Best wishes Julie.
julieplummer20
Product and Topic Expert
0 Kudos
Hi Ramesh,

We are working on this. As soon as this is available, I will update the main blog accordingly:

 https://blogs.sap.com/2013/05/16/developer-trial-editions-sap-netweaver-application-server-abap-and.../


Best wishes Julie.
julieplummer20
Product and Topic Expert
0 Kudos
Thanks Claudio.

I am starting to collect these tips in a Wiki:

https://wiki.scn.sap.com/wiki/display/ABAP/Linux+for+Newbies%3A+Installing+ABAP+OS+-+some+troublesho...

...but it is still just a very rough draft.

Best wishes Julie.
julieplummer20
Product and Topic Expert
0 Kudos
Hi Ponnar,

I have just googled this: "the server port 21212 is not free linux" and found loads of SAPINST information.

Best wishes Julie.
vodela
Active Participant
0 Kudos
Julie

Thanks for info I look forward to try out 7.51.  I have one additional question when I try
https://go.support.sap.com/minisap/#/minisap  to renew the license - the page does not list any entries or does not show up at all. this was working properly


in an unrelated question

When I try the hana cloud account trial with the url http://account.hanatrial.ondemand.com/cockpit - Select a service such as WEBIDE - before I used to get activate service, go to service - Now I don't see this for any of the services - I don't know whom to contact.  Can you kindly let me know how I can go about resolve this as I cant raise a support issue with my id.

Best regards

Ramesh

 
vodela
Active Participant
The url https://go.support.sap.com/minisap/#/minisap  was not working for the last week - it is working now .

Best regards

Ramesh
Former Member
0 Kudos
Hi everybody,


when I install SAP in Ubuntu system I became the following error.


Has anybody idea, whats the reason for this error?


Thanks,

Elnur
former_member190849
Participant
0 Kudos
Thanks for the answer. With this, it really is a great difference between the windows installation and the openSUSE installation, and it should be underlined several times for all newbies (who mostly will be veterans of windows trials): the master password in openSUSE is used only for system users (like npladm), but not -and in contrary to the windows environment- to the sap users inside of netweaver.
SimoneCattozzi
Participant
Thank you!! I've solved my installation problems.
0 Kudos

Hi Julie,

thank you so much for all the efforts you made and still make in your blogs.

I set up my VM in VM Ware Player 12. The configuration is very similar.

I am still stuck in paragraph 21 of your tutorial. If I start ./install.sh it runs fine until this well known error:

What did I do?

  • Check that I am super-user. This is also shown by the command prompt that turns red after sudo -i
  • Check UUIDD is up and running.
  • Password contains one upper case char, three lower case chars and four digits so I think it meets the requirements
  • Hostname is as recommended vhcalnplci

I also tried to start the install script with the “-g” option but then I am stuck here.

Do I need to have the SAP Java-GUI installed for this method? And if so, where do I find a how-to?

I am close to bite pieces from my desk.

Thanks and best regards

Karl


EDIT_1: Just did a quick setup with Virtual Box instead of VM Ware. Same result. The only difference to your tutorial is that I am using openSUSE-Leap-42.2

EDIT_2: Just downloaded openSUSE-Leap-42.1 and tested again with virtual box. Still same result with modlib.jslib...  I am using SUSE out of the box with no updates and no updates concerning the Virtual Box tools. Just to keep everything clean.


zbig_papierski
Discoverer
0 Kudos
Hi Karl,

try these checking:

 
#su sybnpl
#RUN_NPL

My results are:
00:0000:00000:00000:2017/07/02 14:38:57.71 kernel SySAM: Using licenses from: /sybase/NPL/SYSAM-2_0/licenses/SYBASE_ASE_DE.lic:/sybase/NPL/SYSAM-2_0/licenses/SYBASE_ASE_TestDrive.lic:/sybase/NPL/SYSAM-2_0/licenses/SYBASE_ASE_XE.lic
00:0000:00000:00000:2017/07/02 14:38:57.75 kernel SySAM: Failed to obtain license(s) for ASE_CORE feature from license file(s) or server(s).
00:0000:00000:00000:2017/07/02 14:38:57.75 kernel SySAM: Licenses exist for ASE, but a license containing the configured (PE=EE;LT=AC) attributes could not be obtained. Verify that ASE is configured to use the correct type of license, and either reconfigure; or generate and deploy the desired license from the Sybase Product Download Center.
00:0000:00000:00000:2017/07/02 14:38:57.75 kernel SySAM: Feature has expired.
00:0000:00000:00000:2017/07/02 14:38:57.75 kernel SySAM: License feature name: ASE_CORE
00:0000:00000:00000:2017/07/02 14:38:57.75 kernel SySAM: Expire date: 30-jun-2017
00:0000:00000:00000:2017/07/02 14:38:57.75 kernel SySAM: License search path: /sybase/NPL/SYSAM-2_0/licenses/SYBASE_ASE_DE.lic:/sybase/NPL/SYSAM-2_0/licenses/SYBASE_ASE_TestDrive.lic:/sybase/NPL/SYSAM-2_0/licenses/SYBASE_ASE_XE.lic:
00:0000:00000:00000:2017/07/02 14:38:57.75 kernel SySAM: FlexNet Licensing error:-10,32
00:0000:00000:00000:2017/07/02 14:38:57.75 kernel SySAM: For further information, refer to the Sybase Software Asset Management website at http://www.sybase.com/sysam
00:0000:00000:00000:2017/07/02 14:38:57.75 kernel There is no valid license for ASE server product. Installation date is not found or installation grace period has expired. Server will not boot.

I think that Sybase license has expired (30-jun-2017). 😞

Zbig
0 Kudos


Hi Zbig,

thanks, I will check it. But I was struggeling with the setup procedure since one week before posting here. So I encountered the problems already before the expiration date of the Sybase license.

In another blog I found a link to a fix concerning the DB license issue: https://twitter.com/karlojkessler/status/881833752590200832

Karl

Former Member
0 Kudos
how did you solve it pls ?
Even though this post is a bit outdated I can give you an answer, because once I ran into the same problem. Maybe it helps others too.

The problem is in step 2 of the tutorial: please mind to set the size of the virtual drive to 100GB. If you don't do that, the drive ist set to 4GB at default. In that case, the partitioning can not be carried out!

Karl

 
Former Member
0 Kudos
Dear Julie , Chris D and everyone,

I have seen this question here and also in the installation post for minisap 7.40 SP08.   I am also facing the same issue.  Any help is very much appreciated.  Already tried using:

1- different combinations of: opensuse, ubuntu, vmware, virtualbox,

2- 10gb of ram,  6 gb of ram,  12 gb of ram.

3- 7 char passwords, longer alphanumeric passwords,  uppercase/lowercase passwords.

4- ulimit -n,

5- apt-get  libaio1 and libaiodev

6- Install.sh without GUI and with GUI   ( -g ).

7- Looking for SAP Note 1706410   in SAP Knowledge DB  (could not find it)..    but   isql  on my end looks like a tool for accessing  mysql instead of sybase.

I do not see anyone has shared a consistent answer on how to solve the  "Assertion failed: Unable to generate a new password for database login 'sa'"   issue.

In the meantime, I am gonna sit in a corner and cry  🙂

Thanks for any help or directions on this topic.   Kind regards,

Julian
julieplummer20
Product and Topic Expert
0 Kudos
Hi Chris, Have you tried all the steps that I gave to Simone?

If that Doesn't work, please tell me exactly what errors you are getting.

Best wishes, Julie
former_member209372
Participant
0 Kudos
Hi Zbig,


You may be right, my SAP Netweaver stopped working from 1st july onwards, after that i've tried many time but same error occured, is any possible way to overcome this scenario.?
zbig_papierski
Discoverer
0 Kudos
Hi, of course.

Look Julie's note at the beginning of article.

Zbig
mandar_shete
Active Participant
Hi Julian,


I was also facing the same issue from 1-Jul. It is a problem with the license expiration. It resolved for me.

Copy the new licence file from link: New Sybase License  . Need to place this license file in /sybase/NPL/SYSAM-2_0/licenses/SYBASE_ASE_TestDrive.lic. Set the Ownership and Group as per manual attached in the link. Run the installation with ./install.sh -g option

Regards,

Mandar
Former Member
Hi Mandar Shete


Thank you so much! I finally got the message "Installation of NPL successful".

Again, Thank you !!!
Former Member
Hi Mandar,

I followed your instructions and it worked like a charm.

You are the best.  I owe you a couple of beers/ cups of coffee/drinks.

Thank you very much,

Julian
former_member209372
Participant
0 Kudos
Hi Zbig,


If i try to install the netweaver with previous date then will it work.?
zbig_papierski
Discoverer
0 Kudos
Hi Joy,

Maybe, but why do you want to do that?

ASE license replacement works perfect.

I've reactivated my installation without any problems.

Zbig
SimoneCattozzi
Participant
0 Kudos
I've solved with these attensions:

  • increase virtual machine RAM ( at least 6GB )

  • Using the -g option during installation

  • Set admin password with 8 characters, 1 upper case, 1 number, NO special characters


and the installation has been completed with no errors
Former Member
0 Kudos
Hi Mandar Shete,


Thank You very much.

I confirm that it works.

The problem was the license, additionally graphical installation is more user friendly - always you can see errors 🙂

P.S. Maybe it will help someone - Password policy is fullfiled by password:    'pawelP77'


Regards,

Marcin

 
0 Kudos
Hello Julie,

I installed my computer and everything is ok. Bu i wonder how can i connect to my server from different computer. Can you help me ?

 
former_member209372
Participant
0 Kudos
Hi Zbig,


if i try for fresh installation then what i can do.? it will fail always isn't.?

 
zbig_papierski
Discoverer
0 Kudos
Hi Joy,

I've tried. You can.

It fails, but then you can  replace license and start install.sh again.

Second start ends with success

Zbig
mandar_shete
Active Participant
 

Guys good to know it resolves the issue.
mandar_shete
Active Participant


Hi Omeralp,

Well that’s possbile unless and until the computers are in same network.

  1. Select the virtual machine in VirtualBox and change the network setting from NAT to Birdge Adapter
  2. Setup the static IP for the virtual machine

Go to Network Settings

Change the IP Address settings from DHCP to Static

Enter the IP Address (e.g. 192.168.0.100), Subnetmask (e.g. 255.255.255.0) (System will change it to /24). do not change the host name

In the Name Server 1 enter the DNS entry (e.g. 192.168.0.1)

3. Also check the entries in below files

/etc/resolv.conf – It should contain the DNS entry (e.g. 192.168.0.1)

/etc/sysconfig/network/ifcfg-eth0 – entries should be as below

BOOTPROTO=’static’
BROADCAST=”
ETHTOOL_OPTIONS=”
IPADDR=<IP Address>      (e.g. '192.168.0.100')
MTU=”
NAME=”
NETMASK=<SUBNETMASK>   (e.g. ’255.255.255.0′)
NETWORK=”
REMOTE_IPADDR=”
STARTMODE=’auto’
DHCLIENT_SET_DEFAULT_ROUTE=’yes’


/etc/sysconfig/network/routes – having entry as below

default <<DNS IP>>           (e.g. 192.168.0.1)


4. Once the setting is done. Try to ping the static IP from another computer if it succeed you can use this IP as an Application Server in your GUI entry to access SAP


Regards,

Mandar

former_member209372
Participant
0 Kudos
Dear ZBIg,

Thanks for your help, so once failed with installation i have to go and replace without deleting any file and start installation again.? I will update you asap


Thank You.

 
0 Kudos
Hi Zbig,


This may be a stupid question but how do I locate this
/sybase/NPL/SYSAM-2_0/licenses/SYBASE_ASE_TestDrive.lic on my machine. Please supply step by step instructions if you do not mind

 
0 Kudos
Hi Mandar,

This may be a stupid question but how do I locate this
/sybase/NPL/SYSAM-2_0/licenses/SYBASE_ASE_TestDrive.lic on my machine. Please supply step by step instructions if you do not mind, I am struggling

 
mandar_shete
Active Participant
0 Kudos
Hi Njabulo,

Once login to openSuse follow the below steps.

  • Click on "Activities" (Left Corner)

  • Click on "Files" icon

  • It will open a files window

  • Click on "Other Locations". You will see "Computer" icon

  • You will be able to find the "sybase" folder into it.

  •  Rest follow the path inside it and replace the file SYBASE_ASE_TestDrive.lic


Regards,

Mandar
Labels in this area