
-
How do I join?
Participation in SAP Community requires an SAP Universal ID. Learn more here.
If you don't already have an SAP Universal ID.- Start the registration process via SAP Universal ID registration.
- Add your SAP Community display name in the "Username" field.
- Check your email for an activation link and complete registration.
If you already have an SAP Universal ID, you can go directly to the SAP Universal ID account manager to add a username (if the field is blank) or change your username.- Sign in to SAP Universal ID account manager at SAP Universal ID Sign In.
- Select [Edit].
- Enter or change the display name in the ?Username? field, then click [Save].
Please do not use your user ID, email address, your company name, the SAP name/brand, or a series of numbers or letters. However, we encourage SAP Community members to use their real names.
We recommend that all new users take our "Tour the SAP Community" tutorial . -
How do I sign in?
- Click on the avatar icon at the top of any page.
- Enter your login name and password.
- Click "Sign In" to access your account.
Note: Single sign-on is enabled for SAP Community, so you may be automatically authenticated if you have already logged in on another SAP platform. -
What do I do if I forget my login or password?
- Click the avatar at the top right to open the sign-in page.
- Select "Forgot password?" at the bottom.
- Follow the instructions to reset your password.
-
Products and Technology
By Category
-
Groups
Activity Groups
Industry Groups
Influence and Feedback Groups
Interest Groups
Location Groups
Customer Only Groups
- Developers
- Partners
- Events
- Help Center
- Topic Pages
-
Explore SAP
Products
- Autonomous Enterprise
- Artificial intelligence
- Data and analytics
- Autonomous Suite
- Technology platform
- Transformation management
- Midsize business solutions
- Financial management
- Spend management
- Supply chain management
- Human capital management
- Customer experience
- Enterprise resource planning
- Business network
- Sustainability management
- SAP Store
- Try SAP
- View all industries
- Partners
- Services
Learning and Support
-
- Products and Technology
- Groups
- Developers
- Partners
- Events
- Help Center
- Topic Pages
-
Explore SAP
- Explore SAP
-
Products
- Products
- Autonomous Enterprise
- Artificial intelligence
- Data and analytics
- Autonomous Suite
- Technology platform
- Transformation management
- Midsize business solutions
- Financial management
- Spend management
- Supply chain management
- Human capital management
- Customer experience
- Enterprise resource planning
- Business network
- Sustainability management
- SAP Store
- Try SAP
- View all industries
- Partners
- Services
- Learning and Support
- About
- SAP Community
- Help
Help
Turn on suggestions
Auto-suggest helps you quickly narrow down your search results by suggesting possible matches as you type.
Showing results for
Help
-
Getting Started
-
Groups Basics
-
What is a Group?
A Group allows you to connect and conduct valuable conversations with people who share the same interests. Groups and their content focus on a single location, interest, industry, activity, program, and so on. They don't focus on specific products and partnerships, as these topics are covered elsewhere in SAP Community.
Groups can include discussions, Q&A, blog posts, and/or knowledges base, depending on their purpose, and some may be private.
Explore the various Groups available and join (or request to join) the ones that appeal to you! -
Who may join a Group?
Any SAP Community member can join or participate in an open (public) Group. Closed (private) Groups are accessible either by 1) invitation by Group owner or 2) sending a request to join and having this approved by the Group owner.
Partner Groups are restricted to SAP Partners and SAP Employees, and therefore will only be visible to eligible users based on log in credentials. -
Why should I join a Group?
When you join a Group, you may:- Get notified when someone responds to a specific post or topic.
- Exchange private messages with other members.
- Personalize your Group experience.
- Start TKB (Tribal Knowledge Base) and edit own drafts, add comments to others', delete own TKB articles.
- Nominate good community content to be converted into a knowledge base article. This permission must be set at the forum level for nested TKBs.
- Submit own blog posts for publishing (and the Group curators will review for relevance).
You can still browse, search for information, read posts, give likes, and add comments -- but we recommend to click on the "Join Group" button for a better user experience. In fact, we recommend that all members start by joining the Welcome Corner and taking a quick moment to introduce themselves! -
Are Group blogs and conversations public or private?
In general, conversations occurring within an open (public) Group may be read by anyone, but you need to have a user profile set up to participate with comments or feedback. Conversations in a closed (private) Group will be visible to the members in that specific Group only. Conversations happening in Groups under Partner Groups are visible to SAP Partners and SAP Employees only.
In addition, the Private Messenger functionality is available. Please review the Private Messenger section for more information. -
How is a Group launched and managed?
This depends on the type of Group. Any SAP Community member can request a location Group for a city where they are based, or for an activity. This is subject to a scoping call. Please see the section below "May I start my own Group?" SAP also initiates the formation of new Groups, based on SAP Community readership and participation related to specific topics, interest areas, or activities. Groups are managed by SAP moderators with the support of Group owners and curators. -
May I start my own Group?
Some Group types are SAP initiated and some you can request on your own (For example: location, interest). To request a Group or further information, reach out to [email protected]. The SAP Community team will reply or set up a scoping call with you to determine your requirements and next steps to proceed, based on approval.
-
-
Discussions
-
How do I start a discussion?
To start a discussion:
- Go to the Group where you want to post.
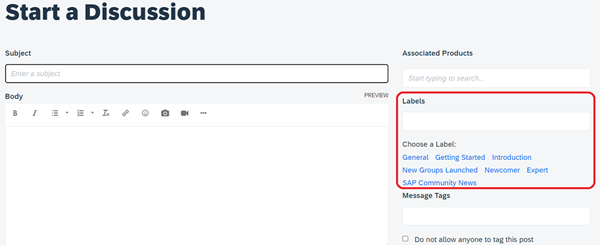
- Click Start a Discussion.
- In the Subject field, enter your discussion title.
Tip: Make your subject clear and concise, as it's the only part of the post that shows up on the discussion-listing page. - In the Body field, type the details of your discussion. Be sure to include all necessary details, especially for technical topics.
- Format and spell check your content, as needed.
- Click Post.
Please note:
Not all Groups have a discussion board. It depends on the purpose and setup of the Group.
Some Groups have mandatory labels. You can choose the relevant label on the right-hand side. -
How do I reply in a discussion?
Click the "Reply" button to respond to the discussion post. You'll also see a reply field at the bottom of the discussion thread, and if you type your response directly there, you'll be able to click the "Post Reply" button when you're finished.
In addition to replying to the primary discussion post, you can respond to other replies in the discussion thread by clicking the "Reply" button found in each reply.
-
-
Q&A
-
What is a Q&A?
A Q&A is similar to a discussion, but focuses on specific questions and answers. Use Q&As to ask questions or find questions that community experts have already answered.
If you're an expert in an area, or just want to share what you know about a topic, Q&As are a great way to answer someone else's question and track the questions that are still awaiting answers.
Please note: Not all SAP Community areas will have a Q&A section -- it depends on the purpose and setup of the section. -
How do I ask a question?
Not all community areas contain a Q&A section. It depends on the area's purpose and setup.
To get details about (and options for) submitting your questions to SAP Community, please see the Asking and Answering Questions in the Community After Migration post in the What's New section. You may also want to watch How do I ask a question from a category page?, as this how-to video illustrates one approach for posting a question to SAP Community.
Before you ask a question, please browse the community in case this question has been answered already.
If you need to create a new question, start with a descriptive title that briefly outlines what your question is about. A clear question title will help community members gain a quick initial understanding of your question. It will also help community members find your question (and its answers) when they are searching for solutions to similar problems.
When writing your question, please share what steps you took that led you to your question. If you don't, community members might tell you to take actions you've already tried yourself.
Make sure that your question is very specific. Provide as many details as you can -- such as which product version you are using and what error message you're receiving. Include screenshots if possible.
-
What is an Accepted Solution?
An Accepted Solution is a way for you to choose the reply that best answers a question that you've posted. When you accept a solution, both the question and the solution get special icons and links that take you directly from the question to the answer.
The blue tick icon for an Accepted Solution also appears on boards and in search results so you can see which messages have solutions.
You can mark a solution as accepted only for questions that you've posted (you started the thread). Group moderators can also mark one of the replies to a message as an accepted solution.
You can learn more by reading Asking and Answering Questions in the Community After Migration. -
How do I accept the answer to a question?
When community members answer one of your questions, you can choose the answer you think are the most useful, helpful, or accurate and mark them as a solution.
To accept an answer to a question:
- Go to the answer that you want to accept.
- Click Options > Accept as Solution.
To revoke an accepted solution:
- Go to the answer that you want to revoke.
- Click Options > Not the Solution.
You can choose another solution or leave the question unsolved.
You can learn more by reading Asking and Answering Questions in the Community After Migration.
-
How do I find questions to answer?
These how-to videos will help you find questions in need of answers:
How do I find questions to answer in a Q&A board?
How do I use search to find unanswered questions related to tag topics?
How to search for unanswered questions with SAP Managed Tags?
You can also find unanswered questions on SAP Managed Tag pages. Choose a tag from the full list of SAP Managed Tags. Then on the tag page, select "Q&A Unanswered" from the "Content Type" dropdown.
-
How do I respond to a question?
If you can provide a solution to a question, you should answer it. If you require more information, you should leave a comment requesting clarifications.
Please watch How and when to answer or reply to a question?, one of our how-to videos, to learn more about participating in Q&A threads.
When answering a question, we encourage you to share your personal knowledge and write in your unique voice. If you want to publish an answer that was helped/created by GenAI, you must include this statement: "GenAI was used to help generate this content."
-
How do I view my questions and answers?
You'll find your questions and answers -- as well as your Q&A comments -- in your "My content" section. (If you aren't sure where to locate "My content," please read Get to Know Your Post-Migration Profile in the What's New section.)
On the "My content" landing page, you'll see tabs for "Posts" and "Replies." Your questions will appear in the "Posts" feed, while your questions and comments will appear in the "Replies" feed.
You can also find your questions and answers specific to an individual Q&A board, as long as your content appears in that board. To learn how to locate questions and answers in a Q&A board, please watch How do I find my questions and answers in a Q&A board?, one of our how-to videos.
-
Can I edit or delete my answers and replies?
You can edit your answers and replies, but you can't delete them. Therefore, please review your content carefully before posting.
If you need one of your answers or replies removed, you must report it as inappropriate content so that the moderation team can review your request. Follow the steps in this video to report your content, selecting "Something else" as the reason and using the "Details" field to explain why you need your answer or reply deleted.
-
-
Blogs
-
What is a blog?
A blog is a collection of blog posts written by one or more authors. Blog posts usually appear in reverse-chronological order, so you see the most recent post first, followed by earlier posts. Some blog posts have comments from readers, which you can read by clicking the Comments link at the bottom of the post. -
How do I post a comment on a blog?
-
Can I post a blog comment without registering or logging in?
No, you will be required to register or log in to post a blog comment.
Please note: You don't have to be a member in a Group to leave a blog post comment, but you do have to join a Group before you can write your own blog post there. We recommend that you "Join" Groups that you are interested in to receive notifications and get the best overall user experience.

-
Can I edit or delete my comments?
You can edit your comments, but you can't delete them. Therefore, please review your comments carefully before posting.
If you need one of your comments removed, you must report it as inappropriate content so that the moderation team can review your request. Follow the steps in this video to report your comment, selecting "Something else" as the reason and using the "Details" field to explain why you need your comment deleted. -
Can I subscribe to a blog?
Yes. You can subscribe directly to a blog or a blog post, or you can subscribe to their RSS feeds. If you subscribe to an RSS feed, you can use an RSS reader to view new content that's added to the blog. If you subscribe directly to a blog or blog post, you receive an email alert when new articles or comments are posted.To Do this Subscribe to a blog Go to the blog page and click Blog Options > Subscribe. Subscribe to an article Go to the article and click Article Options > Subscribe. Subscribe to an RSS feed Go to the blog or article and click Blog Options > Subscribe to RSS Feed.
Then, save the live bookmark or whatever you usually do to add an RSS feed. -
Can I write and publish my own blog post?
Please see the What's New post What You Need to Know About Blogging Post-Migration to learn about the community's blogging tool and process.
These how-to videos may also help you prepare your post:
How to create a blog post from a category area
How to create a post from the homepage
How to create a blog post in a group
How to add Article User Tags and schedule your post for publication
Posts from new bloggers will need to go through moderation before they're published. To bypass moderation, members will need to move up the rank ladder (although posts submitted to a group will always need to go through moderation). You can learn more about the rank ladder in the What's New post Let the Gamification Begin! If your post needs to go through moderation, please note that the moderation team may require up to five business days to conduct each review.
You should always keep the following rules in mind when writing for the SAP Community audience:
Apply the right structure
We expect every blog post to consist of a beginning (introduction), a middle (main portion), and an end (a conclusion that wraps everything up). A collection of links or just a video with short text does not qualify as a blog post.
Write with the proper style, in your unique voice
We recommend a conversational writing style that is clear and easily understood. Ideally, a blog post should reflect the author's unique voice.
If you want to publish content that was helped/created by GenAI, you must add the user tag GenAI Assisted Content.
Share value and your personal knowledge
We remind all bloggers that they should put the reader first. One of the best ways to define a value statement is to actually write one. For example, "In this blog post you will learn" or "As a fellow administrator of XX product, I typically run into this problem. Next, I'll share the solution I've come up with..."
In their blog posts, authors should share their personal knowledge. They should not copy text from other sources, per our Rules of Engagement.
If you want to publish content that was helped/created by GenAI, you must add the user tag GenAI Assisted Content.
-
Do I need to include a cover photo?
No. A cover photo is only required when a group or board owner decides to feature a blog post. It doesn't apply to most blog posts. (See the What's New blog board as an example.) If you do decide to include a cover photo, please make sure that its dimensions are 600x420 pixels, as that size is the requirement for featured posts.
-
Do I need to include an "Article Teaser"?
-
How do I use the "Co-Authors" field?
The co-authors field is part of our platform's out-of-the-box blogging features.
The co-author functionality allows for other community members to assist during the edit and publishing process. The co-authors do not show in the user interface of the published post.
If you want to mention co-authors please do so as part of the post content, for instance thanking them at the end of the post.
-
I submitted a blog post for review. How long does moderation take?
If your blog post needs to go through moderation, please note that the moderation team may require up to five business days to conduct each review. -
Where can I find the drafts of my blog posts?
Each blog board includes a Blog Dashboard that links to the drafts of posts that you have prepared for that board. To learn how to find your drafts in a blog board, please read the What You Need to Know About Blogging Post-Migration post in the What's New section.
You can also find the autosaved drafts of your blog posts in your "My content" section. To learn more, please watch How do I view my autosaved drafts from "My content"?, one of our how-to videos.
-
-
Knowledge Base
-
What is a knowledge base?
A knowledge base is a collection of documents that captures and organizes helpful information. Knowledge bases are great resources for several reasons:
- You can search for knowledge base documents.
- After you find a document, you can add your comments and maybe even edit the document (if you have the right permission). If the document's publisher incorporates your comment into a later version of the article, you'll get credit as a contributor.
- Knowledge base documents can contain images.
- Each Knowledge base document contains lists of contributors and related links.
Contributors could be community members whose posts or comments are used in the document, authors who put the document together, or editors who reviewed or refined it.
-
-
Search
-
How do I search for content?
To search the SAP Community, enter your search in the search field and click Search.
When you type a search term, the system automatically searches at the current level. For example, if you're on the SAP Community front page, the system searches the entire SAP Community.
To perform a more in-depth search, click the Advanced link next to the Search Options on the Search Results page. Here, you can limit your query to a specific board, specific parts of the message (subject vs. body), and other advanced parameters.
-
How does auto-suggest work?
Auto-suggest accelerates your search by displaying results as you type search terms. When you see the post or user you're looking for, just click it.
To turn auto-suggest off, click Turn off suggestions in the auto-suggest list.
To turn auto-suggest on, click Turn on suggestions below the search entry area.
-
How do I filter search results?
You can refine your search using one or more filters (location, author, date).Want to limit your search results to accepted solutions? Click the Solved check box under the Metadata filter. Want only the most recent results? Use one for the date filters to see results for a day or a week ago. You can also filter your results by individual authors or members who have the same rank.
Most search filters work together to narrow the possible results. For example, you can search for accepted solutions in the last month. However, the filters for the type of post work a little differently. If you choose Forums and Blogs, you see results from either forums or blogs (not results that are both forum and blog posts).
Active filters appear at the top of the results list. To turn off a filter, click the X to the right of the filter.
-
How can I customize search results?
You can customize your search results to make them more meaningful in several ways:- Use the interactive filters on the search results page to refine the search results based on a variety of criteria: location, author, date, and others.
- See which filters are active at the top of the results list.
- Turn an active filter off by clicking the X button to the right of the filter.
-
-
Labels
-
What are labels?
Labels are used within the SAP Community to help categorize content in discussions, blogs, Q&As, and knowledge bases
Labels enable you to categorize the content you write based on the themes or content in the article. For example, you might apply labels like "Innovation Alert", "Localization", or "Configuration".Unlike tags, labels are created by the Admin and typically controlled for consistency.
Some Groups have a pre-defined list of labels, depending on the purpose and setup of the Group. In which case authors can choose/apply labels from the pre-defined list in the Group in which the article appears. Some Groups allow members to add their own labels. Tags are more free-form and can be created by any author - therefore anyone writing content.
It is also possible to subscribe to a label to get notifications of new content associated with this label. See the section: How do I subscribe to a label.
-
How do I add a label to my post?
To add a label when you're creating a new piece of content, whether in discussions, blogs, Q&A, or the knowledge base:
- In the Labels field, start typing the label or choose one from the list.
- If you add multiple labels, you must separate them with commas.
-
How do I subscribe to a label?
When you subscribe to a label, you will be notified by email when a new post is created with the label.
To subscribe to a label:
- From a particular post with a label, click on the label to filter by that label. (You can also do this from the labels component.)
- Click Subscribe.
Note:You can configure our own subscription settings under My Content > My Settings > Subscriptions and Notifications > My Subscriptions and My Content > My Settings > Subscriptions and Notifications > Notification Settings.
One thing to note about labels is that they are applied at node level. Thus, predefined labels and subscriptions to labels exist only at the node at which they are applied. For example, if you subscribe to a label named 'contest' in one Group, it will not automatically subscribe you to an identically named label in another Group or board. You will have to subscribe twice, once at each Group or board level. This also applies if you add a labels component to your page to display the most popular labels, these are also designed to work at node level.
-
-
SAP Managed Tags
-
What are SAP Managed Tags?
SAP Managed Tags are a type of tag derived from SAP's official list of products and solutions.
It is also possible to subscribe to an SAP Managed Tag so that you will receive notifications of new content about that product. Click on the SAP Managed Tag, for example at the bottom or a blog post, and choose to "Subscribe" in the Options drop-down menu.
-
How do I tag a post with an SAP Managed Tag?
To add a product to a post or blog:
- Begin by typing a hashtag before a product name in the message body.
- A search box will appear listing products with matching titles.
- Select the product you want to mention.
You can also use the SAP Managed Tag field on the post creation screen:- Type a product name in the field.
- A search box will appear listing products with matching titles.
- Select the product you want to include as a tag.
-
How do I view an SAP Managed Tag page?
To view the product page for a specific SAP Managed Tag:- Click the hyperlink of the SAP Managed Tag on a specific post.
- This link will take you to a page in the community where you can view all the posts about the same product.
-
-
User Tags (Article, Question, Message)
-
What is a User Tag?
A User Tag is a single keyword or phrase that further describes the topic, theme, or subject of content, complementing the SAP Managed Tag. They are also known as Article User Tags (in blog posts), Question User Tags (in Q&A), and Message User Tags (in discussions).
SAP Managed Tags are fixed, but members can create their own User Tags. For example, in a blog post about SAP S/4HANA Cloud, you might add these Article User Tags: implementation, guidance.
Be sure to use commas between tags. -
What can I do with User Tags?
User Tags -- also known as Article User Tags (in blog posts), Question User Tags (in Q&A), and Message User Tags (in discussions) -- provide another way to help other users discover interesting posts. They also provide another way to organize content in the SAP Community that you think is related.
To see how User Tags can be applied (specifically, Article User Tags in this case), please watch this how-to video. -
Why do people apply User Tags?
Some users will tag posts for their own convenience in finding them later. Other users enjoy helping categorize interesting posts for the benefit of the SAP Community. -
How do I apply User Tags?
User Tags are also known as Article User Tags (in blog posts), Question User Tags (in Q&A), and Message User Tags (in discussions), and you'll find fields for these things depending on the type of content you're creating.
To see how Article User Tags can be applied to a blog post (as an example), please watch this how-to video. The same approach also applies to discussions and questions. -
Where are my User Tags?
-
-
Likes
-
What are likes?
- Likes is a content rating system that lets you vote for useful or valuable posts.
- Giving likes is a way to appreciate good content and recognize the author.
-
How do I give likes?
- Click the "Like" button on a post to appreciate its content and author.
- Revoke likes by clicking the "Like" button again if you change your mind.
-
How can I see which posts or authors have received the most likes?
- The Community Authors Like Leaderboard displays users who have received the most likes in the last 30 days.
- The Community Posts Like Leaderboard displays the most liked posts in the last 30 days.
- The Community Givers Like Leaderboard displays the top like givers in the last 30 days.
Leaderboards are area-specific, counting likes within that section and its boards.
The leaderboard sidebar widgets that you find throughout the community display activities within the last 7 days' time range. -
How can I see who has given me likes?
- Navigate to your profile page by clicking on the Community Profile icon in the white breadcrumb navigation bar, then "My content" to see your like activity details.
- In the sidebar, look for the "Likes From" widget, to see which users have liked your content.
- Clicking "View all" at the bottom of the Like widget, will take you to a Like page where you get an overview over all your Like activity: your most liked posts, which users have liked your content, posts you have liked, and which authors you have liked.
-
-
My Settings
-
How do I change the avatar next to my name?
Changing your avatar is an easy way to personalize your SAP Community identity. You can change your avatar as often as you like. Your current avatar appears at the top of the Avatar page.
To change your avatar:- Click on your avatar at the top of the page to sign in.
- Go to My Content.
- Click on the edit icon on the avatar at the top of the page
- Click on Upload new image.
- Browse for the image you would like to use.
- Click on Open to preview your selection
- Click on Save to save your selection.
-
How do I create a signature for my posts?
Your signature is text that appears at the bottom of your posts.
To create your personal signature:- Click on your avatar at the top of the page to sign in.
- Go to Settings > Personal Information.
- Enter your signature text in the Signature box.
- Click Save.
-
How do I tell other SAP Community members about me?
You can tell other SAP Community members as much or as little about yourself as you want. You can enter a short biography, your location, your interests, or anything else (within the SAP Community Guidelines, of course).
To tell other Group members about yourself:
- Click on your Avatar at the top of the page to sign in.
- Go to Settings > Personal Information.
- You can enter your name, location, personal web page link and any other information you want to share.
- Click Save.
To display your info only to people on your Friends List:
- Click Preferences > Privacy.
- Set show private information in profile to to friends only.
- Click Save.
-
How do I set my viewing preferences?
You can customize the look and behavior of the SAP Community in many ways, including time zone and language preference, text size, menu behavior, message order, and privacy settings.
To set your viewing preferences:- Click on your Avatar at the top of the page to sign in.
- Go to Settings > Preferences.
- Click through the various preference tabs and make the changes you want.
- Click Save on each tab where you make changes.
-
How do I change the language of the interface?
You can change the language of the SAP Community interface to Chinese, French, Japanese and Spanish.
To change the language of the interface:- Click on your Avatar at the top of the page to sign in.
- Go to Settings > Preferences.
- Select the relevant language.
- Click Save.
-
How do I change the format for date displays?
The system defaults to displaying dates as yyyy MMM dd (e.g., 2024 Aug 27). You can change via the "Date display format" field found by going to My content from the avatar dropdown, selecting My settings, then choosing Preferences.
For example:
If you prefer to display the date as 2024 08 27, change to yyyy MM dd.
If you prefer to display the date as 27 Aug 2024, change to dd MMM yyyy.
Not that the month must always be in all caps (i.e., MMM for abbreviation, MM for numbers) or you will receive an error message.
-
-
Bookmarks, Subscriptions, and RSS
-
How do I use subscriptions?
Subscriptions let you get email updates whenever new content appears in an area of the SAP Community or for an SAP Managed tag that you're interested in. You can subscribe to a board, any type of posts or an SAP Managed tag in the SAP Community.
To subscribe a piece of content, board or SAP Managed tag:
- Go to the item you want to subscribe to.
- Click Options > Subscribe.
To view and manage your subscriptions:
- Go to Settings > Subscriptions & Notifications.
- Click My Subscriptions to see a list of the items you've subscribed to. You can click a subscription to go to the item.
- To delete a subscription, click the check box for the subscription and click Email Subscription Options > Delete Selected Subscriptions.
-
What is RSS and how do I use it?
RSS stands for "Really Simple Syndication." It is a way for you to get the latest content from the SAP Community, along with many other sites that you visit, all in one place. With an RSS feed reader, you subscribe to web sites, and those sites feed you new content so you can stay up to date.
To use RSS, you need a feed reader, such as Google Reader, MyYahoo, or the Live Bookmarks feature of Firefox. There are many free options. After you have your feed reader set up, you can find RSS feeds in the SAP Community by going to a board, blog, thread, or message and selecting Subscribe to RSS Feed from the options menu. There you will see a preview of the feed. Most RSS readers give you a button to click at this point. After you click it, the RSS feed appears in your reader as well as new content from that section of the SAP Community whenever it becomes available
-
How do I use bookmarks?
Bookmarks enable you to list SAP Community content (boards, articles, topics, or individual posts) on a special page so you can easily find it again.
To bookmark a piece of content:
- Go to the post or board you want to bookmark.
- Choose Options > Bookmark.
To view and manage your bookmarks:
- Go to Settings > Subscriptions & Notifications.
- Click My Bookmarks.
- You can click a bookmark to go to the item.
- To delete a bookmark, click the check box for the bookmark and click Bookmark Options > Delete Selected Bookmarks.
-
-
Topic Pages
-
What are topic pages?
An SAP Community topic page provides members with in-depth information and serves as a hub for exchanging knowledge with users, building relationships, and sharing expertise related to SAP products and more.
-
How do I find topic pages?
You can access the full list of topic pages from the the Topics link in the SAP Community navigation.
Once on the Topics page, you can browse the various topics to find the pages that interest you. To learn more, please watch How do I find a topic page?, one of our how-to videos.
-
-
Private Messenger
-
What is the Private Messenger?
Private Messenger enables you to send private notes to other SAP Community members. Private Messenger has two big advantages over email:
- You don't have to know the other member's email address to send the note. (Also, you don't have to reveal yours.)
- You can read and send private messages without leaving the SAP Community, making it easy to a quick conversation with another SAP Community member.
To use the Private Messenger, you must be registered and signed in. You'll see a Private Message icon at the top of your page. If you have any new messages, you'll see the number of unread messages next to the envelope icon.
Click the message count or envelope icon to go to your Private Messages Inbox.
-
How do I send a private message?
To send a private message:
- Click on your Avatar at the top of the page to sign in.
- Click the message count or envelope icon to go to your Private Messages Inbox.
- Click Compose New Message.
- Enter the recipient's name in the Send to area.
- Enter the subject for the message in the Message Subject area.
- Type the reply in the Message Body editor.
- Click Send Message.
You can look for the messages you've sent in the Sent tab.
-
How do I read a private message?
To read a private message:
- Click on your Avatar at the top of the page to sign in.
If you have any new messages, you'll see the number of unread messages next to the envelope icon. - Click the message count or envelope icon to go to your Private Messages Inbox.
- To read a message, click the message subject.
- To reply to a message, click Reply. Type the reply and click Send Message.
- Click on your Avatar at the top of the page to sign in.
-
How do I reply to a private message?
To reply to a private message:
- Click on your Avatar at the top of the page to sign in.
- Click the message count or envelope icon to go to your Private Messages Inbox.
- To read a message, click the message subject.
- To reply to a message, click Reply.
The recipient and subject are automatically entered for you, but you can edit them. - Type the reply in the Message Body editor.
- Click Send Message.
-
How do I delete a private message?
You can delete messages one at a time as you read them, or in bulk from your Inbox.
To delete a private message:
- Click on your Avatar at the top of the page to sign in.
- Click the message count or envelope icon to go to your Private Messages Inbox.
- To delete a single message, click the message to view it and then click Delete.
- To delete all messages, click the Options menu and click Delete All.
-
How do I see private messages I've sent to others?
To see the private messages you've sent:
- Click on your Avatar at the top of the page to sign in.
- Click the message count or envelope icon to go to your Private Messages Inbox.
- Click Sent Messages.
-
After entering your comment in the field, click the "Post Your Comment" button.
Note that you can comment on a blog post but you can't comment on someone else's comment. If you'd like to notify a member that you're responding to his or her comment, you can @mention that member in your comment. (Simply type @, then the member's display name, and you'll be able to select his or her name so that it appears in your comment.)
The comment field gives you several options for formatting your text. You can use simple HTML as well.
Note: Unless you have special permissions, you can't edit or delete a comment after it's posted, so be sure to preview your comment and check it carefully before posting.